Loading...
The built-in Pandoras Box Encoder Extension allows to transcode most AVI -and Quicktime- as well as WMV files to Mpeg1 or 2 up to a 4k resolution. The files will be encoded to MPEG Elementary Video Streams. If the original file contains audio, a separate wav-file will be created
The resolution can be set to SD, HD or a custom one. The Encoder Extension allows you to transcode files larger than 1080p to our proprietary .mxl format. The maximum resolution is 4080x2800 px and the encoding process depends on available graphics card RAM.
Please read the topic "Video Formats" if you are interested in knowing more about video formats and codecs that are supported by Pandoras Box and about optimum video playback.
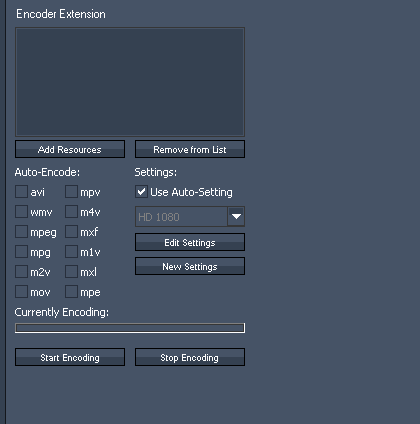
To open the Encoder Extension Tab, please click on the Tabs Menu and choose Extensions - Encoder Extension. The Encoder Extension tab will appear next to the Inspector tab.
Please note that the Encoder Extension needs to be activated on your dongle, depending on your license this will be fee required.

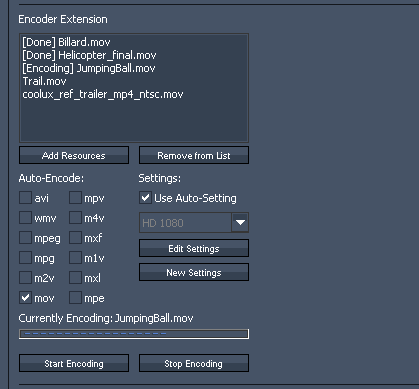
To use the Auto-Encode function please set a check in front of all file formats that should be automatically encoded when added into your project.
The Encoder Extension supports the following file formats:
avi
wmv (Windows Media Video)
mpeg (Mpeg)
mpg (Mpeg)
m2v (Mpeg 2 Video only)
mov (Quicktime Video)
mpv (Mpeg)
m4v (Mpeg 4 Video)
mxf (File Exchange Format e.g. used by Avid and Sony XDCam)
m1v (Mpeg 1 Video only)
mxl (proprietary Pandoras Box file type)
mpe (Mpeg)

The added files will appear in the Encoder Extension Window, the encoding starts automatically. The status bar shows the progress of the currently encoded file. Once a file is completely encoded, the file extension in the project tab changes to .mpv. The original file is discarded from the project but kept in the windows folder from where you added the file into the project.
To stop encoding, please press "Stop Encoding". Pressing "Start Encoding" will continue the encoding process.
To encode files manually please select the files in the project tab.
In the Encoder Extension press "Add Resources", the selected files will be added into the Encoder Extension window. The drag and drop function does not work here. To start the encoding process press "Start Encoding".
Now everything behaves as described for the Auto-Encoding.
REMOVE FROM LIST:
To clear files from the encoder extension window - no matter if new encoded or not, select the files and press "Remove from List".
Auto-Settings
Using Auto-Settings will encode all your files to MPEG2 Elementary Video Stream.
The bit rate will be set to a constant bitrate: CBR 8.000 kbit/s (SD) or CBR 20.000 kbit/s (HD).
The field encoding will be set to "Progressive Frame".
All other parameters like video mode (PAL or NTSC), resolution and frame rate will be adopted from the original file and are not affected through encoding.
Choose Profiles manually
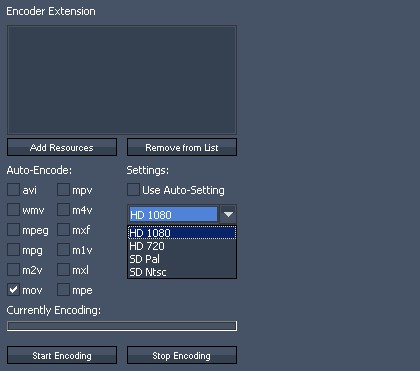
By unchecking "Auto-Settings" you will be able to choose one of the default profiles manually.

Using one of the default profiles will not only affect the bitrate and field encoding but might change the files resolution: e.g. encoding an HD-file (resolution 1920x1080 px) using the SD PAL Profile will resize the video to 720x576 px.
Please note: the default profiles can not be edited.
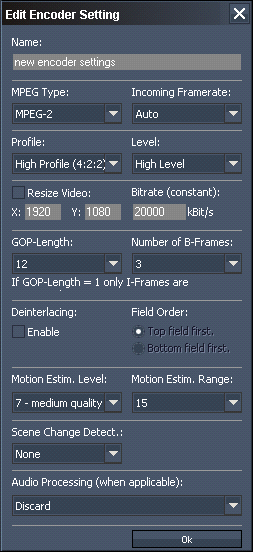
Please uncheck "Auto-Settings" and press "New Settings" to create a new encoding profile.

The new dialog allows you to:
[Name]
Name the profile
[MPEG Type]
Choose the MPEG Type (MPEG-1 or MPEG-2)
[MPEG Profile / Level]
Set MPEG Profile and Level. Please note that you will need High Profile (Profile 4:2:2:) and High Level for HD 1920x1080 px resolution. The Level automatically changes to MXL if you encode files to a format bigger then 1920 x 1080 px.
[Resize Video]
To resize your video, check the box and insert the resolution your video file should be resized to. Note that the "MPEG Type" and "Level" influence the maximum allowed resolution. In general, the highest resolution is 4080x2800 px for the MPEG2 format and MXL level.
[Bitrate]
Choose an amount of kbit/s (recommended are about 8.000 kbit/s for SD, 20-25.000 for HD and 80-120000 kbit/s for 4k)
[GOP-Length]
The length of the Group of Pictures is editable from 1 to 100. The higher the GOP-Length the better the compression rate gets at the expense of quality.
[Number of B-Frames]
Choose a value between 0 and 7.
[Deinterlacing]
To enable Deinterlacing, please check the box and also choose a Field Order.
[Motion Estimation Level]
Set a value between 0 (no motion search) and 15 (high quality). The higher the value, the better the quality, the longer the encoding process.
[Motion Estimation Range]
Set a value between 0 (no motion search) and 31 (high quality).
[Scene Change Detection]
Choose between None, Fast and Refined.
[Audio Processing]
- Discard: discards the Audio Part, the video file extension
- Split to separate wav: splits the Audio part to a separate wav-File. This file will be added into the project. automatically. On the hard-drive it will be created in the same folder where the related video source is located.
- Include: includes the Audio Part into the encoded video (the video file extension will be "mpeg").
The Audio Part is discarded by default.
If there is no Audio Part included in the encoded video file, the file extension will be ".mpv" (Video Elementary Only). Including an Audio Part, the video file gets the extension ".mpg"
Click OK when the new setting is finished. The created profile will appear in the drop down menu.
EDIT SETTINGS:
Select your profile from the drop-down list and click "Edit Settings". All settings are described above in "Create New Settings".
Please note that the default profiles are not editable!