Loading...
This topic explains how to use the Pandoras Box Quicktime Converter using the coolux codec, and the codec settings itself. Please refer to the previous chapter for general information about the coolux codec also called the coolux Quicktime Component.
If you use the coolux codec in third-party software like AfterFX and the Quicktime Player PRO, please refer to their documentation to learn how to start the encoding process itself. There should be somewhere a choice what format you would like to render in. The coolux codec is listed as "coolux". The first of the below steps do not apply to you, the others do eventhough the dialogs probably look different.
As mentioned in the last topic, the Quicktime Converter allows to transcode other MOV files into a format that is recommended for Pandoras Box. The coolux codec renders i.e. encodes image sequences (a folder containing sequential images), or MOV files (containing sequential frames).
Keep in mind that image sequence playback is mainly aimed for SSD based systems.
To convert other MOV files, install the latest Quicktime Player and start the Pandoras Box Quicktime Converter.

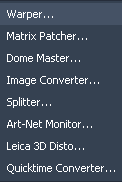
You may find the QuicktimeConverter along with all other Pandoras Box tools (Warper; Matrix Patcher,...) in the "Tools" menu in Pandoras Box. Alternatively, you can open the Quicktime Converter without Pandoras Box by executing the "Pandoras Box Quicktime Converter.exe" from the installation path of Pandoras Box under data > tools.
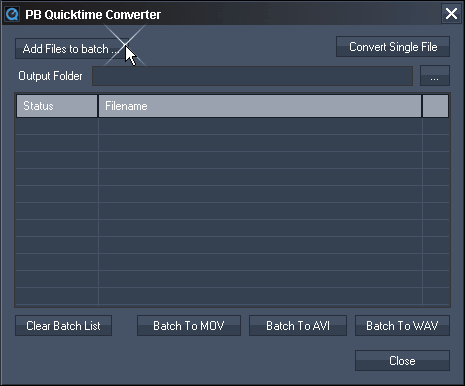
Single File:
The "Convert Single File" button opens a dialog where you can choose a MOV file as a source. As soon as you have picked one, the "Export As" dialog opens automatically.
Batching:
With the button "Add Files to batch" you may choose several source files that will be added to the batch list. Click the button again to (multi-)select additional files. Enter a output folder yourself or click the [...] button. In this folder all new files will be exported with the same name as the source files. Click one of the "Batch To..." buttons to convert all files.
Please note that a MOV file is a so called container format, which means that it can contain other codecs. If the Pandoras Box Converter fails to read your source file(s), make sure that the source codec is installed on your system.
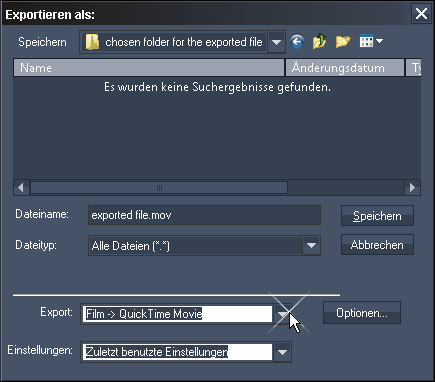
Single File:
The "Export As" dialog opens automatically. Enter a name and choose the entry "Film -> QuickTime Movie" in the "Export" drop-down list.
Click the "Options" button to the right, to set up the output format in more detail. If you use the Converter for the first time, its strongly recommended to set up the format according to your needs. Every following rendering will call the settings previously chosen as a new default.
Batching:
This dialog is skipped when you clicked a "Batch To..." button.
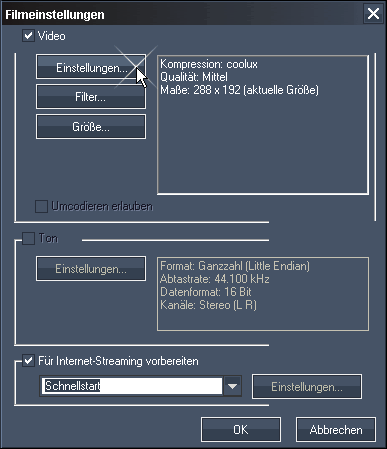
In the "Movie Settings" dialog, click "Settings".
Click "Filter" only if you would like to add or adjust additional video filters. If you wish to resize your movie, click "Size".
If your original MOV file contains audio information, you can choose to export a separate wave file. Click "Settings" if you would like to change the default settings regarding sample rate etc. For ASIO playback please ensure that "PCM" is chosen.
Internet-Streaming is not needed.
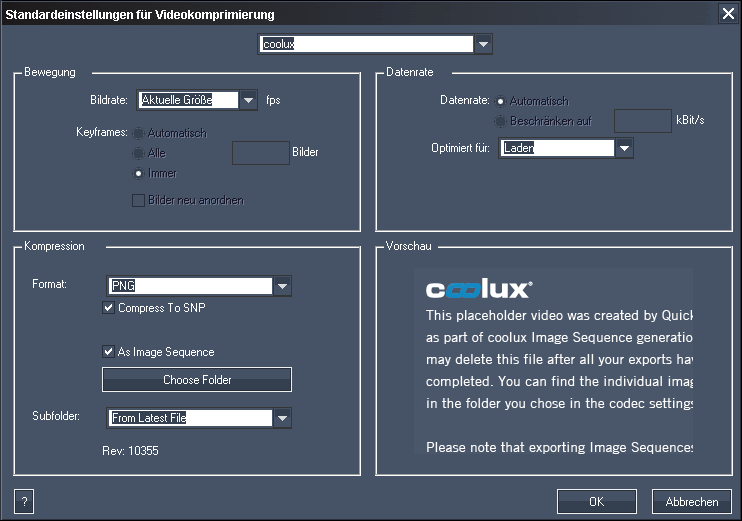
In the "Standard Video Compression Setting" dialog there is a drop-down list to select a codec. All the standard as well as third-party video codecs installed on your system are available. Select "coolux". Now, three sections "Motion", "Data Rate" and "Compression" offer adjustments influencing the quality of your export. Define the "Frame Rate" of your exported movie only if you would like to change the original one. The "Data Rate" should be set to be optimized for Upload. The Compression settings are explained in the next paragraph.
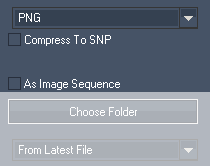
1) Choose the image format: DDS, PNG, or BMP
(in short: DDS compresses the most and allows the best playback performance, PNG compresses the file size but not the image quality but generally needs more performance whilst BMP is uncompressed but demands most performance). Choose the alpha version if your source file consists of transparent parts.
The image format mainly influences the quality of your content. The coolux codec simply renders single frames and bundles them into a MOV container. There is no additional intra-frame compression!
2) Decide whether the chosen image format should be compressed (in real-time) using the snappy compression library. Snappy reduces the file size but keeps the available quality. The result is a much smaller file size which is especially interesting for SSD systems as their drives normally offer less space.
3) Uncheck the option "As Image Sequence".
Single File:
Click "OK" twice to return to the "Export As" dialog. The button "Save" starts the conversion. The result is a MOV file with the name and path chosen in the "Export As" dialog.
Batching:
Click "OK" twice to return to the "PB Quicktime Converter" dialog that starts the conversion automatically. The result are several MOV files with the original source name in the folder chosen in the "Output Folder" text field in the "PB Quicktime Converter" dialog.
drop-down in "Standard Video Compression Setting" dialog |
- |
"Choose Folder" button |
- |
Single File) "Export As" dialog: C:\folder A\newname.mov |
|
Result for single converted file |
C:\folder A\newname.mov |
Batching) "PB Quicktime Converter" dialog: C:\folder A\ |
|
Result for batch list item #1 |
C:\folder A\sourcename1.mov |
Result for batch list item #2 |
C:\folder A\sourcename2.mov |
To play the exported MOV in Pandoras Box, simply drag the file into your Project tab.
To play it back without using Pandoras Box, use the Quicktime Player and install the coolux codec.
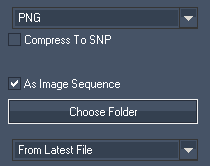
1) Choose the image format: DDS, PNG, or BMP
(in short: DDS compresses the most and allows the best playback performance, PNG compresses the file size but not the image quality but generally needs more performance whilst BMP is uncompressed but demands most performance). Choose the alpha version if your source file consists of transparent parts.
The image format mainly influences the quality of your content. The coolux codec simply renders single frames and bundles them into a MOV container. There is no additional intra-frame compression!
2) Decide whether the chosen image format should be compressed (in real-time) using the snappy compression library. Snappy reduces the file size but keeps the available quality. The result is a much smaller file size which is especially interesting for SSD systems as their drives normally offer less space.
3) Check the option "As Image Sequence". Now, the images are not bundled into a MOV container but will be rendered as separate image files into a folder.
4) Choose a folder where the folder(s) should be saved that contains the separate images. It is a good workflow to choose the folder whereto the MOV file is exported as well. That was the step in the "Export As" dialog or "Output Folder" text field in the first "PB Quicktime Converter" dialog. In both cases, the image sequence folder will be named with the same name as the MOV.
Single File:
Click "OK" twice to return to the "Export As" dialog. The button "Save" starts the conversion. The result is a image sequence folder with the name and path chosen in the "Export As" dialog.
Batching:
Click "OK" twice to return to the "PB Quicktime Converter" dialog that starts the conversion automatically. The result are several image sequence folders with the original source names, all in the folder chosen in the "Output Folder" text field in the "PB Quicktime Converter" dialog.
drop-down in "Standard Video Compression Setting" dialog |
From Latest file |
|
"Choose Folder" button |
choose where you saved the MOV file (e.g. C:\folder A) |
|
Single File) "Export As" dialog: C:\folder A\newname.mov |
||
Result for single converted file |
C:\folder A\newname.mov |
(these files can be deleted) |
C:\folder A\newname\newname_[00000001].png |
||
Batching) "PB Quicktime Converter" dialog: C:\folder A\ |
||
Result for batch list item #1 |
C:\folder A\sourcename1.mov |
(these files can be deleted) |
C:\folder A\sourcename1\sourcename1_[00000001].png |
||
Result for batch list item #2 |
C:\folder A\sourcename2.mov |
(these files can be deleted) |
C:\folder A\sourcename2\sourcename2_[00000001].png |
||
drop-down in "Standard Video Compression Setting" dialog |
Unique Number |
|
"Choose Folder" button |
choose where you saved the MOV file (e.g. C:\folder A) |
|
Single File) "Export As" dialog: C:\folder A\newname.mov |
||
Result for single converted file |
C:\folder A\newname.mov |
(these files can be deleted) |
C:\folder A\folder A_[001]\folder A_[001_00000001].png |
||
Batching) "PB Quicktime Converter" dialog: C:\folder A\ |
||
Result for batch list item #1 |
C:\folder A\sourcename1.mov |
(these files can be deleted) |
C:\folder A\folder A_[001]\folder A_[001_00000001].png |
||
Result for batch list item #2 |
C:\folder A\sourcename2.mov |
(these files can be deleted) |
C:\folder A\folder A_[002]\folder A_[002_00000001].png |
||
drop-down in "Standard Video Compression Setting" dialog |
None (All Files in Main) |
|
"Choose Folder" button |
choose where you saved the MOV file (e.g. C:\folder A) |
|
Single File) "Export As" dialog: C:\folder A\newname.mov |
||
Result for single converted file |
C:\folder A\newname.mov |
(these files can be deleted) |
C:\folder A\folder A_[00000001].png |
||
Batching) "PB Quicktime Converter" dialog: C:\folder A\ |
||
Result for batch list item #1 |
C:\folder A\sourcename1.mov |
(these files can be deleted) |
C:\folder A\folder A_[00000001].png |
||
Result for batch list item #2 |
C:\folder A\sourcename2.mov |
(these files can be deleted) |
C:\folder A\folder A_[00000001].png |
||
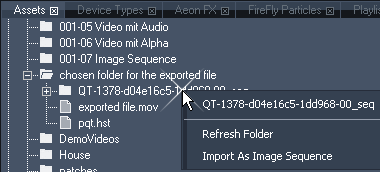
To playback the image sequence in Pandoras Box, right-click on the folder in the Assets tab, and choose "Import As Image Sequence".
To play it back without using Pandoras Box, use a media player that supports image sequences.
