Loading...
The Projector device in the Configuration dialog allows you to easily remote control a growing set of projectors.
Note that the device is only available in the licensed Widget Designer edition, not the Free version.
To add a Projector device, open the Devices menu and select "Projector > Create Projector". This also opens the Configuration dialog and focuses the newly created device. Alternatively, with the dialog already open, you can add one or multiple new devices using the "+" or "++" buttons respectively.
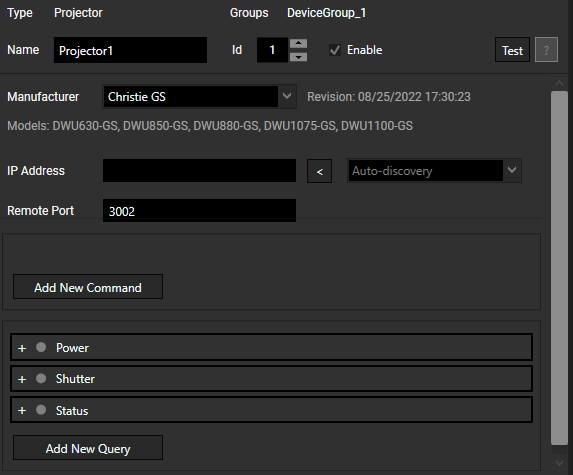
On the right side, you see several options:

Type informs you about the type of device.
Groups lists which groups this device have been assigned to.
Name is the unique identifier for this Projector object in Widget Designer, and the general rule for naming objects apply here as well: only letters, numbers, and underscores are allowed; the first symbol must be a letter. It is possible to change the default name to a more descriptive one. When scripting, enter this name to access available members or use the Project object and device Type instead. See "Using the Device in Regular Scripting" below for examples.
Id offers an alternative way to address the device when scripting.
The "Enable" check box is selected by default. In the device list on the left side of the Configuration, the icon on the Projector device indicates three states:
•Enabled and connected: solid blue dot
•Enabled but not connected: empty blue dot
•Disabled (also not connected): solid grey dot
The "Test" button opens a log window showing the last received messages. For further information, see the description for Test dialog.
The "Manufacturer" drop-down lists several manufacturers and their product series to choose from. The supported models are listed below the drop-down after selecting an option.
There are two ways to provide an IP Address and Port for the projector device:
1.If the product is capable of broadcasting its presence into the Network (device discovery), find the instance you want to connect to using the Auto-discovery drop-down. Any device from the selected product (range) in Manufacturer will be listed. Use the arrow left button to assign the selected device's IP address to the IP Address field. The specified port is pre-set to the default port for the product range and not generally obtained from the device itself. If this needs to be adjusted, you can overwrite the port using the control.
2.You can manually provide the IP Address and the Remote Port of the projector.
If Auto Apply is not activated, select the "Apply" button to save any changes done here. The shortcut [Ctrl + Enter] can also be used to apply changes.
You can add your own commands, by selecting Add New Command. Using the Add New Command button opens two entry fields: Alias and Command.

In the Alias field, enter the custom command name. This is used for scripting. In the Command field, enter the corresponding projector command in the correct syntax of the projector's api documentation. To remove a custom command from the device, select the trash can icon.
Use queries and react to replies with scripting commands.

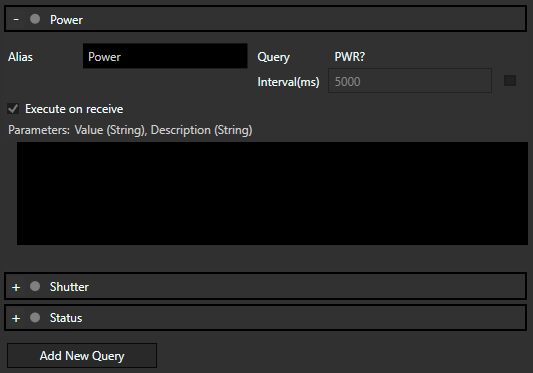
There are some predefined queries which are typical and work globally for that manufacturer series.
Interval and the check box next to it allows for defining a query interval and whether the query is active. The activity state is also reflected in the icon next to the Alias name shown in the Command's header (grey dot: inactive, blue: active).
Execute on receive triggers the script defined whenever the active query in question yields a matching reply. Parameters, provided by the query (and parsed from its reply), are shown above the script editor.
Label1.Text = "Power status of projector1: " + Value + " (" + Description + ")"
The status can also be queried manually for example from a Custom Script button which would look like the following:
Projector1.SendQuery("Power")
This only sends a command and does not return a value. The expected reply is matched and executed in the Query's script editor, working as an EventListener.
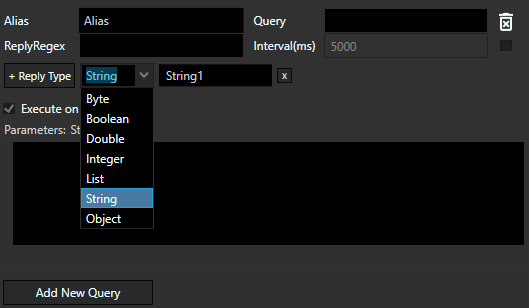
With the Add New Query button, you can define your own query. For it to work, use the correct syntax for query (consult the projector's documentation) and a regular expression to match the expected reply.

In the Alias field, define the name for that query. This alias is used for scripting (Projector1.Alias).
Define a command to be sent to the projector in Query. In the ReplyRegex field, insert a regular expression to match the expected reply for that particular query.
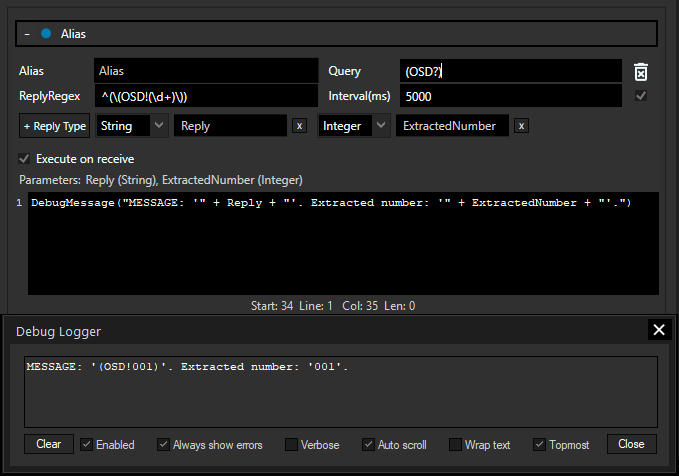
For Example:
Given by the projector:
•Query: (OSD?)
•Expected Answer: (OSD!001)
•RegEx: ^(\(OSD!(\d+)\))
•Result: Two captured groups. First for the whole Reply, second for the extracted number.
Number of captured groups NEED to match the number of reply types in the script editor. In this case ONLY the script will successfully be executed
DebugMessage("MESSAGE: '" + Reply + "'. Extracted number: '" + ExtractedNumber + "'.")

You can capture groups to extract values from the reply and use them in the scripting editor below. For each group you defined in this field, you need a matching Reply Type. You can choose the kind of Reply Type in the drop down and name this variable, how you want to use it for scripting. You can use the "message tester" to help identify correct queries and response messages.
When a device is created, it can be addressed via scripting to perform actions on the device as well as retrieve information from it.
To send commands to the device, create a CustomScript button or anything with a scripting field. In the script field, enter the device's name (defaults to "Projector1"), and Script Assist will offer a list of all Projector Members.
For example, you can set the IP address of the projector device in the configuration:
Projector1.IpAddress = "10.169.80.10"
You can also retrieve information via scripting:
Label1.Text = Projector1.IpAddress
This assigns the IP address of Projector1 to Label1.
As an alternative to explicitly naming the device, the "Project" object can be used. Choose the device type and address the device by entering its ID or name. Script Assist then offers you the same list of members. This is the alternative for the first example from above:
Project.Projector(1).IpAddress = "10.169.80.10"
Substituting the ID with a dynamic variable allows for automation. Actions can be performed on many connections of the same type simultaneously, e.g. by using for-loops:
For i = 1 to 10 {
var ip_base = "10.169.10."
var ip = ip_base + i
Project.Projector(i).IpAddress = ip
}
The chapter "Project and Context Member" shows more examples with for-loops and if-clauses; normal variables can also be used.
Event Listener or Group Event Listener can be added in the Configuration dialog and provide a simple way of listening to triggers from connected devices.
Please see the chapter Event Listener or Group Event Listener for a detailed description of its functionality and Projector Events for an overview (with examples and description) over the events raised by this device.