Loading...
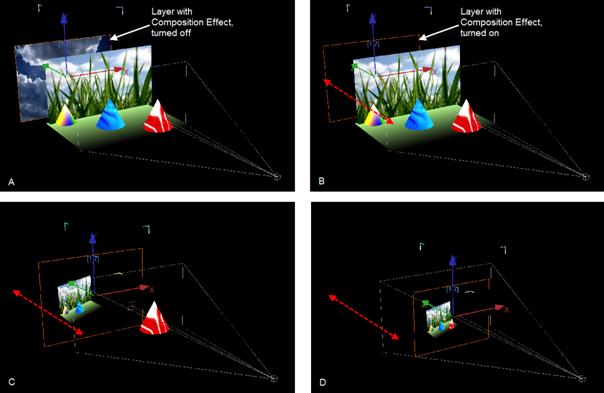
The Compositing Effects allow rendering a whole composition onto one layer, this is the so called Renderhistory. This way the composition can e.g. be scaled or positioned somewhere else on the output without the need of scaling or positioning every single layer. Please note: The example below shows how the Compositing Effects works.  A: There is a layer with grass on it, a bottom layer and three cones. Each item stays in a different Z position. The Compositing Effect will be applied to the layer in the background (with clouds on it). B: The Compositing Effect is applied to the background layer. The layer now shows black, because there is nothing behind it that could be rendered. C: The background layer was moved in Z position. It is now in front of the grass, the bottom layer and the first two cones, but behind the red cone. Everything except the red cone is now rendered as texture on the background layer. D: The background layer is moved further to the front. Every item of the composition is now behind it and will be rendered as its texture. When looking at the scene above by previewing the Output (and not in Global Cam Mode), you will see this result:  E: When seen from the front side, the composition looks like in the beginning. The difference between the single Compositing Effects is the way the composition behind the layer is rendered and mixed with the texture being originally on the layer. The three images for each Compositing Effect show: |
Fades between the Target's texture and the Rendering.
|
Adds the pixel values of the Target's texture with the ones of the Rendering. In case of values above 255 (in the case of RGB), white is displayed.
|
Example above: left: Mix=0; center: Mix=128; right: Mix=255
|
The Color Burn effect divides the inverted Rendering by the Target layer, and then inverts the result. This darkens the Target layer increasing the contrast to reflect the color of the Rendering. The darker the Rendering, the more its color is used. Blending with white produces no difference.
|
Darken takes the darkest value for each pixel from both, the Rendering and the Target layer.
|
Difference subtracts the Target layer from the Rendering or the other way round; to always get a positive value. Blending with black produces no change, as values for all colors are 0. (The RGB value for black is 0,0,0). Blending with white inverts the picture.
|
Lighten takes the lightest pixel from both, the Rendering and the Target layer.
|
Multiplies each pixel of the Target texture with the Rendering. The result is a darker picture.
|
Reflects the Target's texture.
|
With Target Screen effect the values of the pixels in the two layers (Target and Rendering) are negated, multiplied, and then negated again. This is in some way the opposite of multiply. The result is a brighter picture.
|
This Effect subtracts pixel values of the Target's texture with the Rendering. In case of negative values, black is displayed.
|