Loading...
Widgets and Nodes can be combined into groups.
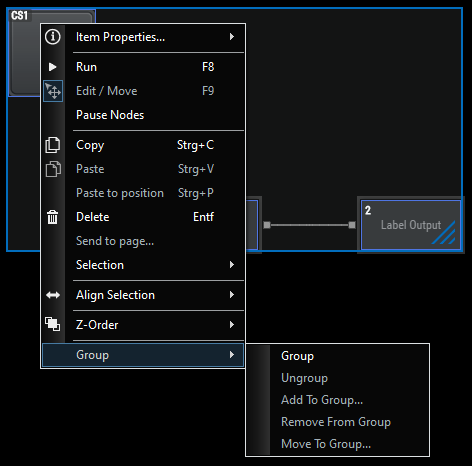
To be able to create a group, at least two objects, such as widgets and or nodes, much be selected. Right-click on a selected widget or node and select Group > Group. Groups get an additional frame where all members are included. To dissolve a group, right-click a selected group and in the context menu select Group > Ungroup.

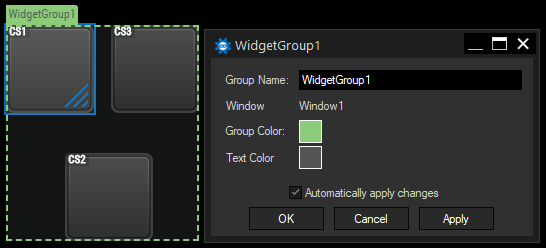
To rearrange items in an existing group, double-click on the item. The frame of the group gets a dashed line and only the selected item gets a blue frame. Multi-selection is possible. In this state, it is possible to change the position or size of the item or delete an item.

To open the group properties, right-click on a group name or a group member. The corresponding shortcut [Alt + P] works only with a group selection. You can also double-click on the group header. In the group properties dialog, you can change the group name, group color, and text color. You can change these colors via scripting, such as an intense violet color for the frame:
WidgetGroup1.SetFrameColor(150,0,255).
The window in which the group is located is listed in the Windows field.
You can do scripting on the group itself or for group members. See the chapter Widget and Node Group Members for more examples. If a Widget Group contains several custom script buttons, all or only individual buttons can be scripted. To script all buttons use the following:
WidgetGroup1.CustomScript.SetLabelColor(150,0,255)
This will turn the label color of all CustomScript buttons from WidgetGroup1 intense violet. To change the label color of only one CustomScript button, use the following:
WidgetGroup1.CustomScript(3).SetLabelColor(0,0,255)
or
WidgetGroup1.CustomScript("CustomScript3").SetLabelColor(0,0,255)
To get an overview of the different commands of a Widget or Node of the WidgetGroup, see the chapter Object and Member Notation (dot syntax).
Once a minimum of one group is created, other widgets or nodes can be added to a group by using the context menu and selecting Groups > Add To Group. To remove items, select Groups > Remove From Group.
To combine two groups, right-click one group and select Group > Move To Group. From now on, the selected group belongs to the target group. The settings of the target group are retained.
If the group or only parts of the group are copied and pasted again, the copies are also part of this group.
Groups can contain multiple widgets or nodes on different pages, but not across multiple windows. To make such a group recognizable inside the GUI, there is an asterisk in front of the group name. In addition, the items on the other pages are greyed out but also displayed on this page. You can rearrange the items from other pages in this state.
If you have assigned a device to the wrong group, select Groups > Move To Group to move the selected device directly from one group to another existing group. This also works for multi-selection or for group members on other pages.
To get a better overview of the content of a group, the groups are also listed in the Widget Explorer. You can directly change the name, group color, and text color.