AirScan IP Configurator |


|
AirScan IP Configurator |
|
AirScan IP Configurator |
|
AirScan IP Configurator |
|
Loading...
The AirScan IP Configurator enables you to readout and set the IP address of a connected AirScan. The chapter "AirScan" describes how to work with the device in Widget Designer.
The installer for the Configurator can be found in our Download-Center and includes the pcap driver which should be installed first. Please also make sure that .Net 4.0 or .Net 4.8 is installed, see Download-Center too.
After the installation, make sure that the power cable of the AirScan device is unplugged as the unit needs to be power cycled.
Now, navigate to the "AirScan IP Config Tool" and choose the option "Run as administrator".
Connect the AirScan to your network and turn the AirScan device on again. It is recommended to connect it directly to the your computer's network card without any switches in between to eliminate this source of error.
Now you can readout the current IP address in case it is unknown as all found IP addresses are shown in the list. Further, you can set a new one as described below. For best connection results follow the exact order, especially when the device responds "Connection Failed. Check IP or power cycle the unit":
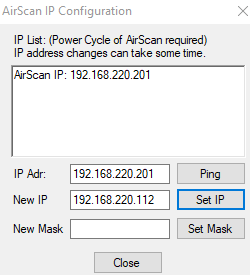 2 - "New IP" > Enter the new IP address. 3 - "New Mask" > Enter a subnet mask, e.g. 255.255.255.0 or 255.0.0.0 4 - Press "Set Mask". 5 - Press "Set IP".
It can take up 5 to 30 seconds until the AirScan adopts the new settings, you can ping the IP address with the tool to verify your settings by pressing the "Ping" button.
The chapter "IP Addresses and Network Setup" describes how to set a computer's IP address. If you are having trouble connecting to your AirScan properly, please also check the Windows Defender and virus software as mentioned in that chapter. "Using Command Prompt (Ping, etc.)" might be of interest too. |