Loading...
The AirScan is available as an optional input device for Widget Designer. The AirScan is a laser scanner device that measures distances in two dimensions. Thus, it allows for optical and contactless detection of objects or persons or just their hands. It can be used for any touch-less interaction with a display or a projected touch surface. The device is available in the licensed versions of Widget Designer, not the Free Version.
Please see Hardware and Accessories > AirScan for more information about the hardware. The chapter explains the following:
- What the AirScan feature is, and what it can be used for
- The hardware itself including technical specifications, LEDs and connectors
- Restrictions to ensure correct usage and measurement readout
In Widget Designer the AirScan (units) can be setup using the AirScanManager device. It is possible to read up to 100 input points and use them for various applications within Widget Designer or Pandoras Box.
There are currently three types of AirScan units that can be added to an AirScanManager (plus one virtual unit). AirScanManager will then merge all data to
a) visualize the system of all connected input devices
b) visualize and process incoming raw data of said inputs
c) generate composite Touchpoints
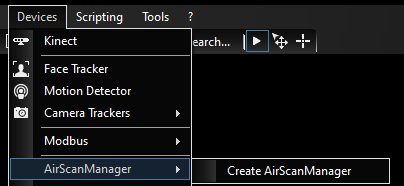
To add an AirScanManager device, open the Devices menu and select "AirScanManager > Create AirScanManager". This will open the Configuration dialog. Alternatively, you can add a new device in the Configuration dialog with the "+" button or multiple devices using the "++" button as well as remove a device using the "-" button when the dialog is already open.
On the right side you see several options:

The Type informs you about the type of device or connection.
The Groups lists the groups to which this device belongs.
The Name is the unique identifier for this AirScanManager object in WD and the general rules for naming objects apply here as well: only letters, numbers and underscores are allowed; the first symbol must be a letter.
It is possible to change the default name to a more descriptive one. When scripting, enter this Name to access available members or use the Project object and device Type instead; examples are shown further down.
The Id offers an alternative way to address the device when scripting.
The "Enable" check box is selected by default. On the left side, you should see that the icon in front of your AirScanManager device is a filled blue circle. An empty blue circle indicates an enabled device where the IP address is not available. A filled gray circle indicates a disabled device.
The various Add buttons indicates the type of Unit to add.
The "Auto Apply" check box allows you to automatically apply changes if enabled. If not selected, use the Apply button to save changes manually.
Open the AirScanManager from the Devices menu. 
The AirScanManager is divided into several sections: |
Four unit types are available: AirScan, R2000, R2300, and Virtual.
Select any of the 'Add...' buttons to add a unit of the respective type and change its details. Once an 'Add...' button is selected, the respective details window appears below. The following Add buttons are available:
The Add AirScan button corresponds to the Christie AirScan unit.
The Add R2000 button corresponds to the Pepperl & Fuchs R2000.
The Add R2300 button corresponds to the Pepperl & Fuchs R2300.
The Add Virtual Unit button corresponds to adding a virtual device.
With the introduction of the new AirScanManager module, users can have multiple AirScan devices of the types AirScan, Pepperl & Fuchs R2000, as well as Pepperl & Fuchs R2300. Users can also create a virtual unit.
As soon as a device is created, it can be addressed via scripting to perform actions on the device as well as retrieve information from it.
To send commands to the device, create a CustomScript button or anything with a scripting field. Enter the device's identifier name into the script field (per default that is "AirScanManager1") and Script Assist will offer a list of all AirScanManager Members.
You can for example to enable AirScanManager1:
AirScanManager1.Enable
You can also check if AirScanUnit1 from AirScanManager is enabled:
vstring = AirScanManager1.Units("AirScanUnit1").Enable
Note that this recalls the last message any time the command is executed. It is also possible to execute a script automatically whenever a new message is received. To accomplish this, use an Event Listener as explained below.
As an alternative to explicitly naming the device, the "Project" object can be used. Choose the device type and address the device by entering its ID or name. Script Assist then offers you the same list of members. This is the alternative for the first example from above:
Project.AirScanManager(1).ConfirmCalibration
Substituting the ID with a dynamic variable allows automation. Actions can be performed on many connections of the same type simultaneously, e.g. by using for-loops:
For i = 1 to 10 {
Project.AirScanManager(i).Enable
}
The chapter "Project and Context Member" shows more examples with for-loops and if-clauses; of course, normal variables can also be used.
Event Listeners can be added in the Configuration dialog and provide a simple way of listening to triggers from connected devices.
Please see the chapter Event Listener and Group Event Listener for a detailed description of its functionality and AirScanManager Events for an overview (with examples and description) over the events raised by this device.
To use the AirScan for further programming, please use the AirScan Multi-Point Input Node. After entering the point ID, it will offer its "Active" status and position data that you can use in following filter or output nodes.
In addition, there are many commands controlling the AirScanManager. This enables you for example to adjust the tracking during a show without the need to open the tool and look for a certain value.