Loading...
The UDP Client in the Configuration dialog allows to set up a UDP connection. The UDP Client is perfect for scenarios where you would like send UDP messages to a fixed address and optionally also receive messages. The UDP Server&Client connection however is more useful if you would like to listen on a certain port and send messages to various addresses. The IP and ports are scriptable, allowing the UDP Client to connect to various devices on the fly. Incoming messages can be received via Event Listeners. Messages can be sent using Widget Designer's scripting.
Previously, the Connection Manager offered the only method to add UDP connections. The node system and some commands still use those connections which allows a more advanced message handling and can also be more useful for streaming information.
To add a UDP Client, open the Devices menu and select "UDP Client > Create UDP Client". This will open the Configuration dialog. Alternatively, you can add a new UDP Client in the Configuration dialog with the "+" button when the dialog is already open.
In the dialog, the left side lists all devices and connections that were already added to the project. The circle in front of the entry symbolizes the current connection status; note that UDP is a stateless protocol and therefore has no connectivity status as known from the TCP protocol:
|
The UDP Client is enabled and active. |
|
The connection or device is disabled, i.e. the "Enable" box is not checked. |
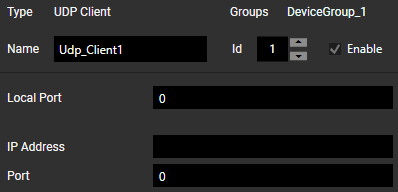
On the right side you see several options:

The Type informs you about the type of device or connection.
The Groups lists the groups to which this device belongs.
The Name is the unique identifier for this object in WD and the general rules for naming objects apply here as well: only letters, numbers and underscores are allowed; the first symbol must be a letter.
It is possible to change the default name to a more descriptive one. When scripting, enter this Name to access available members or use the Project object and device Type instead; examples are shown further down.
The Id offers an alternative way to address the device when scripting.
The "Enable" check box is selected by default and can be used to disable the device or connection internally.
Now, please enter the Local Port, which is the source port the UDP Client listens on. In addition, this defines the sending port in case you are sending messages. If you not enter a specific port and leave "0", WD picks any free port. This is of interest if you are just sending messages, as the sending port is usually not important.
Next, enter the IP Address and Remote Port of the remote UDP server. This defines the destination of messages you are sending.
Click the "Apply" button to save any changes done here. The shortcut [Ctrl + Enter] can also be used to apply changes.
Once the settings are applied, the dialog can be closed. The newly created connection will also be added to the Devices menu > UDP Client and can be opened from here or with the Devices menu > Configuration.
As soon as a connection is created, it can be addressed via scripting in order to send or receive messages.
To send messages to the connected UDP server, create a CustomScript button or anything with a scripting field. Enter the device's identifier name into the script field (per default that is "Udp_Client1") and Script Assist will offer a list of all UDP Client Members.
To send a message, choose the "Send" member. Literal text should always be enclosed in either single or double quotation marks; otherwise, the text is handled like a variable. The second example combines literal text with the global variable "Now" to add the current date and time.
Udp_Client1.Send("Test")
Udp_Client1.Send("This is my time: " + Now)
Displaying incoming messages is also easy:
vstring = Udp_Client1.LastMessageReceived
Note that this recalls the last message any time the command is executed. It is also possible to execute a script automatically whenever a new message is received. To accomplish this, use an Event Listener as explained below.
As an alternative to explicitly naming the connection, the "Project" object can be used. Choose the connection type and address the connection by entering its ID or name. Script Assist then offers you the same list of members. This is the alternative for the first example from above:
Project.Udp_Client(1).Send("Test")
Substituting the ID with a dynamic variable allows automation. Actions can be performed on many connections of the same type simultaneously, e.g. by using for-loops:
For i = 1 to 10 {
Project.Udp_Client(i).Send("Test")
}
The chapter "Project and Context Member" shows more examples with for-loops and if-clauses; of course, normal variables can also be used.
Event Listeners can be added in the Configuration dialog and provide the easiest way to handle incoming messages.
Please see the chapter Event Listener and Group Event Listener for a detailed description of its functionality and UDP Client Events for an overview (with examples and description) of the available events.