Loading...
The CustomScript button allows you to execute one or more commands whenever the button is clicked or activated in a different way. You can set up any button style and any click-able user interaction. Over 1500 commands are available to remote control all important Pandoras Box features as well as Widget Designer interface elements and much more.
 To edit the CustomScript button properties simply right-click it and choose the first menu entry "CustomScript Properties". Alternatively, you can press [Alt + P] whilst the mouse is hovering above it or switch to the edit / move mode with [F9] and double-click on it. |
The property dialog is divided into eight sections additional to the general widget properties on the top: Settings, Button Styles, four different kinds of Scripts, Network Broadcasting and Ui Effects & Animations.

A unique name can be entered to identify the widget via the Object and Member Notation. The default name is based on the widget type and ID.
This drop-down offers all available pages to place the widget on.
ID:
The CustomScript button's ID may be changed by entering a new one in the text field top left. If you change it, you will be asked if you also want to adapt the name to the new ID.
A short note can be added here. It is not displayed outside the widget but can be set and retrieved with the WidgetID.Note property member.
Uncheck this box to hide the widget.
Fix:
When the option "Fix" is checked, the CustomScript button will be displayed on every page.
Enter a pixel size for the CustomScript button's size.
Enter the location of the widget (upper left corner) in pixels

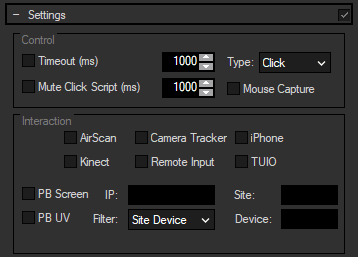
Timeout (ms):
The timeout setting can be used to call the click script after a given timeout. The timeout is always restarted upon mouse enter on the control.
This feature is particularly useful for AirScan or touch applications where the user can only position the mouse but not cause a click with the input device.
Mute Click Script:
Set a specific time in milliseconds for a CustomScript click script to be muted (not executed).
This protects a CustomScript button from accidental double clicks.
Type:
You may set the button type to be Click or Toggle. The toggle state of the CS button will be kept when the project is saved and loaded.

When the button's type is "Click" and you release the mouse click (= mouse up event), the button goes back into the "Released" mode and the Release Script executed (if defined).
At this point, when the button's type is "Toggle" the state does not return automatically, but changes to "Pressed" mode. The next time it is clicked, the "On Release" script is executed and the button changes to the "Released" mode again.
The modes can be indicated by an image (see below). There are commands that press a button, with or without executing the associated script and with or without changing the mode.
Mouse Capture:
CustomScript buttons allow to capture a mouse left click even when WD GUI is in the background, as well as Mouse Enter and Mouse Leave events. This is useful when WD is used on the same machine as the Pandoras Box Client (e.g. a Server). Please note that the WD interface needs to be minimized for this feature to work!
This section is of interest if you would like to "click" a CustomScript button without using a mouse device, including node solutions addressing a mouse. It is possible to use the input device directly to execute the "On Press / Release" or "On Mouse Enter / Leave" script. If the device generates more than one input event you can use all of them even if running a Win XP system that is normally restricted to one input event. The following input devices are supported: AirScan, Camera Tracker, iPhone, Kinect, Remote Input, TUIO.
In addition you can also receive inputs from a device that is physically connected and set up on the Pandoras Box Manager or even Client system. The Client sends the mouse / touch / etc. inputs to the Manager system which sends it through the Widget Designer Device to the Widget Designer interface.
Set up the supported device connection as usual to generate input events.
Last, open the Item Properties of the Custom Script Button that should receive the input data. Enter the script as usual and in the section "Interaction" enable then the check box for the input device, e.g Camera Tracker as shown in the below screenshot. If you would like to click the button with data from a PB Manager or Client, decide whether the screen (i.e. output resolution) or UV data of a layer is of interest. If you would like to filter data from a specific site / layer only, enter the Manager's IP address, then the Site (and Device ID) and the filter type. For more info about UV data see the chapter about Layer Picking.
The Web Link section is of special interest when working with the Web Server feature, i.e. clicking the CustomScript button in a web browser. Enter a URL e.g. "https://www.christiepandorasbox.com" that your browser should call when clicking the button.
But it is also possible to achieve a quick page change with the URL, simply enter a hash tag "#" and the page name. E.g.: #Page2
Check the option "Open In New Tab" if you would like to keep the Widget Designer page loaded in your browser.

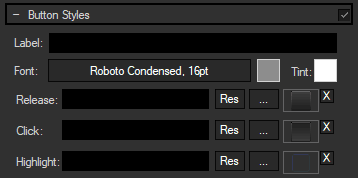
Label:
Enter a label that will be displayed on the button. The text's color can be set via the color field and its font via the according button.
Tint:
CustomScript buttons can be colored by selecting a tint color, this applies only to the default button images.
Three images can be assigned to the different states of the button (the modes are explained above).
"Release" refers to no click or not toggled.
"Click" is on press or toggled.
"Highlight" can be used to draw a PNG with alpha over either the click or release image.
Click on the "..." button to open a file dialog where you can choose your path and image. If you would like to choose an image from the Widget Designer "library", click on the "Res" button. The Resource Manager opens where you can double-click on the image of your choice. You can also save custom images in the Resource Manager to access them faster. The small "x" at the right sets the default image.
 Since version 6.5.3 you can also assign animated GIFS as button images. Note that WD recognizes transparent areas in static GIF images but not in animated ones where they count as visible pixels even though WD renders them transparent. It is recommended to assign images with the same size to the three states and to reduce the transparent area to the borders of visible pixels. If you would like to work with transparent buttons, it might be faster or more convenient to use Labels (with an on-click-script) instead. |

In the Script section you may enter commands to be executed. You can type directly in the text field, the Script Assistant will help you finding the expression you search for. The topic Script Language explains this in more detail.
The scripts for Press, Release, Mouse Enter and Mouse Leave are executed when the Widget Designer button is being used, on the local interface as well as on any web client.
You can enter as much text in one of the scripting fields as you like. For sophisticated scripts, Macros and Functions allow you to keep a good overview.
If you are interested in the Web Server feature and some small examples, please read the topics Web Server and Object and Member Notation .
See here a list of all commands.

The NBS (Network Broadcast Service) allows to transmit and update Faders, Labels and Custom Script Buttons across multiple WD Designers instances on the network. To activate this service, please refer to the Remoting dialog!
Enable Send:
To send the CustomScript buttons state (clicked or released) as broadcast into the network, you only have to check "Enable Send".
Enable Receive:
To receive values from other CustomScript buttons, please check "Enable Receive".
Now you have to specify which item should update your CustomScript button:
Enter the IP address of the computer you want to listen to. This could be the local computer (to control the fader through another item on the same Widget Designer) or a different computer in the network. If you do not want to specify the computer but want to listen to all computers in the network, enter "255.255.255.255".
As next step specify the CustomScript button you want to take the status from. This could be e.g. "CustomScript1" or "CustomScript2".

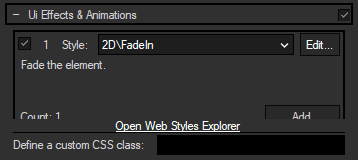
The topic Effects & Animations explains how to add and apply CSS based effects and animations.