Loading...
This chapter explains how to convert multiple images as a batch conversion with the Fulldome Converter. Please see the introductory chapter for general information about this tool and links to other topics.

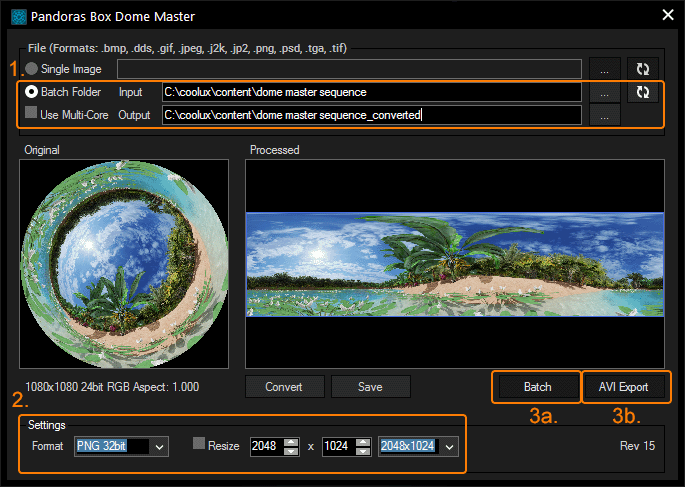
First, select the option "Batch Folder" and click on the […] button to choose the folder where your Fulldome image sequence is located.
Alternatively, paste the path manually into the text field and press Enter or click the refresh button 
Note that the folder should be updated with the refresh button  if the image sequence has been changed, e.g. an image frame was replaced, deleted or added.
Next, define an output folder, where the converted files should be stored.
Optionally, you can enable "Use Multi-Core". This splits the conversion process evenly over all available cores of your computer which results in a faster conversion.
The first file of the first folder is now displayed on the left side in the Image section, together with information regarding: Size, Color Depth, Aspect Ratio and total file count.
The image size in the example above is 1080 x 1080 px, its color depth is 24 bit (containing RGB, no Alpha), the aspect ratio is 1 (which is common for Fulldome files) and the chosen folder includes 160 files.
Second, choose your conversion settings. The default settings mean that the image is converted to the file format "PNG 32bit" which contains an alpha channel and that the processed file will have a 4:1 aspect ratio.
You can choose these formats: BMP 24/32bit (snp), PNG 24/32bit, DDS RGB(A) (snp) or JPG as image formats.
The formats labeled "24bit" or "RGB" do not support an alpha / transparency channel whilst the versions with "32bit" or "RGBA" do support it.
See the chapter "Image Formats" for information about the formats (including snappy) and when to choose which format.
Without enabling "Resize", the converted image will have a 4:1 aspect ratio whereas the height is half the height of the original image. If your input file has a resolution of 4096 x 4096 px, for example, the result would have 8192 x 2048 px.
You can choose other size options after ticking "Resize".Second, choose your conversion settings. They are explained in detail in the chapter Settings. The default settings mean that the image is converted to the file format "PNG 32bit" which contains an alpha channel. If you have not chosen another size option, the converted image will have a 4:1 aspect ratio whereas the height is half the height of the original image. If your input file has a resolution of 4096 x 4096 px, for example, the result would have 8192 x 2048 px.
Third and last, choose how the converted files should be saved. Optionally, you can use the "Convert" button to convert the left image and the "Save..." button to choose whereto the (one!) converted file should be saved.
Now you have the option to convert all input images as single images to the target path using the "Batch" button, or convert them to an AVI video file.
"Batch" will start the batch conversion according to the Format and Resize Settings and save the results to the target path chosen above.
While the batch conversion process is running, the message "Batching files …" is displayed in the image fields.
To skip the batch conversion process press "Stop".
Choose "AVI Export" to create a video out of all files located in the Input folder.
 File Name
Choose a file name for your AVI video and use […] to browse to the location where it should be stored.
Choose the format: RGBA32bit, RGB24bit, RGB555, RGB565, YUY2(4:2:2), UYVY(4:2:2) or IYUV(4:2:0).
Choose the frame rate in FPS (frames per second). Possible values are 24, 25, 30, 50 and 60.
Displays the total frame number.
Now press the "Start Export" button and your AVI video will be created.