Loading...
In digital image editing, blend modes are used to determine how a layer blends with underlying layers. In Pandoras Box, the default blend mode (called "Normal") has the effect that the top layer simply obscures the background layer(s) and its RGB values stay unchanged. Only if the top layer has (partly) transparent parts, the layer(s) below can be seen. The other blend modes mix the RGB values of the respective layers in a different way, e.g. add them up or subtract them.
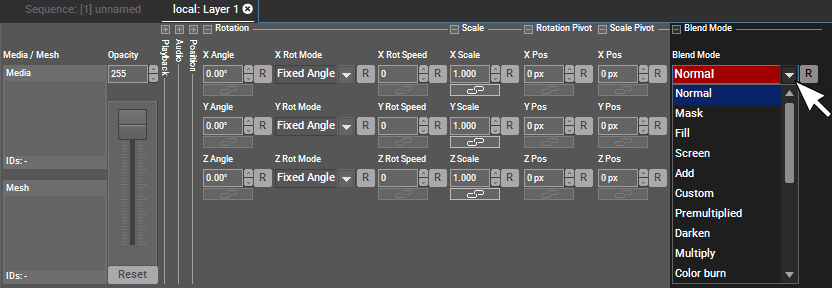
To switch the blend mode, first select the top layer. Per default, that is the one with the higher Layer number or the one nearer to the Camera Layer. In the tab "Device Controls", click on the + symbol above "Blend Mode". Open the drop-down list which offers all available modes and choose one. If needed, adjust the opacity value with the "Opacity" fader.

You can control the Blend Mode parameter externally, simply send a value (0 to 19) to set the drop-down to this index.
For DMX control, the chapter DMX Tables lists all parameter information, for other external control e.g. via the Widget Designer the Parameter List is of interest.
The top layer obscures the background layer(s). The RGB values of the top layer stay unchanged. Only if the top layer has transparent parts, the layer below can be seen through. |
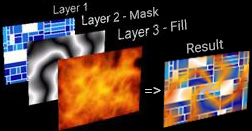
The "Mask" and the "Fill" blend mode are meant to be used together. The "Key and Fill" effect is based on the layer stack from back to front, as the back layer is being rendered first and every other layer is rendered on top of the previous one. The below image shows an example:  The fire content should be in the very front, so it is assigned to Layer 3. With the default blend mode, it simply overlays the background layer. As soon as the blend mode is changed to "Fill", it is only rendered in areas defined by the mask. Last, select the layer in between the two, in our case Layer 2 , and change the blend mode to "Mask". If you now assign an image or video with transparency, you will see that the fire content is rendered in those transparent areas only. Indeed, you can use any content as a mask. Simply assign a key effect to define transparent areas. For this example, a black and white content should be the mask. The "White Key" effect is chosen and the "Mix" parameter is set to 255 to key out all white parts. Please note: If the Key & Fill Layers (Layer 2 and 3 in the example above) should be faded in / faded out, please use the Mix-Parameter of the White Key of the Mask Layer to do so, instead of using the Opacity of both Layer 2 and 3. |
This looks at the value of the red, green and blue channel of each pixel from the inverted(!) blend layer and background layer(s) and multiplies them which always results in a lighter color. Blending with black leaves the color unchanged as the inverted vector value is 1. The result reminds on a projection of multiple images on top of each other. |
This blend mode simply adds the RGB values of each pixel of the blend layer and background layer(s). If a red, green and blue pixel (with value 255) overlap, white is displayed. |
Here you may use a customized blend mode. By default the blend mode "Normal" is set. When opening this .txt-file scroll down to this section: ;---------------------------------------------------------------------------------; ;description: ;possible values for blend operations are defined in D3DBLENDOP ;find more information here: http://msdn.microsoft.com/en-us/library/bb172509(VS.85).aspx ;possible values for blend modes are defined in D3DBLEND ;find more information here: http://msdn.microsoft.com/en-us/library/bb172508(v=vs.85).aspx ;default: [LayerBlending] ;---------------------------------------------------------------------------------; Modify the entries under the section [LayerBlending] to create your own blend mode, like described below in the tweak_config. Please note: |
With the "Premultiplied Alpha" blend mode, the alpha value specifies how much an RGB value obscures the background. Alpha and RGB are linked. To make an object transparent you must reduce both its RGB (to contribute less color) and also its alpha. The RGBA value of fully transparent objects must be zero, which means 100% transparent and black. With the "Normal" blend mode, so called Straight or Linear Alpha is applied which means that the alpha value specifies how solid an RGB value is rendered. Alpha and RGB are independent. To make an object fade out, you would gradually reduce its alpha value while leaving RGB unchanged. |
This looks at the value of the red, green and blue channel of each pixel from the blend layer and background layer(s) and mixes a new color based on the lowest value. If you overlay a purely red pixel (RGB = 255,0,0) with a light cyan colored one (RGB = 127,255,255), the resulting pixel is dark red (RGB = 127,0,0) because the lowest red value is 127 and the lowest green and blue one is 0. |
The Multiply blend mode simply multiplies the RGB vector values from the blend layer and background layer(s). Multiplying any color with black (vector value 0) results in black. Multiplying it with white (vector value 1) leaves the color unchanged. Hence, the result is always darker. |
This looks at the value of the red, green and blue channel of each pixel from the blend layer and background layer(s) and mixes a new color which is always darker. Blending with white leaves the color unchanged. The contrast between the background color and blend color is increased. |
This looks at the value of the red, green and blue channel of each pixel from the blend layer and background layer(s) and mixes a new color which is always darker. Blending with white leaves the color unchanged. The brightness of the background color is decreased. |
This looks at the value of the red, green and blue channel of each pixel from the blend layer and background layer(s) and mixes a new color based on the higher value. Blending with white results in white. Blending with black leaves the color unchanged. Pixels darker than the blend color are replaced whilst lighter pixels do not change. |
This looks at the value of the red, green and blue channel of each pixel from the blend layer and background layer(s) and mixes a new color which is always brighter. Blending with black leaves the color unchanged. The contrast between the background color and blend color is decreased. |
Depending on the background colors, the Overlay blend mode works either as the Multiply or as the Screen blend mode. The blend layer overlays the background pixels while preserving their highlights and shadows. Thus, the resulting mixed color reflects the lightness or darkness of the background. |
Depending on the colors of the blend layer, the Soft Light blend mode results in darker or lighter background colors. The effect is similar to shining a diffused spotlight (light source = blend layer) on the background. If the blend color is lighter than 50% gray, the background is lightened as if it were dodged. If the blend color is darker than 50% gray, the background is darkened as if it were burned in. Blending with pure black or white produces a distinctly darker or lighter area. |
Depending on the blend colors, the Hard Light blend mode works either as the Multiply or as the Screen blend mode. The effect is similar to shining a harsh spotlight (light source = blend layer) on the background. If the blend color is lighter than 50% gray, the background is lightened, as if it were screened. This is useful for adding highlights. If the blend color is darker than 50% gray, the background is darkened, as if it were multiplied. This is useful for adding shadows. Blending with pure black or white results in pure black or white. |
This looks at the value of the red, green and blue channel of each pixel from the blend layer and background layer(s) and mixes a new color by subtracting the lower value from the higher one. Hence, blending with pure black leaves the color unchanged. Blending with pure white results in inverted background colors. |
This is very similar to the Difference blend mode, but the contrast is lower. Blending with pure black leaves the color unchanged. Blending with pure white results in inverted background colors. |
This looks at the value of the red, green and blue channel of each pixel from the blend layer and background layer(s) and mixes a new color by subtracting the blend value from the background value. The lowest value must be 0. Hence, blending i.e. subtracting with pure black leaves the background color unchanged. Blending with pure white results in pure black. The result is always darker. |
This blending mode is similar to the Exclusion blending mode except that it shows brighter and more vibrant colors. Blending with pure black leaves the color unchanged. Blending with pure white results in inverted background colors. |