Loading...
This chapter explains the Calibration settings of the AirScanManager, which allows for an intuitive calibration experience while setting up a system comprised of one or more AirScan Units. For more information please see the introductory chapter.
See a comprehensive Step-By-Step example at the bottom of the page.

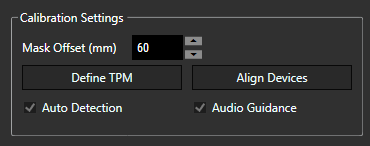
Mask Offset (mm):
This advanced property is the offset of each reading towards a static obstacle, for example a wall. The default is 60. This might be required to optimize the calibration process beforehand or to fine-tune a second run (if the result of the first calibration run is not accurate).
Auto Detection:
Per default Auto Detection is enabled. This means that created Touchpoints for 'Define TPM' are automatically taken for defining corners of the TPM. This is useful if you want to define a TPM in front of a wall. Where, on the other hand, it is better to deactivate Auto Detection if you want to define a TPM on a floor. With a disabled Auto Detection you can position your obstacle to define TPM corners at the correct place. Use the newly appeared “Confirm” button to manually confirm the position of the obstacle as a TPM corner. After confirming 3 corners 'Define TPM' is done.
Enabled Auto Detection for 'Align Devices' means that your alignment is confirmed when your align-obstacle leaves the scan area. With a disabled Auto Detection you have to hit the button 'Finish Alignment' to confirm you alignment. So if your align-obstacle leaves the scan area alignment is not automatically finished. It is only completed when this is confirmed manually with the button.
Audio Guidance:
Enable or disable audio guidance for 'Define TPM' and 'Align Devices'.
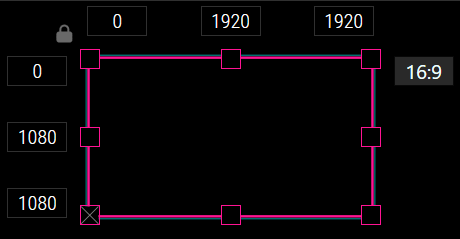
Touchpoint Map (TPM) can be defined using at least 3 points as corners of the TPM. The Define TPM button is active only if
•Only one AirScan Unit is present and connected.
•Multiple AirScan Units are present, connected, and the alignment process has been completed. Here Align Devices is mandatory before setting up Define TPM.

As mentioned before 3 corners of the TPM are mandatory to define the TPM. In Advanced mode, like shown in the picture above, the bottom left corner is marked with a cross. This means, that this corner is not used for defining TPM. By right clicking into another corner you can exclude this corner from calibration process and the cross will be moved into this corner for clarification.
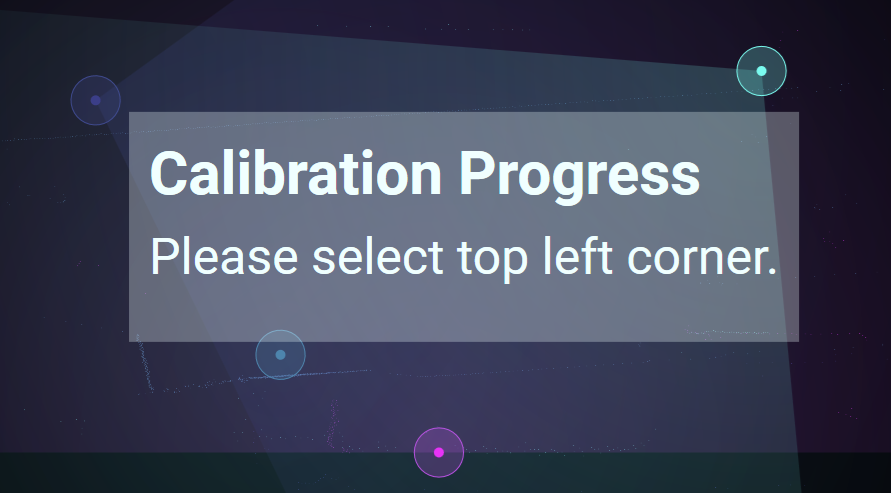
Running 'Define TPM' shows the message below for each corner one after the other. If 'Audio Guidance' is activated, there is also an audio output of what to do. The process waits until what is considered a Touchpoint has been provided by the user for each corner requested, then proceeds to ask about the next corner. If 3 points have been successfully detected and the points are arranged in a rectangle, the TPM creation is completed. If Auto Detection is deactivated each corner has to be confirmed manually by hitting the button.

If your TPM is not set correctly you have to repeat 'Define TPM'. Try to be more precise when positioning the obstacles to define a rectangular TPM.
The Align Devices button is enabled only if more than one AirScan Unit is connected. It is mandatory to first align all Units before you can start defining the TPM. If only one AirScan Unit is connected, you can start the Define TPM straightaway.
Align Devices can always reset earlier alignments. TPM that was defined in an earlier attempt is kept.
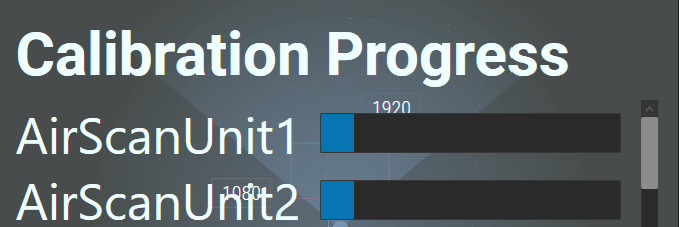
During the align devices process, a progress bar appears. This is also output acoustically when 'Audio Guidance' is activated. In general, you receive feedback on what percentage of the calibration has been achieved or on which units more data is required for successful alignment.

Throughout the process, freely wave your hands or any other object within the active scan area of the setup devices while the overall progress is announced.
Additionally, progress bars for each AirScan Unit are displayed to visualize potential lack of data.
When only two units are left with not yet 100% progress, these units are mentioned once explicitly by Alias. Generate more touchpoints near those devices to cover the needs for accurate alignment computation.
When there is only one AirScan unit left with not enough input data, the unit is mentioned explicitly by Alias and only once.

The calibration is finished when the obstacle leaves the scan area (Auto Detection is activated) or the user hits the 'Finish Alignment' button manually (Auto Detection is deactivated).
The calibration process gets aborted by closing the configuration dialog during calibration, deselecting the device inside the configuration, or selecting multiple devices inside the configuration.
The following is a step-by-step description of how to do a complete Calibration run.
In case of a single AirScan Unit:
1.Add an AirScan Unit and connect.
2.Click 'Define TPM'.
3.Select the three corners as mentioned.
4.Calibration done.
In case of multiple AirScan Units:
1.Add two or more AirScan Units and connect.
2.Click 'Align Devices'.
3.Do the alignment by moving the palm/hand/obstacle inside the scan area.
4.After alignment is completed, click 'Define TPM'.
5.Select the three corners as mentioned.
6.Calibration done.