Loading...
The EventViewer widget allows you to create new Events and gives an overview of them. An Event is a scheduled script, i.e. it allows to execute commands at a certain time and can also be repeated in a certain time interval.
To create an EventViewer widget choose "Widgets > EventViewer". The mouse cursor changes to a crosshairs icon, indicating the create mode. Each left-click adds the selected widget to the current page. To quit the create mode, you can switch to the run mode with [F8], where you can use all widgets. Most widgets however need to be set up first.
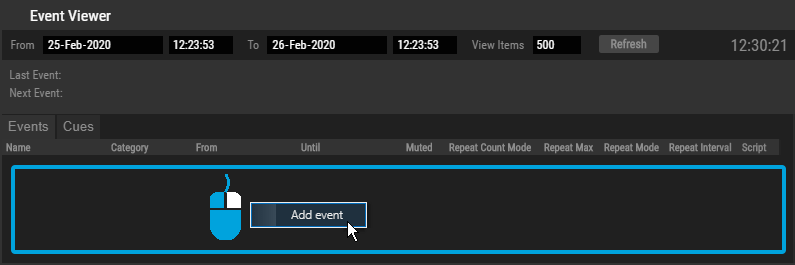
Now, you can add an Event or Event series. Simply right-click into the area where the Events are listed, and choose "Add event". The Event Properties dialog comes up.
All changes done in the dialog are applied immediately. There is no dedicated "Apply" button, you simply close the dialog when you are done.
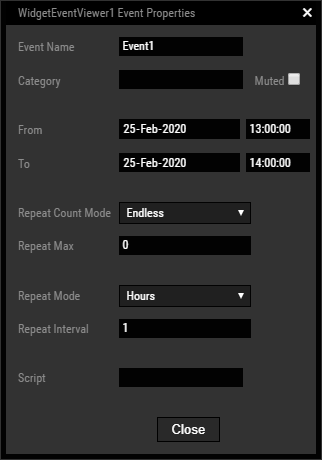
The name simply helps to identify the Event. Please choose a unique name.
The category simply helps to allocate and identify the Event.
If this option is checked, the Event is not executed.
Choose a start date and time for the scheduled Event. For the date, you can either de-/increase the date by one day with the small up/down arrow keys, or choose one from the calender that opens as a drop-down list, or you can enter the date manually.
The end date is only of interest when the "Repeat Count Mode" option is set to "Until Date". Choose an end date and time for the scheduled Event whereas the same options apply as described for the Start date.
The mode influences if and how the Event repeats. You can choose between three options:
- Endless: The Event repeats according to the options "Repeat Mode" and "Repeat Interval" for an unlimited number of times. The options for the end date and "Repeat Max" are ignored.
- Until Date: The Event repeats according to the options "Repeat Mode" and "Repeat Interval" but only until the end date and time is reached. The "Repeat Max" option is ignored.
- Max Count: The Event repeats according to the options "Repeat Mode" and "Repeat Interval" for the number of times set up under "Repeat Max". The end date is ignored.
This number is only of interest when the "Repeat Count Mode" option is set to "Max Count" and sets up how many times the Event happens according to the options "Repeat Mode" and "Repeat Interval".
With both settings you can setup, that the Event is scheduled every 5 minutes for example.
The "Repeat Mode" sets up the time unit and the "Repeat Interval" the count of those units after which the Event repeats. Choose "Single Event" if it should only happen ones. Choose Seconds, Minutes, Hours, Days, Weeks, Months, or Years and a "Repeat Interval" if the Event should be scheduled multiple times.
Enter the command that should be executed at the scheduled time. Currently, the script field only supports one line of code. To execute a longer script, write it first into a Macro or CustomScript button and call it then with the Event. To call a macro, simply enter the macro's name into the Script field. To "click" a CustomScript button, enter the command CustomScript1.Click
Once you created an Event, the EventViewer will display it in two different ways in the tabs "Events" and "Cues".
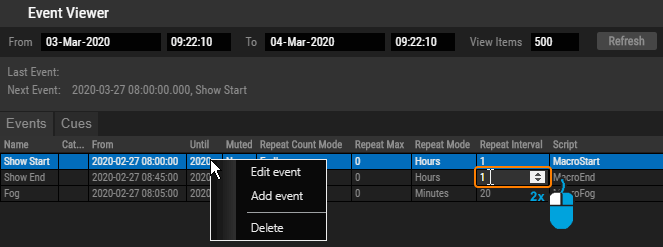
"Events" lists all Events once in the order in which they where created and the top date filters do not apply so that you really can see every Event. You can right-click one to edit or delete it. You can also double-click a single field to edit it.
 |
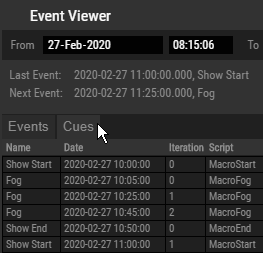 |
The "Cues" tab on the other hand lists all instances belonging to one Event. So if you created an Event that happens every hour, you will see 24 entries per day. All instances of all Events are sorted by date and time so that you can see the upcoming Event right away. You can filter this view by using the options at the top of the widget, like the start and end date / time.
Again, you can right-click an Event instance to edit or delete the superordinate Event, the tab switches to "Events" and selects the according entry there. You can also select an Event and press the [Delete] key.
To edit the EventViewer properties simply right-click the upper half and choose the first menu entry "EventViewer Properties". Alternatively, you can press [Alt + P] whilst the mouse is hovering above it or switch to the edit / move mode with [F9] and double-click on it. The EventViewer property dialog opens up.
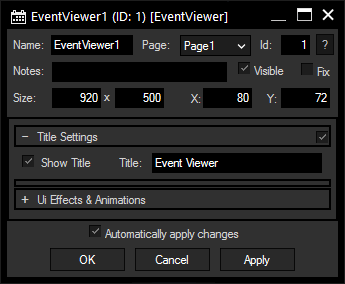
A unique name can be entered to identify the widget via the Object and Member Notation. The default name is based on the widget type and ID.
This drop-down offers all available pages to place the widget on.
ID:
The EventViewer's ID may be changed by entering a new one in the text field top left. If you change it, you will be asked if you also want to adapt the name to the new ID.
A short note can be added here. It is not displayed outside the widget but can be set and retrieved with the WidgetID.Note property member.
Uncheck this box to hide the widget.
Fix:
When the option "Fix" is checked, the InputBox will be displayed on every page.
Enter a pixel size for the EventViewer's size.
Enter the location of the widget (upper left corner) in pixels
Decide whether a title should be shown at the top of the widget and enter one.
The topic Effects & Animations explains how to add and apply CSS based effects and animations.