Loading...
A DropDown List is a control element that allows to select one value from a series of predefined options.

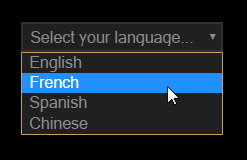
First, the DropDown List displays a single line, e.g. "Select a language". When the user clicks on the small down arrow, a list is displayed from which one entry can be chosen. Once this is done, Widget Designer displays the chosen value and in addition returns an internal index number. For the above depicted example, the operator gets the information that "French" and the index "1" has been chosen. Note that the indexing starts with "0". Depending on this information further commands can be executed accordingly. For example, Widget Designer toggles to a certain page with French labels or Pandoras Box calls a cue with French content.
To create a DropDown List widget choose "Widgets > DropDown List". The mouse cursor changes to a crosshairs icon, indicating the create mode. Each left-click adds the selected widget to the current page. To quit the create mode, you can switch to the run mode with [F8], where you can use all widgets. Most widgets however need to be set up first.
To edit the DropDown List properties simply right-click it and choose the first menu entry "DropDownList Properties". Alternatively, you can press [Alt + P] whilst the mouse is hovering above it or switch to the edit / move mode with [F9] and double-click on it. The DropDown List property dialog opens up.
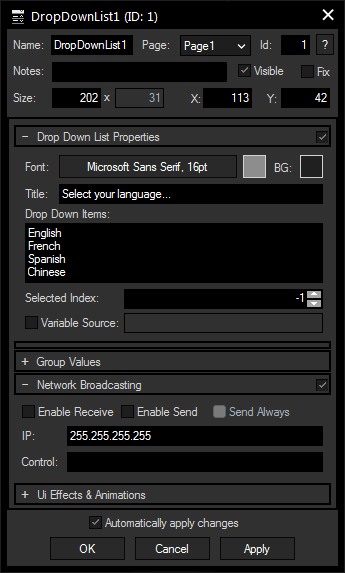
General Widget Settings A unique name can be entered to identify the widget via the Object and Member Notation. The default name is based on the widget type and ID. Page:This drop-down offers all available pages to place the widget on. ID: Notes:A short note can be added here. It is not displayed outside the widget but can be set and retrieved with the WidgetID.Note property member. Visible:Uncheck this box to hide the widget. Fix: Size:Enter a pixel size for the DropDown List's size. X and Y:Enter the location of the widget (upper left corner) in pixels |
Title:
Enter the text that is displayed per default before the Drop Down List is opened.
To set this text back you can use the command WDDropDownListSetText(ID,Text)
Font and Color:
Pick a font setting and color for the displayed text including the DropDown Items.
Drop Down Items:
Enter the items for the list to be displayed when the Drop Down List is opened with the down arrow.
The "Command List" lists all available commands.
Choose here the selected item you would like to display per default, e.g. when you do not want to show a Title but one of the items.
Variable Source:
Check this option and enter the name from an existing list variable.
This option is only available for the Unlimited version and offers the possibility to assign a group. Please refer to the chapter Group Values for more information.
The NBS (Network Broadcast Service) allows transmitting and updating Faders, Labels and CustomScript buttons etc. across multiple WD Designers instances on the network. To activate this service, please refer to the Remoting dialog!
Enable Send:
To send the DropDown List's state as broadcast into the network, you only have to check "Enable Send".
Enable Receive:
To receive values from other DropDown Lists, please check "Enable Receive".
Now you have to specify which item should update your DropDown List:
Enter the IP address of the computer you want to listen to. This could be the local computer (to control the DropDown List through another DropDown List on the same Widget Designer) or a different computer in the network. If you do not want to specify the computer but want to listen to all computers in the network, enter "255.255.255.255".
As next step specify the DropDown List you want to take the status from. This could be e.g. "DropDown1" or "DropDown2").
The topic Effects & Animations explains how to add and apply CSS based effects and animations.
This is a short description how you can program with the DropDown List.
First of all there is a DropDownList Input node which can be used to forward the chosen text and index number to a following filter or output node.
Second, the DropDown control returns member values, allowing for example the following script. Please find more information in the topic Object and Member Notation .
If DropDownList1.Index = 1
{
Label1.Text = "Bonjour"
}
Lastly, the "Command List" lists all available commands.