Loading...
This chapter explains the Fixture Library and Channel ID settings of the Fixture Editor inside the Matrix Patcher. For other sections of the Fixture Editor, see here.
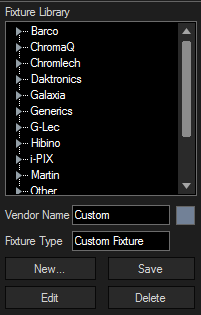
 The section below allows to create a new custom fixture and edit or delete any existing fixture. Vendor Name / Fixture TypeAs soon as a fixture is created or set to be edited, the Fixture's Vendor Name and Type are displayed in the text fields. Fixture ColorThe small colored box next to the Vendor Name allows to choose the fixture's background color. It will open a colour-picker once you click on it New...Allows to create a new fixture, see File Menu. Please note that any prior work won't be saved automatically. The Fixture will be loaded into the Workspace now for further editing. EditTo start editing an existing fixture, please select the fixture in the Fixture Library and press [Edit]. The Fixture will be loaded into the Workspace now for further editing. SaveSaves the changes in the fixture under the Vendor Name and Fixture Type currently displayed. DeleteDeletes the fixture currently selected in the fixture library. |
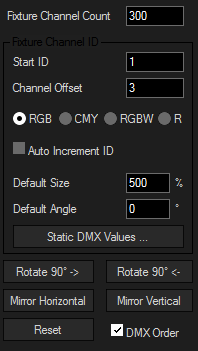
 Fixture Channel CountThis is the amount of channels the fixture contains. It is calculated by the Fixtures Width and Height multiplied with the Channel Offset. For example, the fixture is 4 px wide and 4 px high and has an offset of 3 channels (for RGB), then the Fixture Channel Count is 4x4x3 = 48 channels. This Channel Count is used to calculate the start address for the next fixture when setting up the patch. In order to create fixtures with unpatched pixels you need to manually modify that number, so that the start address for the next added fixture is correct when using auto increase while patching the matrix. Start IDThis is the DMX Start Address for the next pixel. Channel OffsetAmount of DMX channels per pixel. RGB / CMY / RGBW / RDefines if the color values of the pixels will be interpreted as RGB, CMY, RGBW or R. Auto Increment IDWhen activated the starting channel of the pixels will automatically be incremented according to the chosen offset. Default [SizeThis is the fixture's size when added on the patch. By default it is set to 500%, you may change this size when editing a fixture. Default AngleThe default angle refers to the fixture's angle when it will be added on the patch. Rotate 90°To rotate the selected fixture in 90° steps, you may simply use the Buttons [Rotate 90° ->] and [Rotate 90° <-]. MirrorThis allows to mirror the selected fixtures horizontally or vertically. ResetClears the DMX addressing of the currently selected fixture. DMX OrderWhen this option is checked, it shows the pixel addressing order in the fixture with a red line. The starting pixel is marked with a red dot. |