Loading...
The Pandoras Box Matrix Patcher starts with the main patching window:
The Fixture Library on the top right contains a stock of fixtures by different vendors. If the fixtures you need are not included or if the fixtures need to be modified, you have to create/edit them first using the Fixture Editor.
As soon as all fixtures needed are available in the Fixture Library you may start setting up your patch.
Important information about setting up the patch size
The Matrix Patcher up from Revision 12 should be used with big patch sizes, although you maybe only need a patch that is 10x10 pixels big! The reason for this is that the patch size always refers to the size of the Pandoras Box output that is used for the Matrix. Please keep in mind, that Art-Net output is only "rendered" if a display is connected, or at least an EDID manager that leads the graphics card to believe there is one.
Example 1:
The Pandoras Box output 1 of a PB Server should be used to control your LED Panels. The display attached to this output is set up to the resolution 1024x768 px. The LED Panels where the video content should be displayed on are 20 px wide and 20 px high.
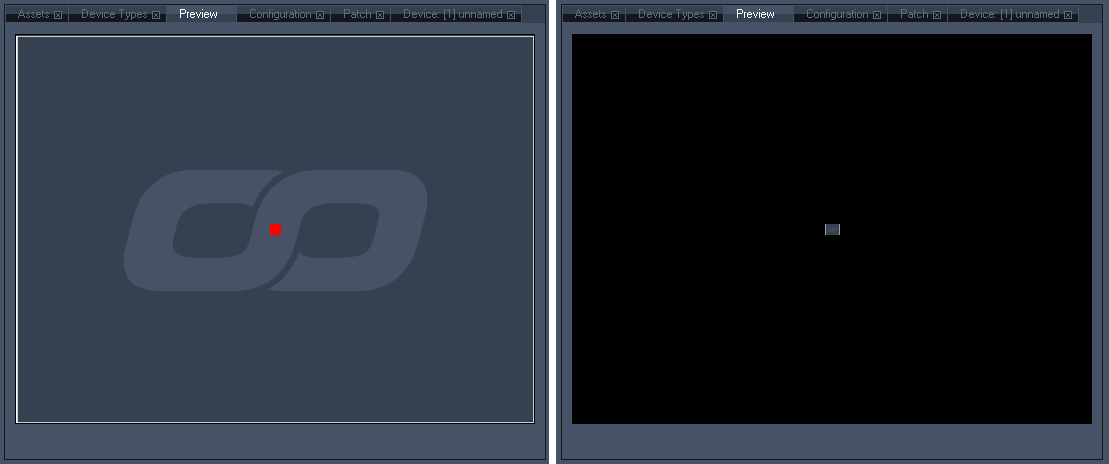
a)If the patch is only 20x20 px large (according to the amount of pixels of the LED Panels), only a fraction of the whole PB layer size will be used for the Matrix, illustrated by the red square in the picture below. This way the content (in this example the infinity logo) has to be scaled very small to be completely displayed on your devices. And this is quite unhandy.

Left side: By default the video content (the infinity logo) covers the whole output (output size: 1024x768 px). A patch with the size 20x20 px would only give out DMX data for the area that is covered by the red square. |
Right side: To ensure that the logo will be shown on your LED Panels with its whole height, it has to be scaled down a lot. |
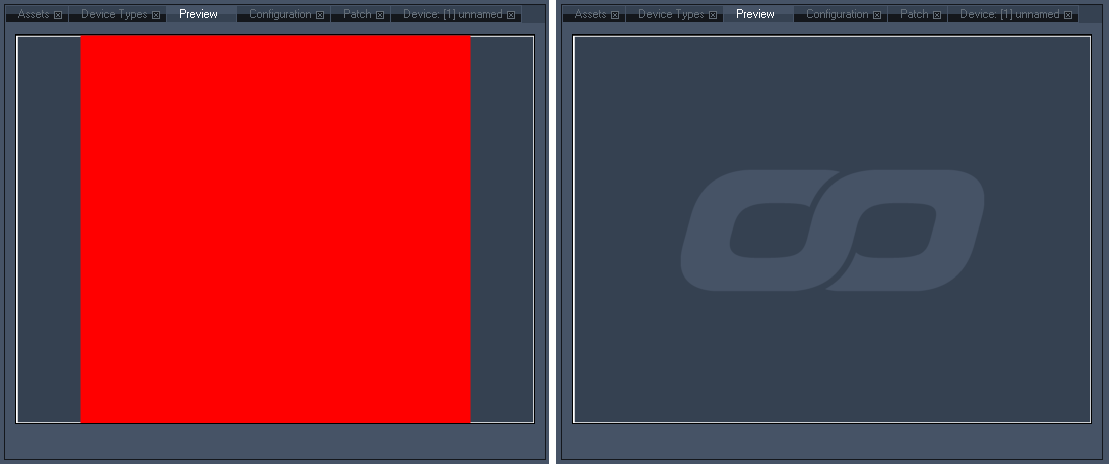
b)A better and more handy workflow inside Pandoras Box is given when the patch gets close to the size of the Pandoras Box Matrix output (PB output= 1024x768 px). You may create a patch now that is 1024x768 px. The fixtures on the patch will be scaled up and arranged so that they form a square (because of the pixel aspect ratio 20:20) covering the whole patch's height. The colour values for one pixel of the patch will now be calculated as average value from a bigger area, not only from one pixel as shown in the example 1a. See picture below.

Left side: By default the video content (the infinity logo) covers the whole output (output size: 1024x768 px). The fixtures on the patch with the size 1024x768 px cover nearly the whole output, shown by the red square. |
Right side: To ensure that the logo will be shown on your LED Panels with its whole height, it has not to be scaled down any more! |
Patch Size
In the Patch Settings the current patch size is displayed. By default the size is set to 1024x768 px. Adjust this patch size to fit your PB Matrix output resolution.
Adding Fixtures
Now that the patch is set up, you need to add one or several fixtures to your patch. Let's assume that you want to place 3 square fixtures (with the size 10x10 px) side by side in a line, covering the whole width of the patch.
Select the fixture in the Fixture Library. If it is not available set it up in the Fixture Editor first. But before adding the fixtures on the patch, think about how they should be addressed if working with DMX fixtures. Turn over to the Fixture Patch and enter the DMX starting address and the Art-Net Subnet and Universe for the first fixture. Don't press [Apply] as this should be used only when modifying DMX addresses after the fixture is created.
If the DMX addressing should be automatically incremented for all following fixtures, enable [Auto Increment]. If you want to address the following fixtures manually, you may enter the new DMX addressing in the Fixture Patch before adding the fixture to the patch.
|
The scaling can be done in several ways: by eye, by calculating the correct zoom factor or by using a prepared background image. |
|
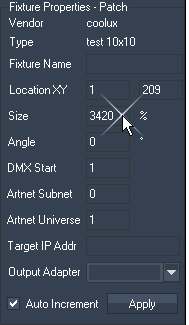
 The patch is 1024 px wide, one fixture is 10 px wide (zoom factor = 100%). A fixture should cover 1/3 of the patches width. So 1/3 of the patch width are 1024/3 = 341,3 px. To get the new size, divide the size 100% through the fixture's width (10 px) and multiply this with the width the fixture should cover (341,3 px): 100% / 10px x 341,3px = 3413 %. Select the first fixture when being in move-mode. Now enter the new size into the according text field in the Fixture Patch and press [Apply]. Do this for all fixtures and position them on the patch. Please note: the size can only be applied in 10%-steps, so that you have to round the value up or down. In this case you could use a size of 3410% or 3420%. A faster workflow using this method is: when starting from the beginning, choose the fixture from the library and press the button "Add array", set up 3420% and choose to insert a "1D" array. |
|
Useful Hints:
You may check and modify the settings in the Fixture Patch for each fixture if necessary (e. g. the DMX addressing or the positioning).
To remove a fixture from the patch, highlight the fixture by clicking it and press [Del] on your keyboard.
Save Patch & Export Matrix:
When patching the matrix is completed, it is recommended to save this patch file in order to still be able to modify it later on. Do this by File > Save Patch. In addition this command adds an according *.pbx file as a media file to the project if a Pandoras Box Manager software is running at the same time plus it spreads the file to all connected Clients. This is very important, especially when working with DMX Fixtures as the Art-Net data is generated by the Client and output through its network adapter.
Please note: In older versions (before Rev 49 and Pandoras Box 5.3) it was necessary to export a patch separately. Automatically a "pixelpatch.csv" was saved in the directory where the Matrix Patcher.exe file is located (e.g. C:\coolux\program files\Pandoras Box SERVER STD Rev xxx). This is now not necessary anymore. However, if you still have copies of those CSV files and want to work with them, simply drag them into the project manually. From here, Pandoras Box treats a CSV like a PBX file.
The next step is, to use the generated matrix file in Pandoras Box. As soon as the file is included in the project you may start programming it onto the timeline. To do so, choose which Pandoras Box Client should calculate the Art-Net data (in addition to the normal video output via DVI) and drag the matrix file on its output. Please note, that effects dragged onto the output layer cannot be considered by the patch file, thus you will not see output effects on your DMX panels.
Of course each Client in your PB network may be programed with different matrix files. In addition it can be saved on the timeline and may change throughout the show.
Use the right-click menu in the Preview to visualize the matrix files.
If working with Video Tiles please proceed to the ReMapping Guide.