Loading...
The Flipswitch is designed to execute scripts only when the control reaches the specified unlock position.

To create a Flipswitch widget choose "Widgets > Buttons > Flipswitch (Horizontal or Vertical)". The mouse cursor changes to a crosshairs icon, indicating the create mode. Each left-click adds the selected widget to the current page. To quit the create mode, you can switch to the run mode with [F8], where you can use all widgets. Most widgets however need to be set up first.
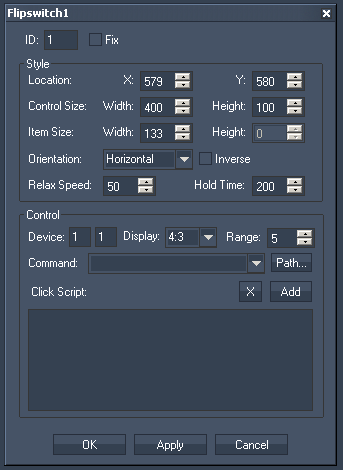
To edit the Flipswitch properties simply right-click it and choose the first menu entry "Flipswitch Properties". Alternatively, you can press [Alt + P] whilst the mouse is hovering above it or switch to the edit / move mode with [F9] and double-click on it. The Flipswitch property dialog opens up.

The property dialog is divided into two sections: Style and Control.
ID:
The Flipswitch's ID may be changed by entering a new one in the text field top left.
Fix:
When the option "Fix" is checked, the Flipswitch will be displayed on every page.
Location:
To position the Flipswitch enter here the Flipswitch ‘s X and Y Position (in px) or move it manually with the mouse over the WD user interface when being in the edit / move mode [F9].
Control Size:
To adjust the Flipswitch's size enter the desired values (in px) for Width and Height. Or scale the Flipswitch manually with the mouse at its corner down right when being in the edit / move mode [F9].
Item Size:
Choose here how wide the handle-item on the Flipswitch should be. The height of an the item can't be influenced here – it always refers to the Height of the Flipswitch‘s Size itself. To adjust the height please change the height for the Control Size.
Relation of the Control / Item Size and the linked layer in Pandoras Box:
The size of the handle item influences the size of the linked layer inside Pandoras Box. To have the layer in Pandoras Box (that is controlled via the handle item) covering the whole output, the Scroller size has to cover the whole height of the WD interface. The width of the Scroller does not necessarily have to cover the whole width of the WD interface as long as the Item's width gets the width resolution of the WD interface.
Orientation:
The Flipswitch can work horizontally and vertically, you may change its orientation here.
Inverse:
Tick the check box to bring the Flipswitch Item to the opposite border of the Control.
Relax Speed:
The Relax Speed defines how fast the Flipswitch Item will move back to its default position after it was moved and the Click Script was NOT executed. The default value for the Relax Speed is 50. Decrease this value to get a slower move, increase it to quicken it.
Hold Time:
The Hold Time (in ms) defines how long the Item will stay on the position where the click script will be executed before it jumps back to its default position.
Device ID:
Set here the PB Layer ID (Device ID) which should be linked to the Flipswitch.
Example:
With the Device ID 1 | 1 the Layer 1.1 in PB will be controlled.
Display:
Please choose here the aspect ratio of the Pandoras Box output. This is important to bring the layers in Pandoras Box to the correct aspect ratio, according to the Flipswitch Item size.
Range:
The range value defines how far the Flipswitch Item has to be moved to the opposite border (in pixels). The default value is 5, that means that within moving the Item 5 pixels to the border opposite the Flipswitch Item the click script will be executed. This range function is useful to define how far the Flipswitch Item has to be moved to execute the script.
Click Script:
To execute a command when the Flipswitch Item is moved into the click-area, please enter the command in the Click Script field. You may use the drop-down list and the "Add" button or type directly in the text field. The topic Script Language explains this in more detail.
See here a list of all commands.