Loading...
This chapter explains how to toggle Sites to the Preview. For other topics regarding the Preview tab please see the introductory chapter.
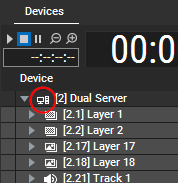
Per default, a Site is not included in the Preview when added to the project. The left image shows the Device tab with a Site excluded from the Preview; note that its icon is not highlighted.


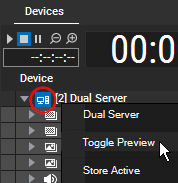
To add a Site to the Preview rendering, right-click it to open the context menu and choose "Toggle Preview". Now, the icon is highlighted in blue as seen in the right image.
Please note: In order to see the Client(s) in the Preview, the Manager needs to render their files. It does not scale the content in any way! That means that the full content needs to be encoded and displayed. The more Clients you add to the Preview tab, the more content files are playing, the higher the content's resolution or frame rate is, the more performance is required on the Manager PC. Please remember to spread the content to the Manager and the Client likewise.
In case you are using the Audio Tracks from the local Site, keep the Preview activated as video and audio output is bound to the "Preview" functionality.
The next chapter explains the preview views. For example you can load a Site's Camera or Output into the Preview or you can preview all Sites at once with the "All Cameras" view.