Loading...
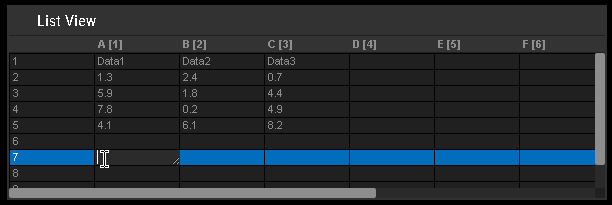
A List View is a control element that displays data in a table with rows and columns. To fill the List View with a new database, you can either import it from other sources (e.g. Microsoft Excel) or create it in Widget Designer. Furthermore in WD, you can edit every cell, add new rows or columns, or use one of the offered WD table operations. You can use the cell values for your Widget Designer programming, e.g. through variables.

To create a List View widget choose "Widgets > ListView". The mouse cursor changes to a crosshairs icon, indicating the create mode. Each left-click adds the selected widget to the current page. To quit the create mode, you can switch to the run mode with [F8], where you can use all widgets. Most widgets however need to be set up first.
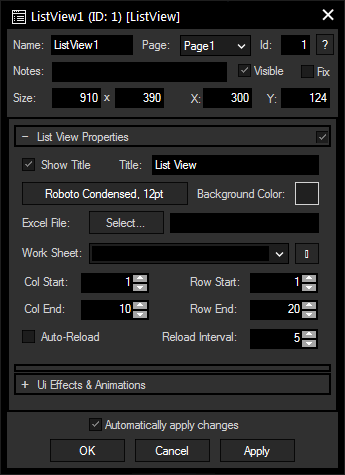
To edit the ListView properties simply right-click it and choose the first menu entry "ListView Properties". Alternatively, you can press [Alt + P] whilst the mouse is hovering above it or switch to the edit / move mode with [F9] and double-click on it. The ListView property dialog opens up.

Page:
This drop-down offers all available pages to place the widget on.
ID:
The widgets's unique ID may be changed by entering a new one in the text field top left. If you change it, you will be asked if you also want to adapt the name to the new ID.
?:
This displays the chapter about this widget in a newly opened helpfile window.
Notes:
A short note can be added here. It is not displayed outside the widget but can be set and retrieved with the WidgetID. Note the property member.
Visible:
Uncheck the "Visible" option to hide the widget.
Fix:
Check the option "Fix" to display the widget on every page. If the option is unchecked (again) the widget is only displayed on the page chosen with the Page drop-down list.
Size:
Enter the width and height for the widget in pixels.
X and Y:
Enter the position in pixels of the widget on the page in pixels. 0,0 is the top left corner of the Page and the position refers to the top left corner of the widget.
Column Names
The commands WDListViewSetColumnName and WDListViewSetRowName let you assign names for columns and rows.
Font and Background Color:
Click the Font button to choose another font and style for all cells including the column and row names. For a new color, click the Background Color button to open the Color dialog .
Excel File, Worksheet, Reload button and Saving:
In case you want to import an existing database from an Excel Sheet, enter the path (or select one with the [...] button) and select one of the loaded names from the sheets. With the Reload button, you can reload this file, e.g. if you would like to undo changes made in Widget Designer after loading the file.
The supported import formats are: XLS or XLSX as well as CSV for comma separated values and TSV for tab separated values.
Alternatively, you can also use the commands WDListViewLoadCSVFile(ID,FileName,Separator)to import data from a CSV-file which is especially interesting when another separator than a comma is used. If the file contains tabs to separate cell values, the command to use would be WDListViewLoadCSVFile(1,"C:\data\file1.csv","\t".Unescape). As explained in the chapter "Data Type specific members", the "Unescape" member is needed to return the object string with the correct formatting when using "\n" (new line), "\r" (carriage return) and "\t" (tab).
If you would like to save the table with the current data, you can use the SaveCSVFile member from the respective ListView. The following script saves the current data in ListView with ID 2 and separates the cells with a semicolon.
ListView2.SaveCSVFile("C:\data\file1.csv",";")
Please note that Microsoft Excel has to be installed on the computer if you want to use the ListView for importing or exporting files!
Col / Row Start and End:
Pick the start and end column and row to reduce the displayed cells.
Auto-Reload and Reload Interval:
If you would like to update your database in a certain interval, check the option "Auto-Reload" and enter the time in seconds after which your data is updated. Please note, that the file must be saved under the same path.
The topic Effects & Animations explains how to add and apply CSS based effects and animations.
This is a short description how you can program with a List View.
If you would like to manually edit a cell value, make sure to be in the run mode [F8] and double-click into a cell. Enter the new value into the small text field and hit [Enter].
There are commands available that write a value, or set another property from a List View. The description of all WDListView... commands is included in the command list.
In addition there are various commands that read a value (or column/row) and write it into a(n array) variable. Further, WD offers operations that calculate the sum or average from a column or row. Again, the detailed description of all VGetListView... commands is included in the command list.
Last, the List View control offers member values, allowing for example the following script. Please find more information in the topic Object and Member Notation.
ListView2.SetCell(1,1,"text")
ListView2.SetCell(1,1,123)
ListView2.SetCell(1,1,var1)
ListView2.SetCell(1,1,Math.Pow(var1,2))
var2 = ListView2.GetCell(1,1)