Loading...
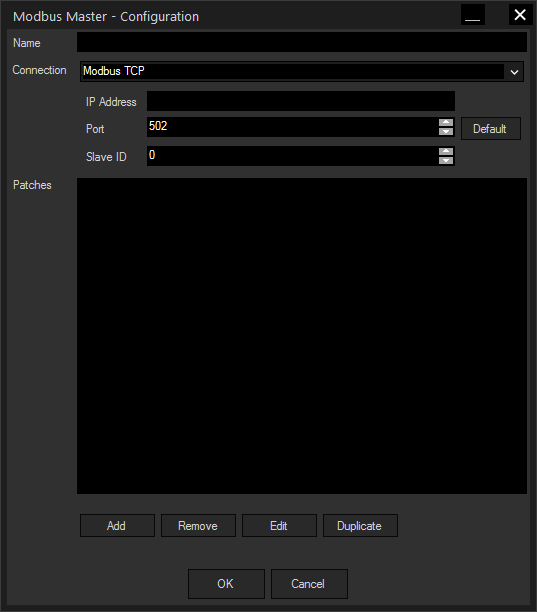
The Modbus Master Configuration dialog enables you to establish a connection between WD and a Modbus control device and manage the connected infrastructure. If you are interested in setting up a patch within a Master, please refer to the next topic, Patch Configuration. For more information about how to utilize Modbus values in WD, please have a look at Using Modbus.
If you want to add a new Modbus Master, go to Devices > Modbus > Add Master, or press the "Add" button in the Modbus Devices dialog (Master List).
Already existing Master configurations can be accessed with the list in the Devices > Modbus menu, or via the "Edit" button in the Master List.

Enter a name for your Modbus Master. It may consist of letters (lowercase or capital) and numbers, as well as underscore "_", the first character must be a letter. A valid name would be e.g. "Modbus_Motordevices1". The name has to be unique in WD.
Scripting members for this Master will be available when typing this name in a scripting field. This is explained in the chapter Using Modbus.
When using nodes (e.g. the Modbus Input) the name is available in the respective drop-down menu.
Currently, only TCP is available for connecting a Modbus device. A serial connection will be added in future versions.
Enter here the IP address of your Modbus control device, e.g. a bus coupler.
The default port for Modbus TCP communication is 502. If your setup requires another port, you can enter it here. The Default button reverts the port to 502.
If you have several control units on the same bus, you can address specific units with the Slave ID. An ID of 0 is used for addressing all connected devices at once. As TCP is already a connection-oriented protocol, only one device is directly connected by definition and the Slave ID is not crucial.
As soon as you define patches for controlling your hardware in- and outputs, they will appear in the list.
For adding a new patch, press the Add button which opens the Modbus Patch Configuration dialog. To remove an existing patch, select the entry in the list and press the Remove button. The Edit button opens the Modbus Patch Configuration dialog for the selected list entry, the Duplicate button creates a new patch with the same settings as the selected patch.
Press OK for submitting all changes or Cancel to revert to the former state.
After creating or editing a Master, please check the connection state of the device in the Master List and initiate a "Connect" or "Reconnect" if necessary.