Loading...
This chapter explains the Mouse Control settings in the AirScanManager in Widget Designer. For more information please see the introductory chapter.
Almost all settings in this section can be scripted using the available AirScanManager commands.

Note: Mouse control options are available only in advanced mode.
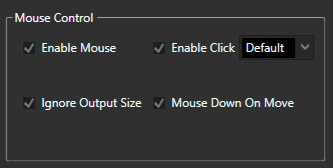
Enable Mouse:
Check this option to see if the point input data should control the mouse movement of your WD computer. By checking the 'Enable Mouse' option, 'Enable Click' and 'Ignore Output Size' becomes available too. 'Mouse Down On Move' is only available when 'Enable Click' is checked.
Enable Click:
If this option is checked, the mouse can generate clicks. Use the tick boxes below to define when the click should be executed.
These options are available when the checkbox 'Enable Click' is activated and define when a mouse click is generated.
Default:
This generates <mouse down> On Enter and <mouse up> On Leave.
On Enter: The click is generated on enter.
On Leave: The click is generated on leave.
Ignore Output Size:
If your TPM is larger than your computer's output resolution, WD automatically is only responsive within the output boundaries. For example, if you set up your TPM with a resolution of 3840 x 2160 px, but the output resolution of your monitor is only 1920 x 1080 px, the mouse cursor would only be active within the 1920 x 1080 px area. To use the cursor, for example on a second monitor, click this box to ignore the output boundaries.
Mouse Down on Move:
If this option is checked, the left mouse down on move is always active. It is only available when the checkbox 'Enable Click' is activated.
Hotkey Shortcut for disabling mouse control:
CTRL + M is the keyboard shortcut key to disable mouse control for all AirScanManagers irrespective of their status.