Loading...
This chapters explains in more detail how to use the remapping feature if working with Video Tiles that are connected via DVI and a LED video processor. If you are working with DMX Fixtures connected via Art-Net feel free to skip this chapter.
BACKGROUND INFORMATION
Most LED video processors are capable of creating only horizontal and vertical layouts for the Video Tile alignment. As soon as any of the tiles are rotated (in any angle), content mapping can be very difficult and complex to setup.
For those creative applications Matrix Patcher and a new Pixel Re-Mapping FX were designed.
DIFFERENCE BETWEEN PATCH AND MAP VIEW
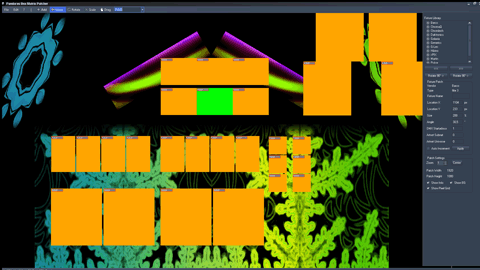
The patch view represents the output pixels, that is how the tiles are programmed and located in the LED processor.
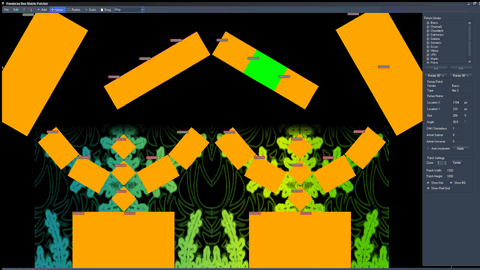
The map view is for relocating the individual tiles in any orientation and size according to the real setup. In other words the map view represents the source pixels of a Pandoras Box Layer Composition Space. In Pandoras Box you set up the content (and layers) according to the stage in the real world. There is no need to create special content in a complex way anymore.
The combination of both views results in the exported map png. The map stores for each source pixel the position of the output pixel. Afterwards the ReMap FX in Pandoras Box reads the map and routes automatically any source pixel to the stored output location. Thus it routes the pixels according to the patch / map setup that you may influence at any time of programming.
When creating Video Tiles you would first create a Video Tile layout as in the video processor view and then switch to the Map View and adjust the tiles as seen in the real world.
- Create a new Patch with the same (!) resolution Pandoras Box Output is set to and how the LED video processor is controlled
- If the fixtures needed are nor included in the Fixture Library, create new Video Tiles in the Fixture Editor
- Add these Video Tiles in the Patch View as they would be laid out in the LED processor
- Then choose "Initialize Map" from the Menu and switch to the Map View that now looks like the Patch View to start with
In the image below a background image was chosen. It shows a scene from the real stage setup. This is helpful for the next step.

- Now re-arrange and rotate the Video Tiles in the Map View as they are in the real world. You can do this by eye or by using a prepared background image.

- Once you are confident with the setup, use the "Export Map" option from the File Menu in order to store the map as a PNG file for the ReMap FX in Pandoras Box.
- Load the map.png into a Pandoras Box project and make sure that anisotropic filtering is turned off. To do so, click the file in the Project Tab and have a look in the File Inspector. This step if very important for the entire process !
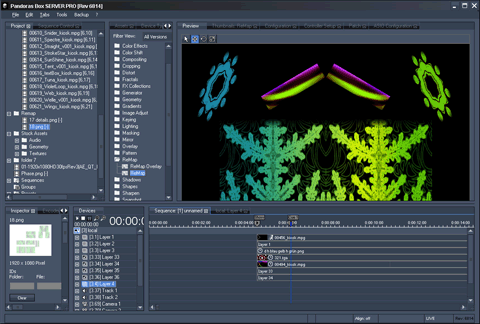
The image below shows a setup up without the ReMap effect turned on.

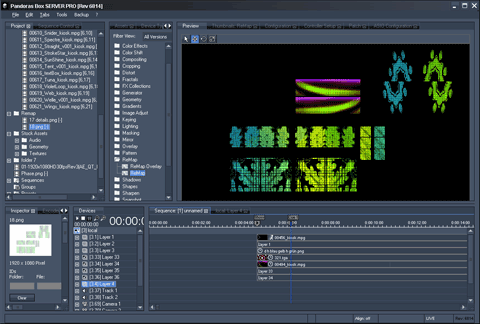
- Add the ReMap FX to the desired Output and load the Map.png into the Media Input of the ReMap FX and set the Mix to 255. Now, the pixels are routed differently as seen in the Preview depicted in the image below. Note that the effect has to be assigned to an output layer and is only visible in the Preview if it is set to an output view, not the global camera.

If you need to change something regarding the fixture setup in the Matrix Patcher please keep in mind that for any exported PNG file the anisotropic filtering must be turned off in Pandoras Box.
If you have to add one more tile to the scene or if you have to replace some of them, it is the easiest to position the few tiles in the Patch View and WITHOUT using "Initialize Map" you position them in the Map View. Keep in mind that the "Initialize Map" command resets all changes made in the Map View so far.
If you need to enlarge the entire Patch, please use the "Resize Patch" command. Do not scale the exported Map. It is very critical to keep every single pixels' information.