Loading...
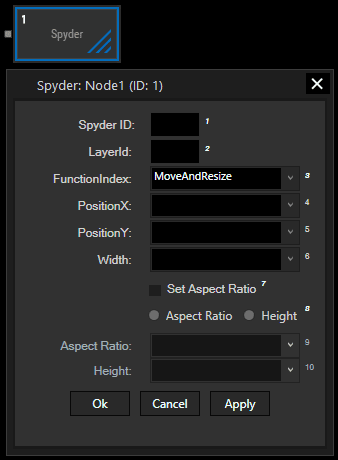
The Spyder output node allows to remote control a connected Spyder device in terms of scaling and positioning its layers. Please add the device in the Configuration dialog first to connect to it. This is described in the chapter "Spyder" which also shows how to work with the device using the scripting language.
This node can be found under Nodes > Output > Devices > Spyder

Enter the ID you used in the Configuration dialog to connect to the according IP address.
Enter the ID of the Spyder layer you would like to scale and position.
Choose which parameters you would like to control of the Spyder layer:
MoveAndResize: This is based on the Spyder command "LSP–Layer Size and Position Change". It sets the size and horizontal and vertical position of a layer as an absolute position setting.
MoveAndResizeRelative: This is based on the Spyder command "LSP–Layer Size and Position Change". It sets the size and moves the horizontal and vertical position of a layer relative to the layer's current position.
MoveLayer: This is based on the Spyder command "KPS–Layer Position Change". It sets the horizontal and vertical position of a layer as an absolute position setting. Note: Positions are mapped in pixels, relative to the top-left pixelspace corner associated with the layer.
MoveLayerRelative: This is based on the Spyder command "KPS–Layer Position Change". It sets the horizontal and vertical position of a layer relative to the layer's current position. Note: Positions are mapped in pixels, relative to the top-left pixelspace corner associated with the layer.
ResizeLayer: This is based on the Spyder command "KSZ–Layer Size Change". It sets the size of the specified layer.
This option is available if a "Move" function was chosen above. Here you can either enter a fixed pixel value for the horizontal and vertical layer location. Alternatively, choose an input from the drop-down list in case you connected an input or filter node beforehand which sends data.
This option is available if a "Resize" function was chosen above. Here you can either enter a fixed pixel value for the horizontal layer size. Alternatively, choose an input from the drop-down list in case you connected an input or filter node beforehand which sends data.
This option is available if a "Resize" function was chosen above.
If "Set Aspect Ratio" is not checked, resizing will affect the layer's width and the height adjusts automatically to ensure the layer's aspect ratio.
If it is checked, you can choose between "Aspect Ratio" and "Height" to either choose your own aspect ratio or adjust the height individually.
For "Aspect Ratio" you can either enter a fixed value (e.g. 1,77) or choose an input from the drop-down list in case you connected an input or filter node beforehand which sends data.
For "Height" you can either enter a fixed pixel value for the vertical layer size or choose an input from the drop-down list.
With Widget Designer version 6, all nodes support so called node commands. Node commands access functions (i.e methods) from a node and / or set a parameter (i.e. property).
Enter "node", followed by the according ID and a dot and a list will pop up showing all available commands for the node. For instance, Node1.TintColor.SetRGB(125,0,255), colors the node in purple.
In addition, the node properties with a parameter ID (the small superscript number) can be edited via the command Node1.SetParam(ID,new Value) or WDNodeSetParam(NodeID,ParamID,Value).