Loading...
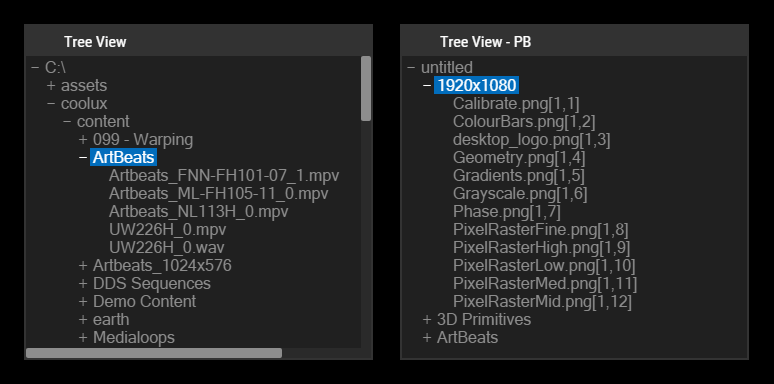
The TreeView enables you to browse and manage data on your local PC or in your Pandoras Box project. It is also able to easily transmit files from an external device to the local machine, using the TreeView in a web client.

To create a TreeView widget choose "Widgets > TreeView". The mouse cursor changes to a crosshairs icon, indicating the create mode. Each left-click adds the selected widget to the current page. To quit the create mode, you can switch to the run mode with [F8], where you can use all widgets.
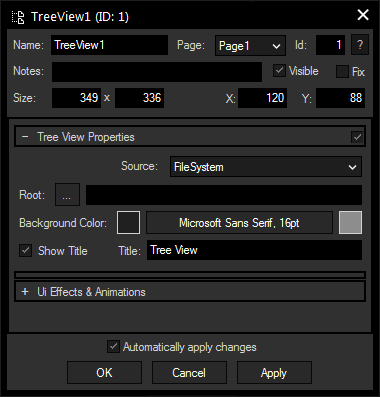
To edit the TreeView properties simply right-click it and choose the first menu entry "TreeView Properties". Alternatively, you can press [Alt + P] whilst the mouse is hovering above it or switch to the edit / move mode with [F9] and double-click on it. The TreeView property dialog opens up.

A unique name can be entered to identify the widget via the Object and Member Notation. The default name is based on the widget type and ID.
This drop-down offers all available pages to place the widget on.
ID:
The TreeView's ID may be changed by entering a new one in the text field top left. If you change it, you will be asked if you also want to adapt the name to the new ID.
A short note can be added here. It is not displayed outside the widget but can be set and retrieved with the WidgetID.Note property member.
Uncheck this box to hide the widget.
Fix:
When the option "Fix" is checked, the TreeView will be displayed on every page.
Enter a pixel size for the TreeView's size.
Enter the location of the widget (upper left corner) in pixels.
Choose between the computer's file system or the Pandoras Box project the Widget Designer is connected to.
Specify here a root of the displayed file tree, you can also click on the "..." button to choose a path from the explorer. This parameter is only available if the source is set to "File System".
Click the box to open a color picker dialog for the background color.
Edit the TreeView text font and the font size by clicking on the button with the current font. To change the text color click in the small box on the right side.
Enter here a title that is displayed at the top of the TreeView. Uncheck the box "Show Title" if you want to remove the title bar.
The topic Effects & Animations explains how to add and apply CSS based effects and animations.
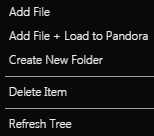
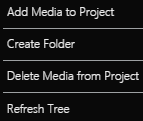
Local file management can be performed by right clicking on a file or folder in the TreeView, the opening context menu depends on the selected TreeView source:
File System
 |
Add File:Opens an explorer dialog where you can choose a file to copy to the selected folder Add File + Load to Pandora:Opens an explorer dialog where you can choose a file to copy to the selected folder. The copied file will also immediately be added to the Pandoras Box project if the software is connected. Create New Folder:Creates a new folder in the selected directory. A dialog will ask you to enter the name of the new folder. Delete Item:Deletes the selected item. If a folder is selected, it has to be empty to be deleted. Refresh Tree:Refreshes the tree if changes were made from outside |
Pandoras Box
 |
Add Media to Project:Opens an explorer dialog where you can choose a file to add to the selected folder in the Pandoras Box project. Create New Folder:Creates a new folder in the selected directory. A dialog will ask you to enter the name of the new folder. Delete Media from Project:Removes the selected item, folder or file, from the project. Refresh Tree:Refreshes the tree if changes were made from outside |
One special feature of the TreeView is an easy way to transfer files from an external computer to the local machine and the direct import to Pandoras Box. To achieve this, simple access the Widget Designer project with an external browser. Follow the link to learn more about the Web Server feature.
In the browser, you will see the TreeView still containing the file system of the local machine or Pandoras Box tree. If you execute a right-click on a folder there, you have the same options as in the main GUI. When you choose to add a file or a media, a new dialog will open and offer you a possibility to browse the external PC for files. The progress bar shows how much of the file is already transferred. If an error occurs, a respective message is displayed in the upper left corner of the dialog. Multiple files can be selected and transferred at once.
If you transfer files directly to a Pandoras Box project, they will be physically copied to the Widget Designer project's data folder (Data/Uploads) which will also automatically be created if it didn't exist before. Both applications have to run on the same PC!
In PB, the file is added to the selected project folder, but as usual only as a link. This link points to the data folder of Widget Designer. Upon content spread, the file is copied physically to the PB clients.

Opens a dialog to browse for files to upload.
As described above, if the TreeView displays the file system, the selected file is transferred to the selected directory. In case it displays the Pandoras Box folder, the file is transferred to the data folder of Widget Designer and then added (as a link) to the selected PB folder.
Aborts the current transfer process.