Loading...
The Art-Net Recorder button is designed to record a full Art-Net DMX universe over a certain time, with the ability to record from Universe A and output to Universe B.
A click on the Art-Net Recorder and the captured Art-Net sequence is send out to the specified Universe.
Please note:
In order to use the Art-Net Recorder Art-Net Input and Art-Net Output needs to be enabled in the Connection Manager!
To create an Art-Net Recorder widget choose "Widgets > Buttons > ArtNetRecorder". The mouse cursor changes to a crosshairs icon, indicating the create mode. Each left-click adds the selected widget to the current page. To quit the create mode, you can switch to the run mode with [F8], where you can use all widgets. Most widgets however need to be set up first.
To edit the Art-Net Recorder properties simply right-click it and choose the first menu entry "ArtNet Recorder Properties". Alternatively, you can press [Alt + P] whilst the mouse is hovering above it or switch to the edit / move mode with [F9] and double-click on it. The Art-Net Recorder property dialog opens up.

ID:
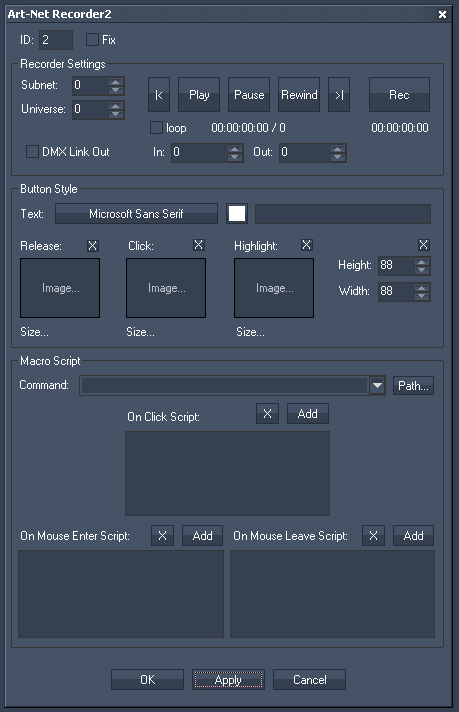
The Art-Net Recorder's ID may be changed by entering a new one in the text field top left.
Fix:
When the option "Fix" is checked, the Art-Net Recorder Button will be displayed on every page.
The Art-Net Recorder Property dialog is divided into three sections.
Subnet and Universe:
Enter the Subnet and Universe the Art-Net values should be recorded from.
[Rec]:
Press [Rec] and the specified Universe will be recorded until you press the button again, that meanwhile changes its name to [Stop].
To send out the Art-Net values on the same Universe they were recorded from, close the Item Properties dialog and just press the Art-Net Recorder Button.
To send out these Art-Net values on a different Universe, do it as following:
Enter the Subnet and Universe the Art-Net values should be captured from.
Press [Rec] and the current state of the specified Universe will be recorded.
Press [Stop] to stop the recording.
Now change the Art-Net settings to the Universe on which you want to send out the recorded Art-Net values (do NOT press [Rec] again) and press [OK] or [Apply] at the bottom of the Item Properties dialog. Close this dialog and click on the Art-Net Recorder Button.
[|>] and [<|]:
With these two buttons you may browse through the recorded Art-Net sequence step by step.
[Play]:
Press [Play] to play the recorded Art-Net sequence.
[Pause]:
Press [Pause] to pause the recorded Art-Net sequence.
[Rewind]:
Press [Rewind] to bring the sequence to ist Inpoint.
[Loop]:
Activate this checkbox and the Art-Net sequence will be looped instead of played once.
In & Out:
Here you may define an In- and Output different from the originally reccorded sequence. To cut off 2 seconds from the beginning of the recording, enter "50" as inpoint (25 frames = 1 second).
[DMX Link Out]:
To play the recorded Universe via the DMX Link Out, aktivate this checkbox.
Please note that "DMX LINK Out" needs to be enabled in the Connection Manager.
Three images can be assigned to the different states of the button (the modes are explained above).
"Release" refers to no click or not toggled.
"Click" is on press or toggled.
"Highlight" can be used to draw a PNG with alpha over either the click or release image.
Click on the "..." button to open a file dialog where you can choose your path and image. If you would like to choose an image from the Widget Designer "library", click on the "Res" button. The Resource Manager opens where you can double-click on the image of your choice. You can also save custom images in the Resource Manager to access them faster. The small "x" at the right sets the default image.
You may also set the Buttons Height and Width.
In the Script section you may enter commands to be executed. You may use the drop-down list and the "Add" button or type directly in the text field. The topic Script Language explains this in more detail.
See here a list of all commands. To control the ArtNet Recorder via commands itself, please use these ones.