Loading...
This chapter explains how to convert multiple images as a batch conversion with the Image Converter. Please see the introductory chapter for general information about the Image Converter and links to other topics.
The top section allows to choose your input and output folder and set up the batch conversion in more detail.

First, select the option "Batch Folder" and click on the […] button to browse to your folder's location.
Alternatively, paste the path manually into the text field and press Enter or click the refresh button 
Note that the folder should be updated with the refresh button  if the image sequence has been changed, e.g. an image frame was replaced, deleted or added.
Next, define an output folder whereto the converted files should be stored and tick the following options if needed.
Include Sub Folder
This converts images in sub folders recursively. The existing folder structure on the input side is created also on the output side.
Delete Input Images
Removes the source images after conversion.
Odd / Even Frames Only
Tells the Image Converter to convert only odd or even images. This is useful when getting an image sequence that is produced for 3D-content where the first, third, fifth... frame is for the right eye and the second, forth, sixth... frame contains the information for the left eye. A typical frame rate would be for example 120Hz. With this feature you may separate the right and left content and render two videos to be played back with 60Hz.
Use Multi-Core
Enables the Image Converter to use multiple processor cores. This uses more system performance but is accordingly faster. With the number field "Cores / Threads" you can set up how many cores should be used.
The Image Converter window will be closed as soon as the batch conversion is completed.
Overwrites the existing files in the current output folder during the conversion.
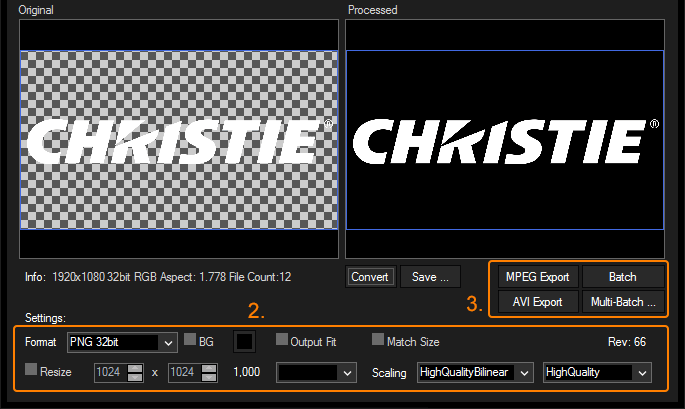
The first file of the first folder is now displayed on the left side in the Image section, together with information regarding: Size, Color Depth, Aspect Ratio and total file count.
The image size in the example above is 1920x1080 px, its color depth is 32 bit (containing RGB + Alpha), the aspect ratio is 1,778 (=16/9), and the chosen folder includes 12 files.

Second, choose your conversion settings. They are explained in detail in the chapter Settings. The default settings mean that the image is not resized but only converted to the file format "PNG 32bit" which contains an alpha channel.
Third and last, choose how the converted files should be saved. Optionally, you can use the "Convert" button to convert the left image and the "Save..." button to choose whereto the (one!) converted file should be saved.
Now you have the option to convert all input images as single images to the target path using the "Batch" or "Multi-Batch" button, or convert them to an AVI or MPEG video file.
Both buttons will start the batch conversion according to the below Settings and save the results to the target path chosen above.
The difference is that "Multi-Batch" shows a dialog first where you can select the number of instances which will be used for the conversion. If you select "8", you will see that indeed eight Image Converter windows will take care of the batch conversion. This option is recommended if you are converting images with a high resolution (4K and above) because this quickly reached the RAM limit of one instance under Windows.
While the batch conversion process is running, the message "Batching files …" is displayed in the image fields.
To skip the batch conversion process press "Stop". To pause the batch conversion process press "Pause" and press "Play" to continue the process.
 File Name
Choose a File Name for your AVI video and use […] to browse to the location where it should be stored.
Choose the format: RGBA32bit, RGB24bit, RGB555, RGB565, YUY(4:2:2), UYVY(4:2:2) or IYUV(4:2:0).
Choose the framerate in FPS (frames per second). Possible values are 23.976, 24, 25, 29, 29.97, 30, 50, 50.94, 60, 100 and 120.
Displays the total frame number.
Now press the "Start Export" button and your AVI video will be created.
The alpha splitting section gives you the possibility to maintain the alpha channel when converting to the MPEG format. The MPEG format was originally specified as a codec not supporting the alpha channel. Therefore the Image Converter enables the following workflow: First the main mpg video that naturally supports RGB only is generated, then an additional MPEG is saved which holds the original transparency information in terms of a black and white mask. In Pandoras Box dedicated effects merge the main video and the mask video resulting in one video with transparency.
Choose a "Mpeg Encoding Preset" or define a custom setting. The encoder is based on the Pandoras Box Encoder Extension, please find more detailed descriptions for the encoder settings here, including recommendations regarding the bitrate setting. Click "Start Export" to confirm all settings. When the process is finished a dialog will pop up. |
|||
The maximum resolution for an MPG2 video is 4094x2800 px, though it is recommend to set 4080x2800 px as this conforms with the MPEG standard. The encoding process depends on available graphics card RAM. For further information regarding the encoder settings please see the Encoder Extension. |