Loading...
This chapter describes the Menu Bar of the Server Management Application.

The Menu Bar shows:
- various menus on the left side: File, Page, VNC, Commands, File
- VNC controls that allow to start or stop a VNC connection to a certain IP address
- a drop-down list that lets you to choose the network for the Server Management Application and the according IP address.
 |
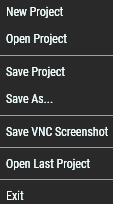
New ProjectThis opens a new empty project. Open ProjectThis opens a file dialog where you can pick an already saved project with the file extension .json. Save ProjectThis saves the project. When saved for the first time, a file dialog opens to choose a name and pick a location to save the current project. The shortcut for this is [Ctrl + S]. Save As...This opens a file dialog to choose a (new) name and pick a (new) location to save the current project. Save VNC ScreenshotThis command is only available if you established a VNC connection to another computer. It opens a file dialog to choose a name and pick a location to save a screenshot from the remote desktop. Open Last ProjectCheck this option if the Server Management should open the last opened project (which was also saved) whenever it starts again. ExitThis closes the current project and application. Remember to save the project first if necessary. |
 |
Create PageThis opens a dialog to specify a name and adds a new page tab afterwards. Alternatively, you can click the +-icon in the Pages Bar. Rename PageThis opens a dialog to re-specify the page name. Delete PageThis deletes the current page. |
 |
View OnlyThis influences the VNC connection. Per default, you see the remote desktop in a window and send your local mouse and keyboard data to interact with the remote desktop. The "View Only" option stops the mouse and keyboard data. To send them again, untick the option once more. Auto ScalePer default, the remote desktop is transmitted with the native resolution; it is not scaled to fit into the local VNC window. Check the option and the remote desktop is scaled to fit horizontally or vertically by keeping its aspect ratio. In case the cursor's position does not match the click postion, please check the (DPI) scaling settings of the remote computer. Depending on your output or EDID, Windows might have increased the scaling automatically but it should be set to 100% to transmit the UI via VNC correctly. RefreshThis refreshes the current VNC Connection. |
 |
The Commands Menu is separated into three sections: Commands from the "Systemwide" menu are sent to all systems in the network running the PB Menu. |
 |
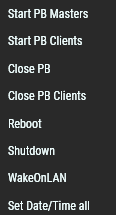
Commands Menu > Systemwide > ... or Commands Menu > Current Page > ... Start PB ManagersLaunches PB in Manager mode on applicable systems where Manager is selected in the PB Menu settings. Start PB ClientsLaunches PB in Client mode on applicable systems where Client is selected in the PB Menu settings. Close PBStops both, the PB Manager and Client process on applicable machines (without saving the project!) Close PB ClientsStops only PB Client processes on applicable machines. RebootReboots all machines where PB Menu is installed. ShutdownShuts down all machines where PB Menu is installed. WakeOnLANThis wakes all machines via WOL if their MAC Addresses were stored in the system information and WOL is supported. Set Date/Time allThis is only available from the "Systemwide" menu and opens the "Date/Time Settings" dialog to adjust the timezone, date and time for all systems. |
 |
Commands Menu > Connected Device > ... Start PBStarts PB in the mode which is selected in the PB Menu. Close PBStops the current PB Manager or Client process. Start WDStarts WD in selected version as specified in PB Menu. Close WDStops the current WD process. RebootReboots the system. ShutdownShuts down the system. |
 |
Install VersionThis opens a new dialog where you can choose to install Pandoras Box, Widget Designer or PB Menu on multiple devices. See below.
Uninstall VersionThis opens a new dialog where you can choose to uninstall Pandoras Box or Widget Designer on multiple devices. See below. Select VersionThis opens a new dialog where you can select - for multiple devices - which version (or other starting options) of Pandoras Box or Widget Designer should be chosen. See below. Gather LogfilesThis opens a new dialog where you can select from which systems you want to gather log files. See below. Gather PropertiesThis opens a new dialog where you can select from which systems you gather the device properties and export them into a CSV file. See below. |
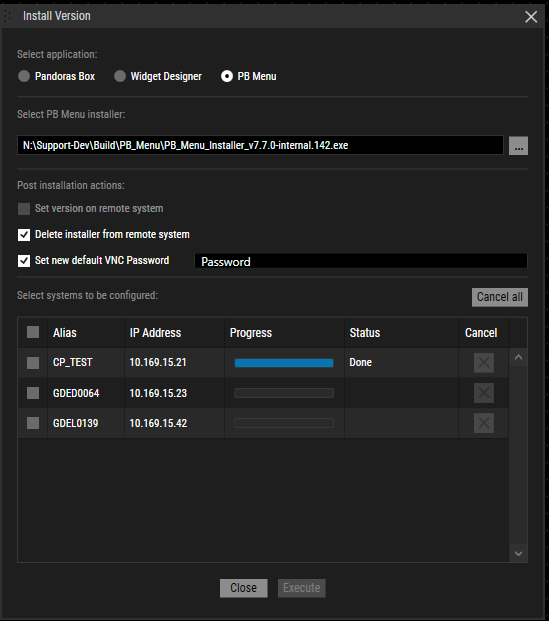
Install VersionThis opens a new dialog where you can choose to install Pandoras Box, Widget Designer or PB Menu on multiple devices.  First, you choose the application and then its installer with the [...] button. You can select Pandoras Box 8.3 or above, Widget Designer 6.5.2 or above or PB Menu 7.4.0 The option "Set version on remote system" selects the newly installed PB or WD version in the "Settings" menu from the remote PB Menu. Whenever you start PB or WD then, it will be the new version. The "Set New Default VNC Password" option enables you to configure a VNC password for remote access, allowing you to set the password remotely during the PB Menu installation process. The option "Delete installer from remote system" removes the installer when the update process is finished. Below, you mark the systems to be updated. By the way, if you select devices in the Workspace and open the dialog from the right-click menu, only these devices will be marked. When the "Execute" button is clicked, the "Progress" and "State" column show information for each system: Request Sent - Checks or creates target path (either C:\Christie\content\versions or respective "coolux" folder, according to logic of PB's file spreading) Sending installer - Copies installer via network Installing - Executes installer remotely Done - Update process is finished including above described post-installation actions Failed - Update process not finished. Possible errors could be: not enough disk space for the installer or application, network connectivity, firewall settings etc. Canceled - User clicked "Cancel" button Offline - Device cannot be found in network anymore In case you would like to remote install the Offline License, e.g. for a training center, simply add "_Offline" to the name so that it says for example: PB_Installer_V8.2.0_Offline.exe
Uninstall VersionThis opens a new dialog where you can choose to uninstall Pandoras Box or Widget Designer on multiple devices. First, decide if you want to uninstall Pandoras Box or Widget Designer.
The "Select version" dropdown lists all installed versions of the systems listed below. After deciding on a version, the list of systems will be analyzed for this version. Systems with this version installed are listed as "Available" and will be automatically selected for uninstallation. Systems without this version are unselected and listed as "Not available". You can change the selection on which systems the version should be uninstalled according to your needs.
After selecting "Execute", the selected version is uninstalled on all chosen systems. Once the uninstallation is completed, the status changes to "Done". If by mistake a system has been selected on which the version to be uninstalled is not located, nothing happens on this system.
Select VersionThis opens a new dialog where you can select - for multiple devices - which version (or other starting options) of Pandoras Box or Widget Designer should be chosen. Essentially, this dialog offers all settings which you also find in the PB Menu under Settings > Pandoras Box or Settings > Widget Designer. Hence, all options are explained in the linked chapters. The huge advantage is, that you set those starting options from one single dialog. First, select the version for PB or WD. Then, activate the "additional settings" in case you would like to overwrite the settings from the remote PB Menu settings. Last, mark your devices in the list and hit the "Execute" button. Note that this does not start PB or WD on the selected systems, it just sets how they start the next time when the applications are called. By the way, if you select devices in the Workspace and open the dialog from the right-click menu, only these devices are marked. Gather LogfilesThis opens a new dialog where you can select from which systems you want to gather log files. First select whether you would like to gather the log files of Pandoras Box, Widget Designer or PB Menu. Then select a location and name for the final zip file and mark from which devices the log files should be requested. When pressing "Execute" the "Status" column displays current information for each device. When all files are stored in sub folders named with the IP address, the file browser opens and displays the final zip file. By the way, if you select devices in the Workspace and open the dialog from the right-click menu, only these devices are marked. Info: As log files from Pandoras Box and Widget Designer are saved in folders depending on the running version, please make sure, that this version in question is selected in the Settings Menu from PB Menu. For this you can also use the above described "Select Version" dialog. If no version is selected, no log files can be gathered which is displayed in the "Status" column. Gather PropertiesThis opens a new dialog where you can select from which systems you want to gather the device properties and export them into a CSV file. First select the separator character. You can select between a semicolon ";", TAB, or a self-entered character. Keep in mind that using a ".", ",", ":", and "space" is not useful because they are already used inside the properties, for example, IP address, mac address, and GPU or software version names. By selecting the checkbox "Include headers", the headers from the Server List will be stored in the CSV file as a header. To select the storing location, type in the correct path or use the "..." button to navigate to the preferred path. Under "Select systems", choose one or all systems from where you want to gather the properties by selecting the checkbox in front of the device name. After selecting "Execute", all properties from the Server List, as well as the mac address from the network devices, are exported into a CSV file which will be stored in the selected folder. When the export is finished, the Gather Properties dialog closes and the Windows folder in which the file is saved opens automatically. To close the dialog, select "Close". |
|
 The Help Menu icon [?] located to the left of the VNC Controls field provides information about the Server Management version and access to the help file. |
 To connect to a remote computer, you do not have to add it to the workspace first. Simply enter or choose an IP address for the "VNC" IP entry field and press [Enter]. You might need to enter a password to establish the VNC connection. The default password is "Pandoras". You can change it in the PB Menu under Settings > VNC Server. If you leave the password blank, you can establish a VNC connection without the need to enter a password. Click the "Disconnect" button to cancel the current connection. Click the "Exit Fullscreen" button to send a "leave fullscreen" command to the remote computer. This makes sense if the remote machine runs Pandoras Box and renders in full screen mode. The fullscreen mode cannot be captured via VNC, hence you see the desktop area underneath the Pandoras Box application but you cannot select there anything. |
 If necessary, select a specific NIC from the drop-down list at the right side of the Menu Bar. This network adapter is then used to send commands and establish connections. The according IP address is shown next to it. The next chapter describes how to work with "Pages and Workspace". |