Loading...
This chapter describes the Settings Menu from the PB Menu. It opens when the "Settings" button is clicked and is divided into the following tabs.
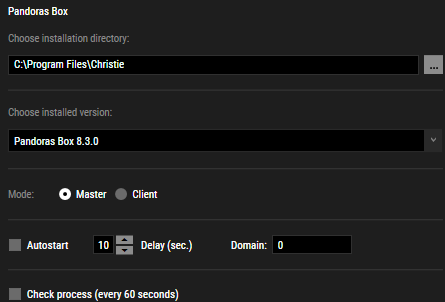 In the "Pandoras Box" tab you can set up how Pandoras Box starts when the "Pandoras Box" button is pressed in the main PB Menu screen or when the Autostart function is switched on. In case you have changed the default installation path C:\Program Files\Christie when installing Pandoras Box, you can change the "Installation Directory" with the [...] button to the new location. Per default, the Domain is set to be 0 and should only be changed if necessary. For more information, please see the chapter Configuration > Network where you can change the Domain in a PB Manager when already started. A PB Client also offers an according "Domain" text field. If you would like to start Pandoras Box automatically each time the system is started or rebooted, check the Autostart "Enabled" check-box. Per default, there is a delay of 10 seconds (after starting the PB Menu) to ensure that the computer finished the boot process and all USB devices (especially the dongle) are ready. The "Check process" option checks whether the Pandoras Box process replies and restarts the application if there is no response for 60 seconds. If you would like to use this feature, activate the option and start Pandoras Box via the Menu, which means via the Autostart feature or the Menu button "Pandoras Box". |
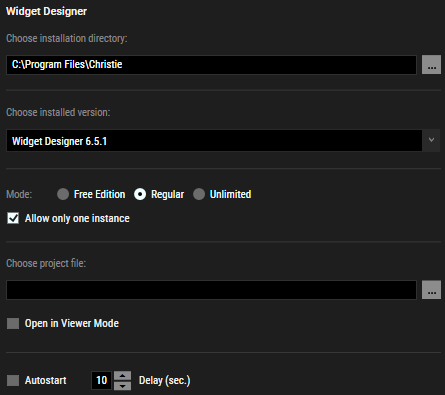 In the "Widget Designer" tab you can set up how Widget Designer starts when the "Widget Designer" button is pressed in the main PB Menu screen or when the Autostart function is switched on. In case you have changed the default installation path C:\Program Files\Christie when installing Widget Designer, you can change the "Installation Directory" with the [...] button to the new location. The option "Allow only one instance" is checked per default which means that Widget Designer cannot be started multiple times by pressing the "Widget Designer" button on the main page. In addition, you can choose a project file that should be loaded. Choose a new project path by clicking on the [...] button to add it to the drop-down list. The check box "Open in Viewer Mode" starts the chosen edition in the Viewer mode, which restricts the user from changing the project. If you would like to start Widget Designer automatically each time the system is started or rebooted, check the "Autostart" check-box. Per default, there is a delay of 10 seconds (after starting the PB Menu) to ensure that the computer finished the boot process and all USB devices (especially the dongle) are ready. |
In the "Mystique" tab, set up the version of Mystique and how Mystique starts when the Mystique button is selected on the main PB Menu screen or when the AutoStart function is switched on. In case you have changed the default installation path C:\Program Files\Christie when installing Mystique, you can change the "Installation Directory" with the [...] button to the new location. The drop-down list below offers all Mystique versions installed there to be selected. In other words, if you downloaded and installed a new version, select the new version in the list. Alternatively, you can select an older version if you prefer to start with that. To start Mystique automatically each time the system is started or rebooted, check the "Autostart" checkbox. By default, there is a 10-second delay after starting the PB Menu to ensure the computer finished the boot process and all USB devices (especially the dongle) are ready. You can set the delay time as required. |
In the "Conductor" tab, set up how Conductor starts when the Conductor button is selected on the main PB Menu screen of when the AutoStart function is switched on. In case you have changed the default installation path C:\Program Files\Christie when installing Conductor, you can change the "Installation Directory" with the [...] button to the new location. To start Conductor automatically each time the system is started or rebooted, check the "Autostart" checkbox. By default, there is a 10-second delay after starting the PB Menu to ensure the computer finished the boot process and all USB devices (especially the dongle) are ready. You can set the delay time as required. |
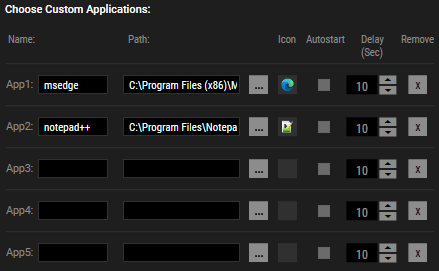 In the "Custom Apps" tab you can choose four additional quick access buttons that should be displayed in the main PB Menu screen. This can be also done by clicking the "Add Custom App" button. Click the [...] button to choose your file, e.g. an executable file like a EXE or BAT file and click "Open". Icons are automatically retrieved from the app. Click the "Icon" button to choose a custom icon. Regular images as well as *.ico are allowed. If you would like to launch the action automatically each time the system is started or rebooted, check the "Autostart" check-box. Per default, there is a delay of 10 seconds (after starting the PB Menu) to ensure that the computer finished the boot process and all USB devices (especially the dongle) are ready. Change the "Name" if you would like to change the text that is displayed in the customized button. App buttons are filled from left to right. If a path is left blank, the entry is simply ignored. |
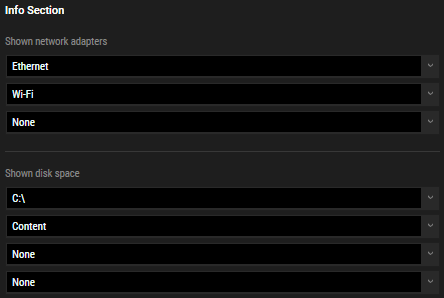 The bottom part of the main screen shows network and disk information. Per default, PB simply chooses three active network adapters (in the order as they are delivered from the system) and either the C: drive or preferably the folder "C:\Christie\content" or "C:\coolux\content".The "Info Section" tab allows to change the shown network adapters and disk space locations. To change network addresses etc., open the section "Network Setup". |
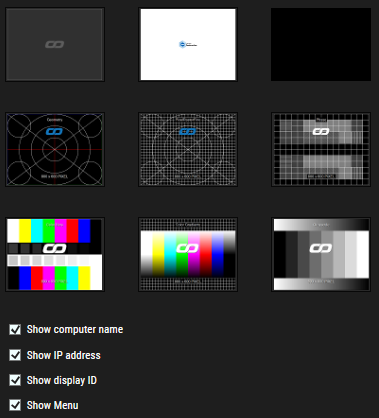 The "Testpattern" tab allows to choose a test pattern that is displayed as a fullscreen background on all connected (single) displays. This is especially interesting when setting up displays or projectors and a test pattern is needed but neither the network nor the Pandoras Box Manager are setup yet. You can also choose a test pattern using the LCD Menu on PB Server hardware. PB Menu creates the gradient and grayscale test pattern using 10-bit color depth (middle and right images in third row in the image above). When configuring the 10-bit color depth in the NVIDIA settings, you can validate the proper setup using the grayscale test pattern. Looking at the bottom section of the test pattern, it exposes a horizontal gray gradient which is vertically split into two. The upper half represents 8-bit whereas the lower half is rendered using 10-bit. With a correct 10-bit configuration (GPU, Monitor, cable) in place, only the upper bottom half (8-bit) shows visible banding or segments whereas the lower half displays a smooth gradient without any visible steps. When the hardware is configured incorrectly or set to 8-bit, both areas in the bottom strip exhibit banding.  Further information on how to set the graphics card output to 10-bit can be found the chapter Changing the color depth. Test patterns are automatically created on-the-fly when starting the system, changing resolutions or opening the Testpattern dialog. Hence, they always match current and possible arbitrary resolutions. The images are saved under C:\Christie\content\Stock Assets\Testpattern (or C:\coolux...). Note that this will not overwrite existing test patterns which need to be deleted manually to have new ones generated. The four check boxes below allow to hide / show further information regarding the Output ID, IP address and Display ID which is shown with some test patterns. Users can choose to hide or display the PB Menu while showing test patterns by checking the "Show Menu" option. When the "Show Menu" option is unchecked, the test pattern displays on the screen. However, users can bring the hidden PB Menu back into view by clicking on the screen. |
Remoting In the "Remoting" tab you have one option: "Allow execution of files on this system". Per default, it is set to "Off", which means that the PB Menu does not trigger any actions sent via the command "PBApplicationStart" from Widget Designer. |
VNC Server The "VNC Server" tab allows you to set up the VNC Server settings. The default port for the VNC Server is 5900, change it only if necessary. In the Server Management Application, you can use the syntax "IP:port", e.g. "2.0.0.1:5905" to specify another port than 5900. |
Taskbar The "Taskbar" tab shows one option: "Taskbar state upon start". Per default, it is set to "Off", which means that the Windows taskbar and desktop are hidden because the PB Menu overlays it. |
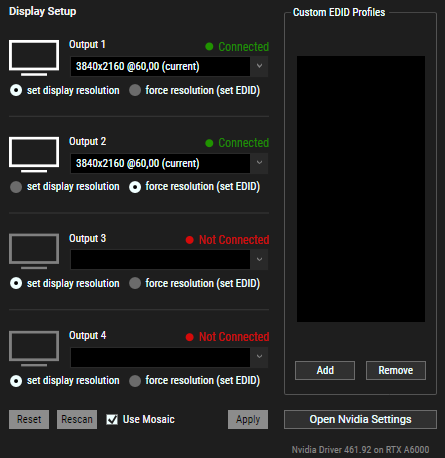 The "Display Setup" tab allows to setup display output settings. You can use the PB Menu directly, if you have one of the supported graphics cards from NVIDIA, i.e. Quadro M4000, P1000, P4000, RTX 4000, RTX 6000 as well as RTX A4000 and A6000. Otherwise click the "Open Nvidia settings" button or use the "Screen Resolution" dialog from Windows. Note that testpattern are automatically created when changing the output resolution. They are available with the Testpattern tab under Settings > Testpattern. The "Display Setup" tab shows the current display configuration (resolution and frame rate) of all connected displays. The numbering corresponds to the output port numbering of NVIDIA. Choose how you want to set a resolution. With the option "Set Resolution" the drop-down list shows all timings that the display communicates to the graphics card including its preferred timing. Keep in mind that it is possible that devices switch to another timing when they are dis- and reconnected or when the signal chain is interrupted. With the other option "Force Resolution" the drop-down list shows standard EDID timings and custom EDIDs (described further down). When applying a timing, the EDID information sent from the monitor has no effect anymore. The used EDID is now based on the information written in a special edid file. Please make sure, that you only pick a timing that is supported by the display device. In summary it can be said that using an edid file is a safer way to setup up timings as they are more reliable and can not change that easily. An even better way is to use external EDID managers which generate and hold an EDID constantly. Therefore the graphics card really thinks that there is a monitor attached that sends the (emulated) EDID. In addition they cannot be reset as easily by mistake or by the need to reinstall the graphics driver. Confirm your settings with the "Apply" button. This will apply the timings to the display devices and possibly rearrange the desktop layout so that the output with the lowest number is on the left side of the desktop and the monitor with the highest number is on the right side. Tick the check box "Use mosaic" if you would like to set the NVIDIA mosaic mode for all displays. For more information, please see the description in the Graphics Card Settings chapter under Multiple Displays. The other buttons at the bottom are pretty self-explanatory: "Open Nvidia settings" opens the according dialog in case you would like to check there something or use it instead of our menu. "Reset" discards all forced EDIDs and sets all displays to the "Set Resolution" mode again. The "Rescan" button updates the displayed settings to the current ones reported from the NVIDIA graphics card.
|
 The "Network Setup" tab allows to set individual IP addresses for Ethernet adapters. First, choose the network adapter's name in the "Adapter" drop-down menu. With the check-box below you can setup whether DHCP is enabled for the selected adapter. If there is no DHCP server in the network, disable the option and enter a static "IP Address", e.g. 2.0.0.1, a "Subnet Mask", e.g. 255.0.0.0 and a "Gateway" if required, e.g. 2.0.0.100. All changes must be confirmed with the "Apply" button before leaving this view or changing the Adapter. At the bottom of the network dialog, you see available Lan ports with their according IP address. The PB Menu itself displays three ports on the main page which can be chosen in the tab "Info Section". |
 This works only on Pandoras Box hardware and opens the installed RAID tool or its web interface via the Windows Internet Explorer. The tool allows collecting information about the computer's raid system and gives the possibility to manage it. Please note: Do not touch the raid system settings unless you are well skilled in doing this. If there are hard drive / raid problems, please contact Support.pandorasbox@christiedigital.com or your local distributor for support! |
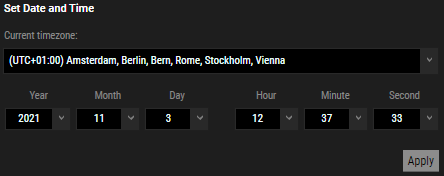 The "Date/ Time" tab allows to set up the timezone, date and time for the local system. It might be of interest that the Server Management Application offers date settings influencing all systems in the network. |
 |
|
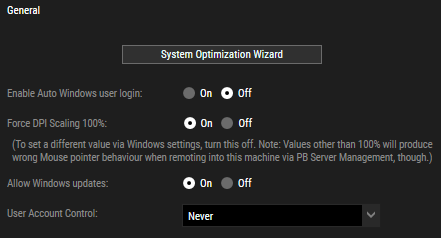
System Optimization Wizard is a tool to optimize the system by automatically adjusting various settings to use a a media server. These changes are permanent and cannot be reversed using the PB Menu. For detailed information, see System Optimization Wizard. |
Enable Auto Windows User Login  Turn on and off the auto Windows login user using this option. When switched to "On", the system prompts user credentials and cannot proceed without providing the necessary user details.  To apply the change, restart or log out of the machine. After the restart, the system logs in automatically without having to enter any login data for that user. Note: If the user enters incorrect or non-existing credentials, the system requests valid credentials to log in to Windows. |
 DPI scaling can be forced to 100% if set to "On" so you see a native rendered image on the screen. When DPI scaling is on, the windows display setting scale is set to 100% and cannot be permanently changed by the user. When DPI scaling is off, the user can permanently change the value inside the windows display settings to other values. Christie recommends turning the DPI settings on for Pandoras Box and Widget Designer applications to enhance usability and maintain high visual quality. The view of PB Server Management is only correct if DPI scaling is set to 100%. To use a different DPI scaling factor from the Microsoft Windows settings, deactivate "Force DPI Scaling". In the Microsoft Windows display settings, choose whether you want to change the scaling or leave it at 100%. Note: As long as the DPI scaling is forced by the menu, you can change the scaling in the Windows settings, but this resets to 100% at every menu start. |
 By default, this is set to "Off" which means automatic updates from Windows are disabled with the installation of the PB Menu. This is done to avoid potential issues caused by automatic updates. Christie recommends using Christie hardware as delivered and operating Media Servers on their own network without a permanent Internet connection. Therefore, deactivating these updates is not a security concern. To reactivate automatic updates, select "On". The change takes effect after the computer is restarted. You may need to restart it twice for the update process to begin. |
 This option allows the user to set access control for applications. User Account Control (UAC) in Windows operates with different permission levels to determine how much control is needed for actions that could affect the system. The following are the four UAC permission levels: •Always: Always Notify me (Highest Level) This is the strictest setting. Whenever a program or user attempts to make changes that require administration privileges (such as installing software, changing settings, or modifying system files), UAC prompts permission every time. This is ideal for users who want maximum security and want to be informed of every action that requires administration rights. •Apps: Notify me only when programs try to make changes to my computer (Default Level) This is the default UAC setting in most versions of Windows. UAC prompts when a program attempts to make changes that require administration rights but does not notify when the user themselves is making changes to the system settings (like updating Windows or changing control panel settings). This is suitable for most users as it balances security and convenience. The user is notified only when software tries to modify the system, but not when making changes themselves. •Apps without Dim: Notify me only when programs try to make changes to my computer, but the desktop is not dimmed. This is like the previous setting, but the desktop does not dim when UAC appears. This means you can continue working on other applications while the UAC prompt is on the screen. This setting is more convenient for users who find the dimming feature of the previous option intrusive but still want to be notified when system changes are attempted. •Never: Never notify me (Lowest Level) UAC is effectively disabled. The system does not prompt for permission when programs attempt to make changes. This setting is highly insecure as it allows changes to happen without user consent or awareness. Christie does not recommend this option as it significantly reduces security and increases the risk of malware or unauthorized changes. |
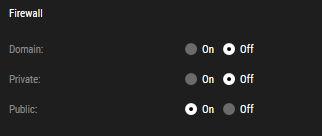 The PB Menu includes an option to configure Windows firewall settings. For each network provided (Domain, Private, and Public), turn on or off the network settings for the local system. The setting directly changes the Windows firewall settings. |
System Optimization Wizard is a tool designed to optimize the system by automatically adjusting various settings to use as a Media Server.  When the System Optimization Wizard button is selected, a new window appears, allowing the user to choose the desired options to run the optimization wizard. Please note: These changes are permanent and cannot be reversed using the PB Menu.  The explanations for each script are provided below. Run Win debloat script  This script is designed to optimize the system by removing pre-installed and non-essential applications, commonly known as bloatware. These may include unnecessary games, trial software, or features you don't regularly use. To fully understand the scope of the applications and system changes that will be permanently removed, Christie highly recommends reviewing the detailed list in the help file before proceeding. The script remove apps by uninstalling them. Below is the list of applications that will be removed.
Run OneDrive remove script  By running this script, you permanently remove OneDrive and all its associated files from your computer. This can is irreversible using PB Menu, so make sure you no longer need OneDrive before proceeding.
Apply system optimizations  This option is used to perform the system optimizations listed below. The system must be restarted for all changes to be applied. To fully understand the scope of permanently removed applications and system changes, Christie highly recommends reviewing the detailed list provided in the help file before proceeding.
|
Learn how to use the wizard tool. 1.Select an optimization category. Hover over each option to read the description.
2.Select Start. The status message displays one of the following: Pending—on initial start. In Progress—during startup. Completed—at the end of startup initiation. Completed with errors—when errors occur, for example an application was not available on the system to remove. 3.In the Warning for non-reversible changes dialog, select one of the following:
This is a media server only device, please proceed - select this to initiate the system optimization wizard execution. This is not what I want, please cancel - select this to cancel the process. Users can also cancel by selecting the X in the top right corner or the "ESC" key on the keyboard. No script is executed.
 The log files are updated while running the system optimization wizard. Logs are stored as a txt file in C:\ProgramData\Christie\PB_Menu\logs. This saved file is also opened after the process is finished so it can be saved directly to another location. 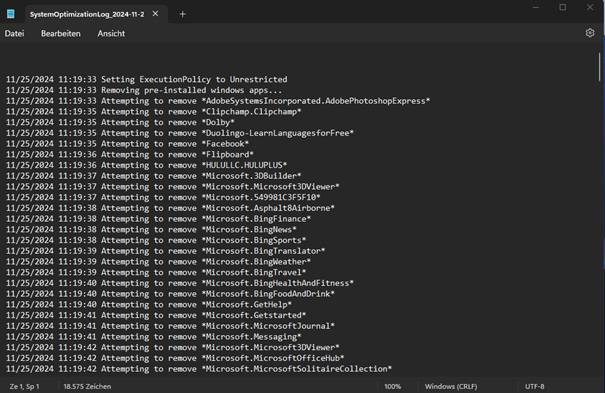 Note: All "Error" entries in the log are either a missing registry key/folder or a missing Service message. 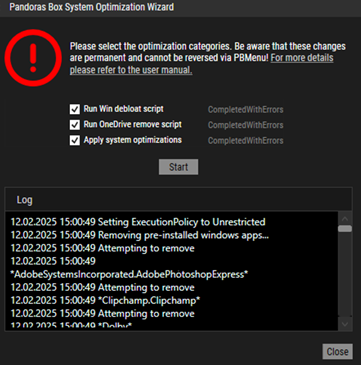 When it is needed, the system prompts a reboot to apply the changes. However, users have the option to reboot immediately or choose to reboot the system later. Running the System Optimization Wizard in Non-Admin User1.In the System Optimization Wizard, select Start. 2.Log in using administration credentials. 3.Refer to the PowerShell window to monitor the execution of the optimization process.  Upon completion, the status is displayed and the saved file with the logs is opened in the default text editor.
|