Loading...
First we will create and configure the Terra device in Widget Designer. Then we build buttons to apply and clear layouts and buttons to switch single sources from A to B. Afterwards we will do a bit more complex programming to react on system events and update our interface accordingly. |
There are also two video tutorials available this tutorial is based on: |
To create a Terra device, go to the top menu and choose "Devices > Christie > Terra > Create Terra" This opens the Configuration dialog. 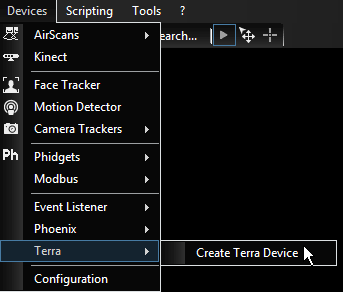 Alternatively, you can click the -"+" button in the Configuration dialog and choose "Christie > Terra". |
To configure a Terra device, simply enter the IP address of the Terra controller in the Configuration dialog and hit the "Apply" button or press [Ctrl + Enter]. (In case the dialog is not open, go the top menu and choose "Devices > Christie > Terra > Christie_Terra1") 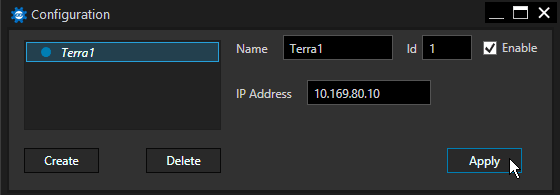 |
To create a button that calls the command to apply a certain layout in Terra we need a Widget control called "Custom Script button". Click the second icon in the icon bar and choose "CustomScript". Or choose "CustomScript" from the top menu "Widgets". 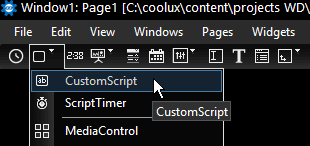 The cursor changes to a cross-hair icon, indicating the Create mode. Position the mouse cursor and click once to create a Custom Script button. Further clicks would create further buttons but we will continue with one for the moment. Right-click the button and choose the first entry "CustomScript Properties" which opens a new dialog. Christie_Terra1.ApplyLayout("PIP") 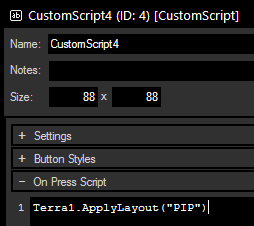 You will notice that the Script Assistant suggest entries whilst typing. You could select something by either clicking on it, or by using the [arrow keys] and the [Enter] or [Tab] key. Optionally, open the section "Button Style" and enter a descriptive button name in the field "Label", e.g. "PIP Layout". Click "OK" to close the Properties dialog. To test the button we need to enter the Run mode. Either, press [F8], [Alt + R] or click the third button from the right in the icon bar. The other modes are called "Edit/Move" (to resize or move the button; [F9] or [Alt + M]) and "Create" (when choosing something from the Create menu as we have done before).  If you would like to apply other layouts, you could either work with more buttons or look at the solution further down that uses a drop-down list. |
In this step we will create a button to clear the display array (i.e. remove any applied layout). First, create a CustomScript button as explained above. Open the section "On Press Script" and enter the following command. It will be executed as soon as the button is pressed and will clear the current layout and all sources from the display array named "4LCDs". Christie_Terra1.ClearDisplayArray("4LCDs") |
In this step we will create a button to switch an input to an output (i.e. route a signal directly). First, create a CustomScript button as explained above. Open the section "On Press Script" and enter the following command. It will be executed as soon as the button is pressed and will switch the video source from the transmitter named "Pandora_Quad_1" to the receiver named "Top_Left". Note that this does not show up in the Terra Manager as it directly routes the signal and has nothing to do with Layouts or Display Arrays. Use the member "SwitchVideoWithEmbeddedAudio" if you would like to switch video together with audio. Christie_Terra1.SwitchVideo("Pandora_Quad_1","Top_Left") |
In this step we will create a button to apply a certain video source within a given layout. First, create a CustomScript button as explained above. Open the section "On Press Script" and enter the following command. It will be executed as soon as the button is pressed and will apply the video source of the Transmitter named "Pandora_Quad_1" to the window with the view index 2 within the layout named "PIP" on the display array named "4LCDs". Christie_Terra1.ApplyVideoSource("4LCDs","PIP",2,"Pandora_Quad_1") Bare in mind that this change of the layout is not saved automatically. If you would like to save it, add the following line of code. This command saves the layout with the name "PIP" for the display array named "4LCDs" and overwrites the current layout setting. Christie_Terra1.SaveLayout("4LCDs","PIP","true") |
In this step we will create for the first time an Event Listener, which gives a trigger as soon as a chosen event happens in the system. In this case, we want to display the current Layout name in a Label and update the text whenever the layout changes. To create a Label, click the "T"-icon in the icon bar. Or choose "Label" from the top menu "Widgets".  Again, the cursor changes to a cross-hair icon, indicating the Create mode. Position the mouse cursor and click once to create a Label. Enter the run mode [F8]. To create an Event Listener, go to the top menu and choose "Devices > Event Listener > Create Event Listener". Now, open the "Device" drop-down list and choose "Christie_Terra1", then the "Event" list and choose "LayoutApplied". This triggers when a layout is applied from anywhere in the Terra system. The event returns two parameters to WD. The first is a string with the name "layout" and holds the new layout name. The second is a string with the name "displayArray" and holds the name of the display array the layout was applied to. Next, we add the command that is triggered for that event. Enter the following command into the scripting field to write the current layout name into our Label: Press the "Apply" button to save the changes we have done so far. To test the Event Listener, simply press one of the buttons that applies a layout. The label should display the layout name. The nice thing is that the Label will always display the current layout name even if it was not programmed to any WD button or if the layout was renamed using the Terra manager. Optionally, add some text in front of the layout name, so that another person knows what it is. To do so, change the Event Listener's script to: Label1.Text = "Current layout: " + layout The chapter "Terra Events" explains all Terra events that can be monitored. |
In this step we will create a DropDown List widget that lists all current layout names. A button applies the layout that is chosen in the DropDown List. An Event Listener keeps it up to date and populates it with all new names whenever a the layout is changed, created or deleted in the Terra system. To create a DropDown List, click the fifth icon in the icon bar. Or choose "DropDown List" from the top menu "Widgets".  Again, the cursor changes to a cross-hair icon, indicating the Create mode. Position the mouse cursor and click once to create a DropDown List. Enter the run mode [F8]. Create a second Event Listener, as explained above. Optionally, give the Event Listener a descriptive name, e.g. "LayoutsUpdated". To populate our DropDown List with those layout names, enter the following command into the scripting field. Press the "Apply" button to save the changes we have done so far. To test the Event Listener, create a new layout in the Terra Manager or make use of the command Christie_Terra1.SaveLayout (e.g. Christie_Terra1.SaveLayout("4LCDs","testLayout","true")). To delete "testLayout" execute the command Christie_Terra1.DeleteLayout("testLayout"). If you now click on the DropDown List, you will see a list of all your layouts. Please select one. In a final step, we create a button to apply this selection. Create a CustomScript button as explained in the beginning (or copy the "PIP Layout" button) and insert the command: Christie_Terra1.ApplyLayout(Dropdownlist1.Text) Optionally, build a CustomScript button that populates the DropDown List with the layout names "manually", i.e. without an Event Listener. This might be of interest when the WD project was not running at the time when layout changes were done. The fastest script is a two- liner that uses a local variable: var list = Christie_Terra1.LayoutNames DropDownList1.SetItemsFromArray("list") |
In this step we will create two DropDown Lists where one shows all Terra transmitter names and the other all Terra receiver names. A button routes the signal directly from the chosen TX to RX. Two Event Listeners populate all new device names whenever a device is changed, added or removed from the Terra system. First, create two DropDown Lists and a CustomScript button. Then we need two Event Listeners. All this was explained in the previous steps. For the first Event Listener, choose the event "TransmitterNames" which is triggered when a Transmitter is changed, added or removed from the Terra system. The event returns all Transmitter names as a list. For the second Event Listener, choose the event "ReceiverNames" which is triggered when a Receiver is changed, added or removed from the Terra system. The event returns all Receiver names as a list. The command for the CustomScript button is: Christie_Terra1.SwitchVideo(DropDownList2.Text,DropDownList3.Text) Optionally, add the commands to populates both DropDown Lists with the Transmitter and Receiver names "manually", i.e. without an Event Listener. The solution follows the principle from last time: var list2 = Christie_Terra1.TransmitterNames DropDownList2.SetItemsFromArray("list2") var list3 = Christie_Terra1.ReceiverNames DropDownList3.SetItemsFromArray("list3") |
The more buttons and other controls you create, the more you might like to align them for the sake of good order. There are two workflows. Lastly, we will add Shape widgets that group our buttons visually which makes our interface nicer and easier to understand. First, you can work with a grid and use the "Snap To Grid" option so that the control borders snap to the grid lines when a control is being moved or resized. Note that this is possible even when the "Show Grid" option is not chosen. The "Grid Settings" dialog allows to alter the grid size and appearance. 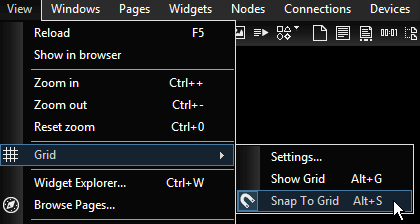 Second, you can align controls manually after selecting multiple controls in the Move/Edit mode. You can either hold the [Ctrl] key and click another button to add it to the selection or you can draw a selection box with the left mouse button.
Now, from the top menu, choose "Edit > Align Selection" and for example "Top" to align all top borders to the highest position. You can also right-click the selection and choose "Align Selection" from the context menu. To add some shapes to your interface , click the shape icon in the middle of the icon bar. Or choose "Shapes > Rounded Rectangle" from the top menu "Widgets". 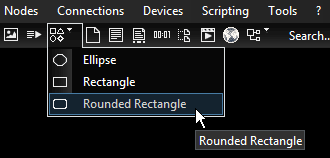 Then, click once where the top left corner should be and a second time for the bottom right one. As always, there is a Properties dialog that offers more options to adjust the widget's appearance (and behavior). Below, you see an example how your interface could look like if you followed all the steps in this tutorial. If you would like to, you could also create a TerraDisplayArray widget which provides a nice overview of a selected Display Array. |