Loading...
This chapter explains the toolbar of the Matrix Patcher. For other sections of the user interface see the introductory chapter.

Please see File Menu.
Please see Edit Menu.
This shows the current Matrix Patcher revision number.
In the "Select mode" you can click on a fixture to view or change the current values in the Fixture Properties - Patch. If you would like to delete a fixture, select it and press the delete key on the keyboard.
In the "Add mode" you can add fixtures to the patch. Choose one of the various LED fixtures in the Fixture Library first. Every click into the patch will create one fixture of the selected fixture type.
The Move, Rotate and Scale Modes allow to move, rotate or scale the fixtures on the patch. Just click on one fixture and move your mouse. You can also multi-select several ones first, either by holding the Ctrl Key and clicking on them or by drawing a selection frame.
To rotate all selected fixtures in 90° steps, you may as well use the Buttons [Rotate 90° ->] and [Rotate 90° <-] from the Fixture Navigation Tools (underneath the Fixture Library).
For accurate positioning, rotating or scaling of one fixture you can also enter values in the Fixture Properties – Patch.
Keep in mind, that you can also Align fixtures, or create them using "Add Array".
In Drag Mode, the whole Patch can be moved to reach every part of the patch. The section Patch Settings (right bottom corner) offers a button called "Center" which moves the center of the patch to the center of the user interface. There, you can also set another Zoom factor alternative to using the mouse wheel.
This mode is of interest when working with rotated LED video tile connected via DVI, HDMI or DP and a LED video processor.
For more information please have a look at the ReMapping Guide.
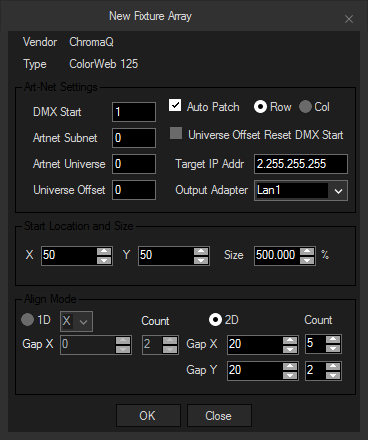
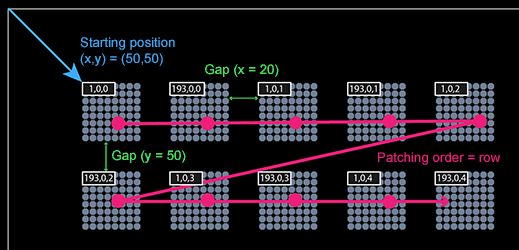
After selecting a fixture from the Fixture Library this command will help you to add not only ONE copy to your current patch file (as the "Add" command does), but several ones. A dialog opens where you can set up how many copies you would like to add and the way how the array is inserted.
The Art-Net settings are of course only available if a DMX fixture was chosen from the library. The options are descriped here.
 |
 |
The "Quick Patch" mode allows to patch fixtures quickly that were added already (in the Add Mode) to the patch. A dialog opens where you can enter your patch settings and a start address. Then, simply click on fixtures you want to patch. All fixtures will be patched one after another in an ascending order automatically.
The Align mode allows to align the fixtures in vertical or horizontal orientation. To multi-select several fixtures, either hold the Ctrl Key and click on them or draw a selection frame.