Loading...
This chapter explains the Toolbar and main Window of the Splitter tool. Please see the introductory chapter for an overview about the Splitter tool.
The toolbar allows you to create and manage the Output Regions.

 Click the left mouse button and span the desired region. This command is also accessible via the right-click menu. |
 Select the desired region and move it to it's correct place. This command is also accessible via the right-click menu. |
 Use this mode to drag the view around. This command is also accessible via the right-click menu. |
 Choose one of the Zoom factors to adjust the Preview window. You may enter an individual zoom factor as well. You may use the keys + / - on your keyboard as well. |
You may choose an Output Region from the list in order to delete it, to adjust its name, position or size. |
 Select an output region with this list. To change the name simply enter the new name and press [Enter]. To delete it, click the X-button. |
 X / Y Pos The Pixel values inside these two text fields display the position of the region's top left corner. To change its position to an exact place please enter new values for X and Y here. To move a region with the mouse please use the option "Move Region", as explained above. |
 These two values display the size of the selected Output Region. To change its size please enter the new Width and Height into the text fields. |
 Choose here the color depth for the Image Sequence. You may choose between: BMP 24/32bit (snp), PNG 24/32bit, DDS RGB(A) (snp) or JPG The formats labeled "24bit" or "RGB" do not support an alpha / transparency channel whilst the versions with "32bit" or "RGBA" do support it. This setting does not affect an exported AVI or MPEG file, it will always be exported as Uncompressed AVI or MPEG-2 (24bit RGB). |
 By default the Resize option is disabled, click the "Resize" button down to enable it. Enter the width and height to resize the selected output region for the exported image sequence / video. Keep in mind that DDS image sequences and MPEG videos have restrictions regarding their size. |
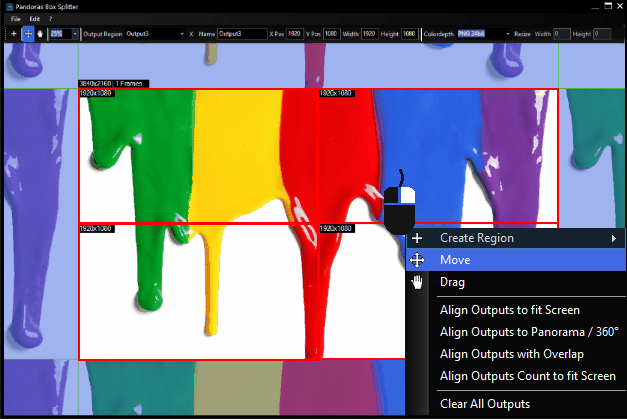
In the middle of the Main Window the loaded main file is shown. It is repeated at the left, top, right and bottom side to allow wrapping Output Regions around which is important for 360° Panorama / Sphere content overlap setups. You can disable this feature in the Edit menu > Show wrap zone.
You may set up any amount of Output Regions using the right-click menu, the "Create Region" button from the Toolbar or the automatic "Align" commands from the Edit menu. In the example, four Output Regions were created for a Multi-Display setup, whereby each region has a resolution of 1920x1080 px. When exporting the main file (via the File menu), it will be split into those four regions and four separate image sequences and/or videos will be created.

From the right-click menu you can choose one of the following options:
- Create an Output Region: Choosing Custom Size will enable you to span a rectangle in the Main Window. When choosing one of the pre-defined sizes, you just have to define the position of the Output Regions top left corner by clicking once into the Main Window.
- Move existing Output Regions to its correct place
- Drag the whole view around (incl. main file and Output Regions).
- Align and clear the Outputs, see Edit Menu.
The next chapter summarizes the Splitter Workflow.