Loading...
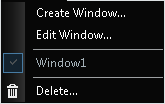
The Windows menu in WD allows you to create a new window, edit or delete the current one, and to open already created windows.
Multiple Windows enable you to split your interface, for example if you have two or more monitors you want to work on, or because you want to work parallel on several pages. Each window can be edited separately, each page can be assigned to each window, which allows a flexible usage of your interface. Please note that multiple windows still belong to the same instance of the application. Exiting the program in one window will close all others as well!


When you create a new window, a new page is also being created. A dialog asks you to name both of them.
When you delete a window, all contained pages will also be erased. In case you would like to move them to another window first, go to Page > Edit Page.
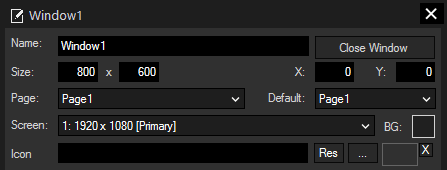
 The maximum window size depends on your maximum desktop size (e.g. If you use two FullHD displays with your PC, the maximum window size would be 2x1920px = 3840px). There are also two drop-downs for managing the Window's pages. The first Page drop-down selects the currently displayed page for this Window, the Default drop-down sets the page that is initially displayed when the Window opens or when this Window is requested in an external web client. The Screen drop-down lists all available displays attached to your PC. Choose where you want to see WD. The background color is only visible if the page is smaller than the window itself. If you would like to give your window a special icon (it is displayed at the left corner of the window's title bar), you can do so either with one of the Widget Designer default icons or with your own image. Choose the directory with the [...] button or choose an image within the Image Resource Manager that is opened with the [Res] button. |
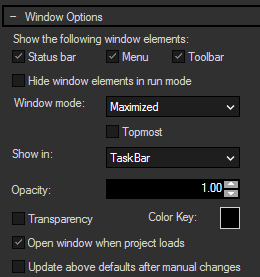
 Choose to show or hide the status bar (at the bottom), the menu bar (topmost bar) and the toolbar. If you check "Hide window elements in run mode", those three bars are hidden as soon as the run mode is activated. Press either [F9] (edit / move mode) or [Ctrl + Shift] (create mode) to show them again. Additional to the settings from the View menu (Kiosk Mode, Minimize, Maximize, Full Screen, Normal size), you can choose to display your window at the center of the monitor and to keep your Window always on top (tick "Topmost" for this option). If your application is not supposed to be visible in the Taskbar, you can choose to hide the symbol in the System Tray (Taskbar Notification Area) with the "Show in" parameter. You can adjust the opacity of the whole window including all bars. The smaller the value is the more transparent the window gets. This does not apply to any dialog, such as properties or drop downs. The color key applies to anything inside your window that matches the chosen color. For example, if you set your color key to blue and add a Shape filled with the same color, the blue area will be completely removed from the window so that you can click on items lying somewhere behind this Widget Designer window. To use this feature, set the opacity to 1.00 and check the "Transparancy" option. The "Open window when project loads" option is especially useful if there is more than one window in the project, and some of them should open automatically when loading the project while others should not. This box is ticked by default, so if you only want to open your main window on startup, uncheck the box for every further window. Please note that at least one window must be set to open when project loads. |

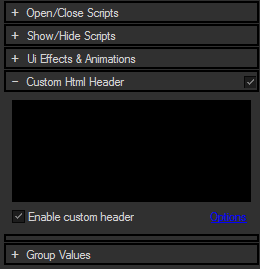
If you would like to run a script (consisting of one or more commands) each time the window is opened or closed, add the commands to the text box. The topic Script Language explains commands and how to use them in more detail.
Tip: You may use a macro or a function.
CSS based effects and animations can be applied to this widget. If you have three dimensional effects on some of your Widgets, you have to apply the effect "3D\Perspective" to your Window in order to activate the Z-axis. Please refer to the topic Effects & Animations for more information.
The former "Protection Settings" can now be found in the File menu > Security Settings.
Due to its nature, being set up in HTML5, it is possible to create your application's own design using this language, CSS3 and JavaScript. The Custom Header affects all objects within the respective Window including Pages. You can set additional style properties for all classes, may it be all Widgets of one type or one special Widget by referring to its modifier. If you open your interface in an external browser, you can find out the modifier name by using the browser's developer tools (most commonly opened with pressing [F12] or the entry within the browser settings) and analyzing the displayed source code.
Example 1:
<style>
.WdWindow{
position: relative;
width: 1200px;
margin: 0 auto;
}
</style>
This Script has the effect that all pages are always displayed in the middle of the Window (provided that the page has a width of 1200px), local GUI as well as external browser.
Example 2:
<style>
#WrapperWidgetXyPanel1{
opacity: 0.25;
}
</style>
This Script has the effect that only XYPanel1 is displayed with 0.25% opacity. This can be especially useful, when you have a graphic or an object, within which you would like to be able to read out a position upon a mouse-click.
Simply place the graphic or object in the background, an XYPanel of the same size in front of it, and set the opacity to 0 with the example script.
The panel is invisible, but you can read out the clicked coordinates with the XYPanel input node.
It is also possible to import and embed your own CSS and JS files. Simply click on the "Options" label and "Import Files". The files you import will be saved in the project's "Data" folder and the header will automatically be supplemented with a link to this file. If you have several files already stored, you can easily add the respective links by clicking "Update header from files".
The check box "Enable custom header" enables you to quickly switch between your own design and the unaffected Widget interface.
This option is only available for the Unlimited version and offers the possibility to assign a group. Please refer to the chapter Group Values for more information.