Loading...
The ImageLoader control is designed to easily exchange an image file that is added to the Pandoras Box project with any other image file on your PC. An interesting application for this could be e.g. if pictures of the audience are made and by button click are displayed on a Pandoras Box output.
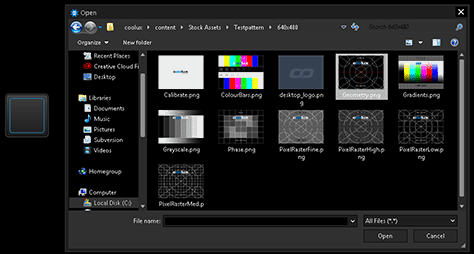
Click on the ImageLoader button and a Windows explorer opens at the locations, from where you want to send image files to Pandoras Box.
The newly loaded image file will automatically spread to all connected Clients.

To create an ImageLoader widget choose "Widgets > Buttons > Image Loader". The mouse cursor changes to a crosshairs icon, indicating the create mode. Each left-click adds the selected widget to the current page. To quit the create mode, you can switch to the run mode with [F8], where you can use all widgets. Most widgets however need to be set up first.
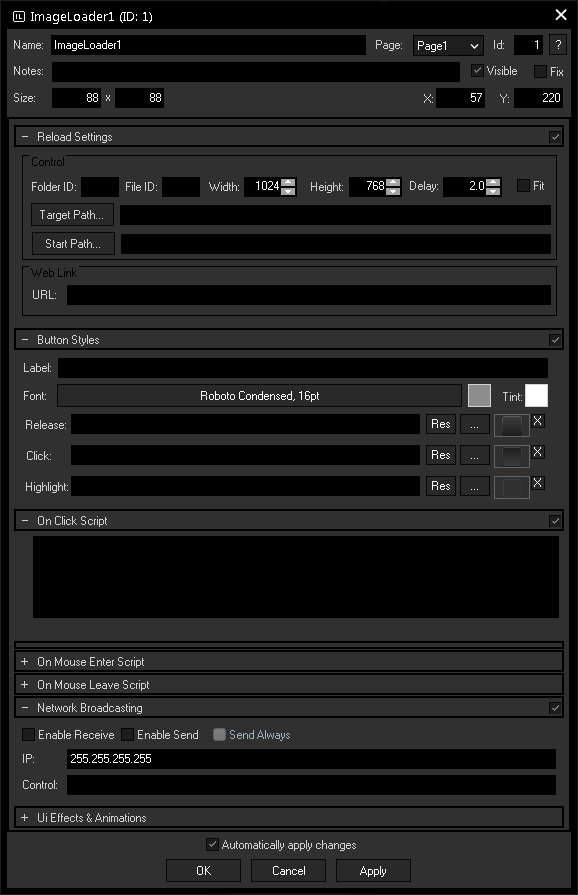
To edit the ImageLoader properties simply right-click it and choose the first menu entry "ImageLoader Properties". Alternatively, you can press [Alt + P] whilst the mouse is hovering above it or switch to the edit / move mode with [F9] and double-click on it. The ImageLoader property dialog opens up.

A unique name can be entered to identify the widget via the Object and Member Notation. The default name is based on the widget type and ID.
This drop-down offers all available pages to place the widget on.
ID:
The ImageLoader button's ID may be changed by entering a new one in the text field top left. If you change it, you will be asked if you also want to adapt the name to the new ID.
A short note can be added here. It is not displayed outside the widget but can be set and retrieved with the WidgetID.Note property member.
Uncheck this box to hide the widget.
Fix:
When the option "Fix" is checked, the ImageLoader button will be displayed on every page.
Enter a pixel size for the ImageLoader button's size.
Enter the location of the widget (upper left corner) in pixels
Folder and File ID:
Enter here the File and Folder ID of the image in Pandoras Box, to which the new image should be loaded.
Width, Height, Fit:
You may enter the Width and Height the image should get. Press Fit to enable this size option, otherwise the image will be fitted to the size of the original image file inside Pandoras Box.
Target Path:
Press [Target Path...] and browse to the image file which should be exchanged through the new loaded images.
Start Path:
Press [Start Path...] and choose or create a folder, from where you later choose the new image files, that should be transferred to Pandoras Box.
Delay:
The Delay between copying the new image to the original image file and loading it inside Pandoras Box is set to 2.0 seconds. This delay is set to be sure that the copy process is finished before the image is loaded into Pandoras Box. This value can be edited by entering a new delay time.
The Web Link section is of special interest when working with the Web Server feature, i.e. clicking the ImageLoader button in a web browser. Enter a URL e.g. "https://www.christiepandorasbox.com" that your browser should call when clicking the button.
It is also possible to achieve a quick page change with the URL, simply enter a hash tag "#" and the page name. E.g.: #Page2
Check the option "Open In New Tab" if you would like to keep the Widget Designer page loaded in your browser.
Label:
Enter a label that will be displayed on the button. The text's color can be set via the color field and its font via the according button.
Tint:
ImageLoader buttons can be colored by selecting a tint color, this applies only to the default button images.
Three images can be assigned to the different states of the button (the modes are explained above).
"Release" refers to no click or not toggled.
"Click" is on press or toggled.
"Highlight" can be used to draw a PNG with alpha over either the click or release image.
Click on the "..." button to open a file dialog where you can choose your path and image. If you would like to choose an image from the Widget Designer "library", click on the "Res" button. The Resource Manager opens where you can double-click on the image of your choice. You can also save custom images in the Resource Manager to access them faster. The small "x" at the right sets the default image.
In the Script section you may enter commands to be executed. You can type directly in the text field, the Script Assistant will help you finding the expression you search for. The topic Script Language explains this in more detail.
The scripts for Click, Mouse Enter and Mouse Leave are executed when the Widget Designer button is being used, on the local interface as well as on any web client.
You can enter as much text in one of the scripting fields as you like. For sophisticated scripts, Macros and Functions allow you to keep a good overview.
If you are interested in the Web Server feature and some small examples, please read the topics Web Server and Object and Member Notation .
See here a list of all commands.
The NBS (Network Broadcast Service) allows transmitting and updating Faders, Labels and buttons across multiple WD Designers instances on the network. To activate this service, please refer to the Remoting dialog!
Enable Send:
To send the ImageLoader buttons state (clicked or released) as broadcast into the network, you only have to check "Enable Send".
Enable Receive:
To receive values from other ImageLoader buttons, please check "Enable Receive".
Now you have to specify which item should update your ImageLoader button:
Enter the IP address of the computer you want to listen to. This could be the local computer (to control the ImageLoader button through another ImageLoader button on the same Widget Designer) or a different computer in the network. If you do not want to specify the computer but want to listen to all computers in the network, enter "255.255.255.255".
As next step specify the ImageLoader button you want to take the status from. This could be e.g. "ImageLoader1" or " ImageLoader2".
The topic Effects & Animations explains how to add and apply CSS based effects and animations.