Loading...
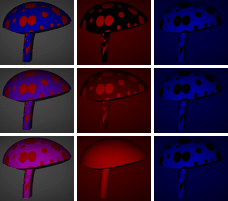
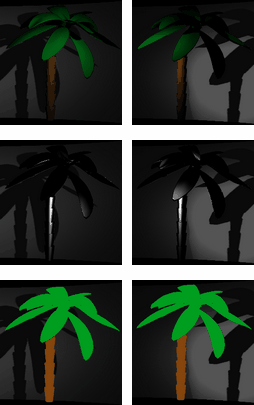
The light feature in Pandoras Box can be best understood and used when the following fundamental course of events is kept in mind: 1. Firstly, light is emitted by a light source. Here the light rays are determined in their starting position, direction, intensity and color. 2. The light then shines on an object's (i.e. layer's) surface. The object's properties, also called its material, determine how the light interacts with it and in which direction and what amount and color it bounces off. 3. Lastly, the reflected light enters the viewpoint. In the real world it would be the human eye whilst here, it is the virtual camera. No adjustments can be made at this point of the sequence. It is now, when the object becomes truly visible, its image is rendered. Light falling on an object holds a source color; in physical terms it has a specific wavelength, in rendering terms it has an rgb value. The rgb value depends additionally on the light intensity. The default color is white - consisting of red, green and blue components in equal amounts.  The mushrooms texture is always covered with red spots; The light changes from left to right: But materials in the real world do not only reflect in one color, rather with many shades and nuances. In an effort to mimic this, more than one light is used to describe an virtual object's reflection. In Pandoras Box (PB), three varieties of light have an effect: ambient, diffuse and specular light. Unlike the first two, reflected specular color does not necessarily need to be modulated by the object's color. In particular, materials like plastic often reflect only the source's color whilst metallic materials might reflect with a shifted hue. Another difference between the three lights is in which direction they reflect from a surface. The left image below shows the first law of reflection theory, considering a perfectly smooth surface. The perpendicular surface normal divides the angle between incident light rays and their reflection equally. In other words, the angle of incidence equals the angle of reflection.   To imitate a rough surface one could apply a mesh with disarrayed polygons. However it is far easier to achieve it with a material's attribute. This is what diffuse reflection does. Diffuse light is reflected in all direction (see right upper principle depiction). The larger the angle between light source and surface normal gets, the less intense is the reflection. As a result diffuse light points the dimension of the object out and enhances surface details. In opposite, the specular level influences how many light rays bounce off coherently / parallel. This is what creates highlights on an object's surface and makes it appear to have a smooth surface such as plastic or metal. The smoother a surface is, the smaller and sharper the highlights are. This last adjustment is done in PB with the smoothness parameter. Just as diffuse reflection, specular reflection depends on the relative position and orientation of light source and target. But as the rays are not reflected in all directions any more, the position of the camera plays an important role too. It influences how intense the highlight shines. The third light variation that is added to the illumination term is ambient light. Other than the above mentioned, ambient light is absolutely directionless. It illuminates all surfaces equally regardless their orientation. Strictly speaking, it has no true counterpart in real-word but still it gives very good results when it comes to simulate global light e.g. sun light and all the light reflected from the surrounding environment. The image sequence below illustrates how the ambient component with a level of 40, the diffuse component with a level of 200 and the specular component with a level of 180 (with its softness set to 60) add up and result in a realistic shaded plastic palm tree.  Please note: |
Allows receiving light emitted by a Light Layer by right-clicking on the Media parameter and choosing "Share Layer Texture". Adjustments can be made influencing the reflection of the light in order to imitate a specific material e.g. wood or plastic. In addition highlights caused by specular light can be tinted. In the images, the light itself was not changed! The left image has no light turned on. Technical Information
|
Allows using a layer as a shadow layer. This is of interest for Virtual Reality applications as this only renders shadows from (multiple, virtual) 3D objects on to one layer, which then can be used as an overlay layer for a Studio set. The left image depicts the scene. A layer with a color bar image lies between a background cloud image and a 3D globe which is illuminated by a light using the "1 Light" effect. Note, for this effect, the light texture should be a solid white or transparent one! Technical Information
|
Allows receiving light emitted by a Light Layer by right-clicking on the Media parameter and choosing "Share Layer Texture". Adjustments can be made that influence the reflection of the light in order to imitate a specific material e.g wood or plastic. In the images, the light itself was not changed! The left image has no light turned on. Technical Information
|
see FX 1 Light Mat-Spec-Color. Here, the effect layer may be influenced by two different light sources. |
Allows adaptive softedge applications. When two projectors project onto a screen that moves towards and away from them, the size of the overlapping area changes. It increases with the distance between projectors and screen. Hence, the softedge parameters must adopt to the new screen position. An adaptive softedge can be programmed using this effect (on the screen layer). The FX subtracts the light amount from 2 Light Layers, it darkens the overlap area which compensates for the higher light amount from the real projectors. For this setup a 3D setup is mandatory, i.e. the PB light sources (as well as PB cameras) have the same parameters (position, FOV etc.) as the real projectors and the PB screen layer corresponds with the real screen. The left image depicts the scene. A green layer moves in front of a cloud image. The light overlap on the background image is larger than on the green image as its nearer to the lights. Technical Information
|
see FX 1 Light. Here, the effect layer may be influenced by two different light sources. |
see FX 1 Light Mat-Spec-Color. Here, the effect layer may be influenced by three different light sources. |
see FX 1 Light. Here, the effect layer may be influenced by three different light sources. |
This effect is very useful when working with many 3D objects. By applying it to all layers, they will instantly share and respond to the same light source. In other words, when using the "1 Light" effect an additional Light Layer needs to be created and shared with each Layer that should receive its light. The "Global Light" effect creates a global light source automatically and each Layer with this effect receives it automatically. Whilst you cannot edit the global light, you can edit how the Layer responds to it. In addition you can influence the visibility of the wireframe edges of the object similar to the effect "Wireframe Edges". The left image depicts the scene with two 3D objects without the Global Light effect. The second image shows the scene with the Mix parameter at 255 but low "Ambient" parameter. In the right image, the ambient light amount is higher.
|
This is a "1 Light" effect that is reduced to the parameters "Mix" and "Light 1". Right-click on the Media field and choose "Share Layer Texture" to receiving its light. This effect is ideal if you simply like to render a light texture on another layer to simulate a projected image. The left image depicts the scene. The Light Layer projects a cloud image onto a white layer with the FX's Mix parameter at 125. For the second image the Light Layer changed the position resulting in a different angle for the projection. The right image depicts the same position but with a Mix parameter at 255, making the white texture invisible when no light is received. Note that the effect "Texture Projection" might also be of interest. Technical Information
|
Allows setting an own light source that can influence only the effect layer itself. The layer's reflection behavior can be adapted to match a specific material. The inherent light source can be adjusted in its position. Other than the Light Layer this light source has no direction, it is rather a point light. In the images, the light's position has changed as well as the material properties. The left image has no light turned on.
|
This is the same effect as "Texture Projection Add" but without the parameters XY Offset. Technical Information
|