Loading...
The section "Render Engine " in the Sites category from the Configuration tab enables you to set up properties of the local and remote render outputs.
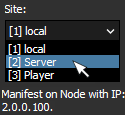 If the node is found in the network the below information will say "Manifest on Node with IP:..." otherwise it says "Node not available in Network". These settings are also accessible with the button "Open Engine Configuration" in the Inspector for the site. If your local Site offers Output Devices in the Device Tree, they can be used in Fullscreen mode [Ctrl + F] or for the maximized Preview [Ctrl + Shift + F]. Without Outputs, you cannot render in Fullscreen. As described in the Preview chapter, you can navigate in the maximized Preview and edit it. The local hardware setup for the Preview can be found in the section Local Preview whilst this Render Engine section sets up the rendering in Fullscreen Mode. |

There are two configurations for the fullscreen mode, which depend on the settings in the graphics card. The chapter Multiple displays explains how to set up your outputs using the NVIDIA Control Panel and explains the difference between using separate outputs and using one Mosaic display as one virtual display spanned across multiple displays. The chapter also includes tips in case you encounter difficulties with setting up the Mosaic mode.
Alternative to the NVIDIA Control Panel, you can click the "Display Setup" button in the PB Menu and use our "Display Configuration" dialog to set up your Client displays.
In any case, it is recommended to setup the displays before starting the PB Client software so that the Manager software does not display wrong information.
If the driver reports separate displays, all outputs can be configured individually regarding the ability to go into full screen. In case one screen should not toggle full screen, check the "Full Screen is single" option and the greyed out check boxes in the column "Use for Full Screen" become available to be activated or deactivated. This is of interest when you would like to see the user interface of your Manager even though you are in full screen mode.
In version 8.7.0, the output routing has been completely revised. From now on, adapters will be assigned to Pandoras Box outputs and not the other way around as it was before. First, as usual, you get an overview of what the hardware provides.
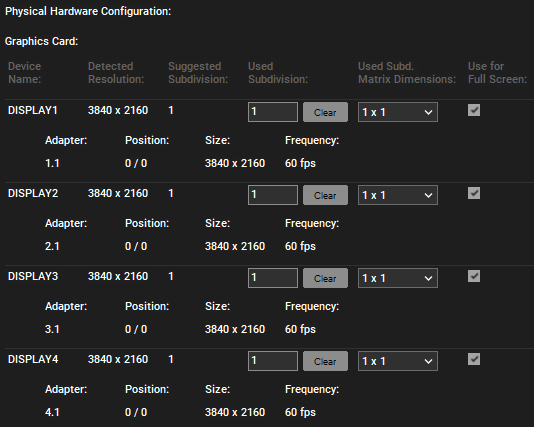
This image shows the hardware configuration from a server with four GPU outputs. "DISPLAY1" means the primary display, "DISPLAY2" the secondary, and so on. Normally, the settings for subdivisions do not need to be altered when using separate displays. "Used Subdivisions" allows you to divide the output into more areas. After entering "2", for example, a second adapter is created for DISPLAY1 and could be assigned to another output layer to render in this area (see below). Hence, you would see the results of two output layers in one display whilst the display where the output layer was assigned to before stays black. The drop-down "Used Subd. Matrix Dimensions" offers settings to align subdivisions vertically and / or horizontally (see next image). The "Clear" button resets the subdivisions to the default setting.
If the driver reports to be in Mosaic mode, you have two possibilities. First, you can leave the default option, meaning that Pandoras Box subdivides the available output. In case you have four display devices, the value for "Used Subdivision" is "4" whilst the first one starts at XY-position 0,0 and the other ones with an offset of one subdivision width or height.
The next image shows the hardware configuration from a Server with four outputs which were setup as one Mosaic display whose resolution is reported from the graphics card to Pandoras Box. As Pandoras Box recognized that this is four times 3840X2160, it offers automatically to subdivide the large displays and link four separate output layers to the subdivisions.
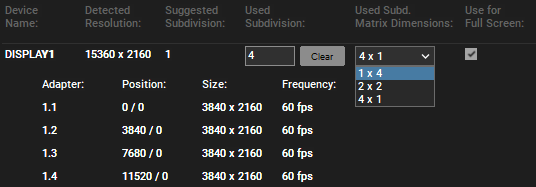
You can edit the subdivision factor "Used Subdivision" manually, too. The drop-down "Used Subd. Matrix Dimensions" offers settings to align subdivisions vertically and / or horizontally. The "Clear" button resets the subdivisions to the default setting.
Please note that you cannot take one subdivision out of full screen!
The second possibility for the Mosaic mode is to change the subdivision count to "1". In that case, Pandoras Box handles the entire output as one software adapter. This means that you have one Camera and one Output covering the reported width / height. But as the driver splits the image, you still have an image on all graphics card outputs.
This can be an advantage as you work with fewer parameters and options. The second Camera and Output have no effect and can be hidden or removed from the timeline. On the other hand, this also means that you lose the flexibility of having more parameters. If you would like to set up one display differently, for example less opacity, softedge on another side and so on, you need both Output Layers, hence 2 or more subdivisions.
This image shows the hardware configuration from the same Server with four outputs joined in Mosaic mode. But this time, the subdivision factor is set to "1" which links all four displays to a single Pandoras Box Output layer.

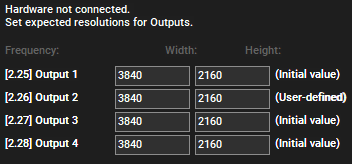
If the Client is not available in the network, for example because
-it is not turned on,
-it is assigned with no or a wrong IP address,
-the PB Client software is not started, or
-the PB Client software is with a wrong version,
no hardware configuration can be read from the driver or the operating system. If you would like to pre-program your show, you can enter the resolution you will later set up in the Client's graphics card and the Camera and Output will adapt to it. Note that this is now saved as a User-defined value. The resolution also influences some "Layer Sizing Modes". If this resolution changes in the real setup later, Pandoras Box warns you by displaying a red exclamation mark icon in this Configuration tab (see below). Click on it to see a pop-up showing the user-defined resolution. Check whether this affects your programming and adjust it if needed.

In this section, you can define a virtual adapter as a playout path. For now, the NDI adapter is the only virtual adapter introduced. The rendered texture from the output to which the adapter is assigned is sent to the network as an NDI stream. The stream is sent to each locally activated network adapter. Note, however, that a stream is only generated if the output is in full screen mode.
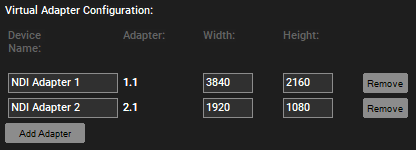
With the button "Add Adapter", a new adapter can be created. The "Remove" button removes an adapter.
The NDI adapter can also be renamed in the "Device Name" field. The name of the network stream is composed of the computer name and the adapter name assigned here for example "PBR5-PK2 (NDI Adapter 1)". Likewise, the resolution of the stream can be set or adjusted under width and height.
An NDI adapter can be assigned to an output. If the adapter is assigned at the first position, the resolution entered under "Virtual Adapter Configuration" defines the output's resolution as well as for other added adapters. If the adapter is assigned to an output in the second or higher position, the virtual adapter resolution must correspond to the resolution of the first adapter (see Output Routing image). If these two resolutions do not match, a red exclamation mark is displayed in front of the corresponding adapter and no stream will be rendered. In this case, the resolution of the NDI adapter must be adjusted to that of the first listed adapter.
Another important note is that an NDI stream is only sent when the associated output layer is in full screen mode. In addition, the performance specs of the site are affected by the number of NDI streams. There is one more limitation. The virtual NDI adapter does not work if a black buffer color depth of 10 bits is set for the render engine. If you try this, the red exclamation mark appears again. If you click on this exclamation mark, you can read in the error message that NDI adapters do not work with a 10-bit render engine.
Please note that we recommend not to do the output routing in full screen mode.
As a next step, you can change the routing of a physical output adapter (meaning the graphics card output) to an Output Layer. According to the license, all available outputs are listed here. With version 8.7.0, it is possible to add several adapters to one Output Layer. However, only one real GPU adapter may be assigned to an output.
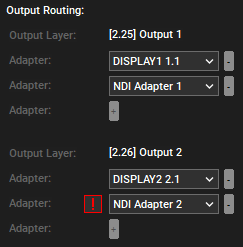
At the start of the project, all display adapters are assigned to an output layer. The assignment can be changed or completely removed. To change the routing, an adapter that is already in use must first be removed with the minus button so that it can be assigned to another location with the plus button. In this way, previously created virtual adapters can also be assigned in the first or following adapter position. The first adapter assigned to an output defines the resolution of the Pandoras Box Output used in the timeline and all the following must correspond to these values. If the resolution of the following adapter does not match the resolution of the first adapter, a red exclamation mark is shown and no stream will be rendered.
Again, these settings depend on the Site chosen in the drop-down list at the top.
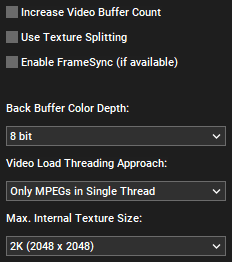
"Texture Splitting" can increase the so called show performance when you are working...:
- on our Player R4 and Server R4 hardware
- with uncompressed formats
- with high resolutions above HD
As the name suggest, this option splits textures internally which has the effect that the system handles smaller (but more) textures instead of one very large one. As a result, the loading process of large textures gets smoother and thus increases the "show performance", which we state on our Performance Sheets found in the Download-Center. The show performance defines the maximum number of videos which can be started and stopped without interfering other videos.
To use the feature FrameSync, you have to activate it for every site separately. Per default, FrameSync is deactivated, as further hardware is required for this.
A color depth of 8bit per channel results in 16.7 million colors, whilst a higher color depth of 10bit per channel allows for a total of 1 billion colors. Use this option only, if you are using 10bit content (HDR etc.) and if your outputs (displays, projectors etc.) are capable to display 10bit as well! All other Clients should be set to 8bit to safe performance.
The increased image quality is seen in higher contrast and cleaner color transitions (no artifacts or color banding) especially when using uncompressed formats.
Please make sure that the graphics card supports the higher color depth as well. For Nvidia cards, the setting can be found in the Nvidia Control Panel > Change Resolution > Output Color Depth drop-down list.
- Full Screen Anti-Aliasing
This refers to a anti-aliasing method used for smoothing object edges in the last rendering pass. Per default this is the Output Pass, thus the anti-aliasing works on the output mesh. In case you have set the Output's parameter "State" to Bypass, the anti-aliasing applies to the Compositing Pass meaning objects on layers. The higher the anti-aliasing value, the more memory and performance is drawn but the smoother object edges are rendered (as seen in the below example). The maximum anti-aliasing level depends on the graphics card. For performance enhancement the default value is set to 2.
 |
 |
 |
100% zoom |
 |
 |
 |
500% zoom |
Level 0 |
Level 4 |
Level 8 |
|
- Video Load Threading Approach
This is of interest when you have programmed multiple containers with video content all starting at the same time. Under circumstances (number of containers, resolution of videos, etc.) this can lead to different render issues as all videos start to be decoded at the same time. With the default option "Only MPEGs in Single Thread" MPEG videos start one after another enhancing the robustness of the render engine. The option "Single thread" does the same with all videos, not only MPEG ones. A drawback is that delay is added. If you need to sync many videos, choose "Multiple threads" from the drop-down list and make sure that your programming does not affect the robustness of the render engine.
- Max. Internal Texture Size
During the rendering process content is buffered onto a so called internal texture. The internal texture is only called when the content is used with
- deinterlacing
- FluidFrame (= frameblending)
- particular effect combination, e.g with Blur. The description of the effects in question mention whether they depend on the internal texture.
Depending on the resolution of the content you are using with those optional features, you might need to select another entry from the drop-down list. Please note that EVERY content file is then buffered with this size. As this consumes plenty of graphics card memory it is recommended to choose the entry next in size and not simply the largest available.