Loading...
 |
The Script Timer control lets you execute a script after a certain amount of time. This can be done once or continuously. By the first click on the ScriptTimer it will be started. A second click on it stops it again. |
To create a Script Timer widget choose "Widgets > Buttons > Script Timer". The mouse cursor changes to a crosshairs icon, indicating the create mode. Each left-click adds the selected widget to the current page. To quit the create mode, you can switch to the run mode with [F8], where you can use all widgets. Most widgets however need to be set up first.
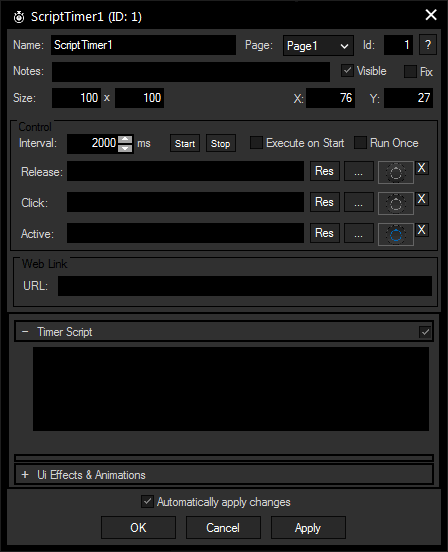
To edit the Script Timer properties simply right-click it and choose the first menu entry "ScriptTimer Properties". Alternatively, you can press [Alt + P] whilst the mouse is hovering above it or switch to the edit / move mode with [F9] and double-click on it. The ScriptTimer property dialog opens up.

A unique name can be entered to identify the widget via the Object and Member Notation. The default name is based on the widget type and ID.
This drop-down offers all available pages to place the widget on.
ID:
The ScriptTimer's ID may be changed by entering a new one in the text field top left. If you change it, you will be asked if you also want to adapt the name to the new ID.
A short note can be added here. It is not displayed outside the widget but can be set and retrieved with the WidgetID.Note property member.
Uncheck this box to hide the widget.
Fix:
When the option "Fix" is checked, the ScriptTimer will be displayed on every page.
Enter a pixel size for the ScriptTimer's size.
Enter the location of the widget (upper left corner) in pixels
Interval:
Enter here the Interval time in ms, after which the ScriptTimer executes the script once or continuously.
Starts and stops the ScriptTimer.
If this box is checked, the script will be executed immediately when the ScriptTimer is started. Otherwise, the first script will be executed in the second interval.
Run Once:
When "Run Once" is enabled, the Script Timer will execute the script once after the Interval Time is expired and then stops again.
When "Run Once" is disabled (by default) the Script Timer will execute the script continuously in the Interval you entered in the text field to the right (in ms).
Three images can be assigned to the different states of the ScriptTimer:
"Release" refers to no click or not toggled.
"Click" is on press or toggled.
"Active" is the image appearing shortly at the beginning of each interval.
Click on the image place holder itself to open a file dialog where you can choose your path and image. If you would like to choose an image from the Widget Designer "library", click on the "Res" button. The Resource Manager opens where you can double-click on the image of your choice. You can also save custom images in the Resource Manager to access them faster. The small "x" at the right sets the default image.
The Web Link section is of special interest when working with the Web Server feature, i.e. clicking the ScriptTimer button in a web browser. Enter a URL e.g. "https://www.christiepandorasbox.com" that your browser should call when clicking the button.
But it is also possible to achieve a quick page change with the URL, simply enter a hash tag "#" and the page name. E.g.: #Page2.
Check the option "Open In New Tab" if you would like to keep the Widget Designer page loaded in your browser.
In the Script section you may enter commands to be executed. You can type directly in the text field, the Script Assistant will help you finding the expression you search for. The topic Script Language explains this in more detail.
The scripts are executed when the Widget Designer button is being used, on the local interface as well as on any web client.
You can enter as much text in one of the scripting fields as you like. For sophisticated scripts, Macros and Functions allow you to keep a good overview.
If you are interested in the Web Server feature and some small examples, please read the topics Web Server and Object and Member Notation.
See here a list of all commands.
The topic Effects & Animations explains how to add and apply CSS based effects and animations.