Settings

Navigation:  Pandoras Box > Devices and Layer Parameters > Light Layer >

Settings

prev main next

Navigation:  Pandoras Box > Devices and Layer Parameters > Light Layer >

Settings

prev main next

Loading...

device-control_light-layer_settings

Next to the parameters Position and Target the Settings parameter section allows adjusting the area in your 3D space that will be affected by light. Layers that are not within the spanned light cone cannot be shed with light, cast shadows or be shadowed.

"Angle" resizes the dihedral angle of the light and spanns the light cone. By default it is squarish, that is the height equals the width. "Aspect Mode" influences the width-height-ration, whereas "Z Roll" rotates the entire light cone. Contrary to the next mentioned parameters all these parameters can be seen in the Preview window if the Light Wireframes are toggled on.
light_layer-control_settings_near-plane
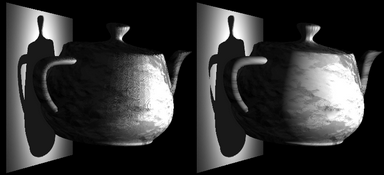
"Near Plane" and "Far Plane" have their origin in the Camera Control. When looking at the distance from the light source itself, the near plane describes the minimum distance an object is allowed to have in order to cast shadows; the far plane refers to the maximum distance. In the example the near plane starts behind the front part of the jug. Even though it is dipped in light it is not casting shadow any more. Note that the light simply cuts the shadows of the front part of the jug, it is not rendering them any more. It cannot see through the first layers of the object and render the shadow of the back side instead.

Note that the planes are not designed to be an artistic tool. They are rather meant to be used if the depth resolution is too small and objects being to close to each other are rendered in a wrong way. If you have such an issue decrease the distance between both planes without cutting objects.

light_layer-control_settings_tolerance
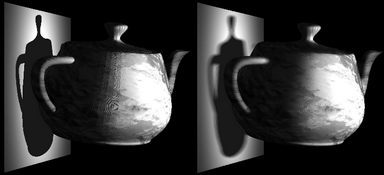
A higher light "Tolerance" decreases the shadowed area, either on the object itself or another object. If a particular area lies within the light-shadow-border it now tends to be on the illumined side.
The tolerance level helps to decrease the phenomenon called self-shadowing which can be especially problematic when using objects with a very rough surface.

In the example the tolerance level is set to 0.005 for the left image, and to 0.990 for the right image. Note that 0.990 is so high that even the shadow of the handle is influenced.

light_layer-control_settings_softness
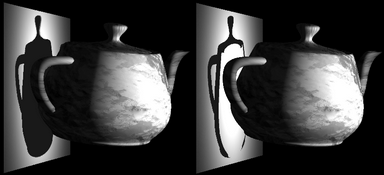
A higher shadow "Softness" blurs the shadow border, on the object itself and on another object. It can be especially helpful when working with a Shadow Map set to a low resolution .

In the example the tolerance level mentioned above is set back to the default value of 0.10.
The softness level is set to 0 for the left image, and to 900 for the right image. Note the difference to the image above. There, the light-shadow-border has moved whereas here, the border remains but the transition is softer.

External Control via DMX, Widget Designer, etc.

You can control all Settings parameters externally.
 
For DMX control, the chapter DMX Tables lists all parameter information, for other external control e.g. via the Widget Designer the Parameter List is of interest.