Loading...
This chapter explains the Notch Layer in detail. The introductory chapter gives an overview on all Pandoras Box devices and layers.
Notch is a real-time content creation tool that brings a combined work flow for creatives and technologists. Notch enables artists and designers to create high-end 3D graphics, live video effects and particles, interactive experiences, virtual production and a lot more in a true real-time environment. The deep and comprehensive integration to Pandoras Box gives you frame accurate playback and full parameter control with zero latency which allows you to edit content directly on stage and over-night renders belong to the past.
In the Notch Builder you first design your scene and then decide which parameters should be exposed in the so called Notch block that will be loaded in Pandoras Box. The exposed parameters can be everything from text, amount, color, to size or position etc. If you program items to the Notch timeline, they will be synchronized to the PB timeline when storing them as a container.
The Notch Layer in Pandoras Box can render and control Notch Layers that come with the Notch block.
In order to work with Notch, Pandoras Box requires a Notch license. Indeed, all PB systems that should render Notch content need to be equipped with a license. As soon as the Pandoras Box Manager finds a PB system with a license, it can import and analyze Notch blocks. The Manager needs its own license only, if it should render Notch content itself, either as a fullscreen output or in the Preview window.
Further, as Notch renderings can demand much GPU performance, we recommend to equip the PB system with the Notch license with an RTX graphics cards.
Since version 8.4, Pandoras Box supports the Live Editing feature of Notch blocks.
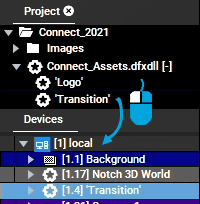 In case you activated the Notch option "Layer as separate effects" all Notch layers are shown as sub resources in Pandoras Box and can translate again into individual layers as done in the next step. In case you leave this option deactivated, your Notch scene is exported as a baked scene and PB shows only one sub resource. In any case, drag a sub resource, onto a Site(!) in the Device Tree and it will show a newly created Notch Layer. In the depicted example, the sub entry "Transition" is added to the Site "Local" which transformed it to a Notch Layer called "Transition". As explained above, this Site needs to be equipped with a Notch license to be able to render the content. By the way, all content is spread by default. If a Client has no Notch license, it cannot render the content, hence it appears as inconsistent in the Assets tab (red exclamation mark). To avoid this, remove either some locations using the File location table or deactivate automatic spreading in the first place. Spread the content manually via the right-click menu in the Project tab, or use folders that spread to specific locations only (see Folder Inspector). As an alternative workflow to add Notch Layers, you could also right-click a Site and choose Add Device > Notch Layer > loaded Notch block > custom Notch layer. This is shown in below image. In this case however, the media parameter is not assigned automatically with the Notch content as in the first workflow. This means that you need to assign the Notch content from the Project tab to this layer manually. The Notch Layer is rendered in the same rendering order as other layers. In the Device Tree, you can drag devices further down if they should overlay other layers (see "Site, Layer and Parameter Structure"). For more information about the rendering passes, see the chapter "Video Processing Pipeline". To change the rendering resolution for a Notch block, select it in the Project tab and change the "Maximum Texture Width and Height" in the Inspector. This resolution applies to all included Notch Layers. If there is the need to render separate layers or the entire block in two different resolution settings for example, add the block again to the Project tab and change the resolution for it. |
 |
Select the new Notch Layer and open the Device Control tab look at its parameters.

As mentioned above, you will notice that the media parameter might be already active. The following parameters, Media - Mesh - Opacity - ... - Scale - Blend Mode - are the same as the ones from a Video Layer. For more information about them, please see the chapter "Video Layer". By the way, you could also add effects to a Notch Layer, just as you would do with a Video Layer. The chapter "Working with Effects" explains all you need to know about this.
The last controls, those in the "Notch" group, are the parameters which were exposed in the Notch Builder. You can work with them as with any other PB parameter, that is, change them to an active value or store them as key frames to the timeline. If you are new to Pandoras Box, the chapter "Sequence" describes how to do that.
Now, toggle back to the Sequence tab and execute the "Store Active" command. On the track from the Notch Layer you will see a new Container and keys for all parameters you changed so far. When you play it back, this could look like a 2D video or transition or like an entire 3D scene with camera animations and particles reacting on content. Of course you can blend other content and live feeds with the Notch content. Or, go a step further and combine both by assigning PB content to an exposed Notch Media parameter. The new Blend Modes or LUT shaders that come with PB version 8 are very helpful for that as well as the new Share Layer Option. The "What's New" chapter gives a good overview about these features.
Since version 8.4.0, Pandoras Box supports the Live Editing feature of Notch blocks which makes it possible to update a Notch project in the Notch Builder and see the changes in real-time in Pandoras Box. This means more than editing existing parameters and media files. You can even update which parameters are exposed in the Media Server block and change their properties. Pandoras Box updates its rendering and shows all changes in the Device Control tab, too.
There are no limitations when using the Live Editing feature; it can be used in a classic Manager-Client-Setup or even in a Multi-User session.
Export the Media Server block in the Notch Builder and load it in Pandoras Box; make sure that all systems that should display the content are equipped with a Notch license. Back in the Notch Builder, connect all systems that render the Notch content: Devices menu > Network Connection > Enter PB's IP addresses > Connect.
From now on, all changes in the Notch Builder are sent to connected systems without the need to export or load the block manually. When you are done editing, export the final Media Server block in order to preserve the current changes. Make sure that it is spread to all respective systems. Changes to a block via Live Editing are volatile and thus need to be re-exported! It is therefore not recommended to use this volatile state during a show.
 |
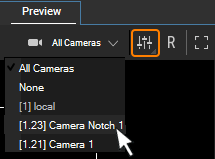 If you now zoom, pan or rotate in the Preview the Device Control tab shows active Viewpoint and Target parameters for the Notch Camera. If the default "Target" parameters are far off the origin, it might be more convenient to set them first to (0,0,0) because Pandoras Box rotates around that point. In general the parameters and parameter ranges for a Notch Camera match those of a Pandoras Box Camera. For more information about them, please see the chapter "Camera Layer". However, the default values differ as they depend on the values saved in the Notch block. Further, a Notch Camera can not be assigned to a Pandoras Box Output or share its texture anywhere else. In order to fully understand what is happening with the Notch Layer when changing values of a Notch Camera please set your Preview to show two viewports: the left should show the "All Cameras" view and the right one the Notch Camera, just as depicted below. |
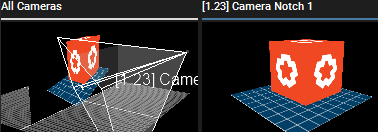
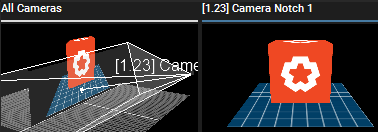 As seen in the right Preview image, the cube is shown from the correct angle as expected. The same image, i.e. the rendering result of the Notch Camera, is now also shown as a 2D texture on the Notch Layer. In the "All Cameras" view it might look confusing at first because it looks like the Notch Camera looks onto the Notch Layer. But indeed, the camera wireframes depict the Notch Camera and the Notch Layer shows the resulting texture.
|
 |
By the way, you can link multiple Notch Layers to the same Notch Camera. Vice versa, you can program various Notch Cameras to the timeline and switch between them by choosing the according Camera in the Notch Layer.
As an alternative workflow to add Notch Cameras, you could also right-click a Site and choose Add Device > Notch Layer > Notch Camera. This is shown in the following image. To link this camera to a Notch scene, simply select the Camera in the drop-down list for the camera values of the Notch Layer. At first, the default values of the Notch Camera resemble those of a PB Camera. However, you can also load those values stored in a Notch block by right-clicking the Camera, choosing "Apply Defaults from Exposed Camera" and then the according Notch Layer.

Of course, you can also control the parameters of a Notch Layer using the SDK or Widget Designer, e.g. through interactive devices like the AirScan or sensors like Phidgets and more. This text in the Widget Designer chapter summarizes which commands or nodes are helpful when controlling a Notch Layer. Remote controlling a Notch parameter is very similar to controlling an additional effect, which means that you need to know the exact parameter name. The name is case-sensitive and all spaces count. For various reasons, Notch parameters are grouped and this hierarchy structure needs to be represented in the parameter name by using the pipe "|" character. The groups are shown in the Device Control tab but also in the Device Tree when unfolding entries. The Device Tree is helpful too, if a name is too long to be displayed in the Device Controls tab. The following list shows some parameters from the following picture.
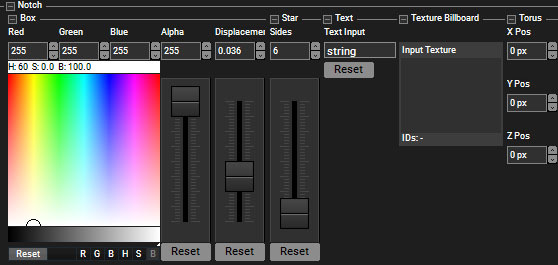
Notch|Box|Red
Notch|Box|Alpha
Notch|Box|Displacement
Notch|Star|Sides
Notch|Text|Text Input
Notch|Texture Billboard|Input Texture
Notch|Torus|X Pos
Note that position values are displayed in Pandoras Box in pixels but the input via the SDK has a different range per default. The chapter Configuration tab > Unit Management explains more about this and the check box "Interpret Automation Param Input as Pixel Values".