Loading...
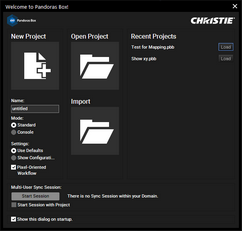
 The Startup Dialog (or Welcome screen) shows all options to start right-away with the project of your choice. You may load a new project (with your favorite settings) a recent project or one from the directory.
On the left side you may choose to open a new project. If necessary, change the default settings and then click the button.
- Name: Enter a name for your project. It will appear in the Project tab and will be the file name when you later on save the project to a directory of your choice. Until you do so, the project is temporarily saved under "C:\Christie\content\projects\temp_projects\temp" (or C:\coolux\...).
- Mode: Decide to load a standard project or one that has optimized settings for being remote controlled by a lighting console.
- Settings: Choose whether the default settings should be applied or whether a pop-up should show the Configuration tab first to let you decide particular settings. Since version 6 the pixel-oriented workflow is the new default. Untick the option to work with generic units as in version 5. All unit settings can be found in the Configuration tab > Unit Management.
The button "Open Project" in the middle section opens a dialog where you can choose the directory from where to load an existing project saved in the PBB format. In case you would like to open a project in the older XML format, please click the "Import" button.
The right side shows a list of recently saved or opened projects. Simply click on the "Load" button next to a name.
In case other Managers are found in the network, you will see the Multi-User options to either start a new session or join an existing one. You can also check the option "Start Session with Project" if you always like to start a Session when creating a new project.
Click the check box at the bottom if you do not like to display this dialog on the next startup. The same option can be found in the Configuration tab > Startup.