Loading...
The Multi-User tab in Pandoras Box allows to setup the Multi-User feature and gives an overview on all Places (i.e. Multi-Users) online with their IP address and network name. The tab is not contained in the default view. To open it, go to the Menu Bar and choose Tabs > Multi-User.
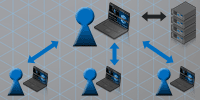
The first possibility for Multi-Users is to work in a "Sync Session" where all changes are synced continuously and seamlessly between all Users. However, you can also activate the "Blind Mode" within the Sync Session for working with an independent Nowpointer and Active Values. This allows you for example to jump to "your" time in the Sequence to store content or to view content in the Preview.
You can leave and (re-) join the Sync Session at any time. When joining a Sync Session you are asked to load the session project.
Alternative to (fully or partly) synchronized programming, you can work asynchronously in a separate project and send ("push") your changes at a certain time, e.g. checked or newly encoded content, warp and softedge settings, parts of a Sequence, etc. The "Run Operation" button in the Multi-User tab opens a dialog to define these Pull and Push Operations.
All settings that are listed in the Global category in the Configuration tab apply to all Multi-Users whilst the other ones apply only locally. The User category now features profiles which are shared with others so they can apply one of them too. This is explained below in more detail.
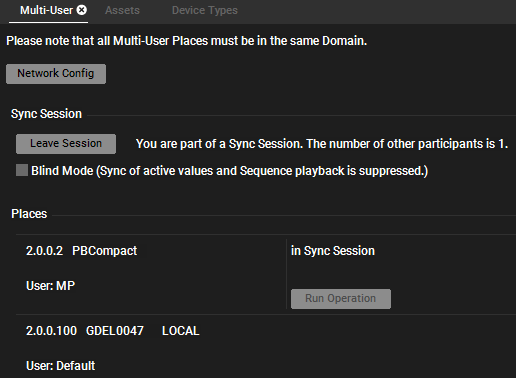
This Multi-User tab shows that there are two Places (= two Users) online. They are in the same network, share the same Domain and the Manager software is started. The User Profile is displayed too.
Multiple Managers in the same LAN network (and Domain) participate automatically as Multi-Users. Now they have the choice to work in a Sync Session. As a possible scenario for a Sync Session, imagine, for example, that one operator is assigned to the Warping job whilst another one previews and arranges content in the Project tab and a third operator wants to setup the connection to Clients and their output resolution.
The first Manager (from now on the Main Manager) clicks the button "Start Session" in the tab. All Clients will automatically connect to the Main Manager. His project becomes the so called Session Project.
All other Managers have then the option to join this session. Alternatively, the Startup menu offers the possibility to start a project and a sync session directly and to join one.

 |
 |
In short: the Main Manager is connected to the Clients, hosts the Sync Session and can be the clock leader. As described below, he cannot enter the Blind Mode.
Within a Sync Session all changes are synced between all Users, including the:
- Device structure (for the Device Tree and Sequence),
- Sequences (with all Containers and Cues),
- Resources (meaning folders and content in the Project tab),
- Active Values and Sequence Playback (if not in Blind Mode).
Tip: In a Multi-User setup you might not want to spread all content to all Managers. First, deactivate the Auto-Spread option in the Configuration tab > Resources (Global). The right-click menu in the Project tab then offers options to spread content or folders to specific sources. In addition, the Folder Inspector offers spread options.
Troubleshoot: In case you encounter problems like not seeing another User, please check your network. Make sure that the ports used by Pandoras Box are not blocked (firewall, anti-virus applications, configurable switches etc.). If you are using configurable switches and would like to use IGMP Snooping, make sure that ALL switches in your network are configured accordingly. Otherwise, IGMP Snooping can be deactivated as well.
  |
As explained above, all project data is synced in a Sync Session. If you would like to detach the Active Values and Playback status (including the time for the Nowpointer), you can activate the option "Blind Mode". Note that this option is only available for Sub Managers (those that join an existing session). You can either click the according button in the Multi-User tab or the last icon in the Sequence Button Bar above the timeline. |
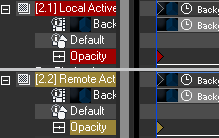
All "Store Active" commands will only store red local active values!
You can right-click on a Parameter / Layer / Client and choose to either "Reset" (respectively "Reset All Active from Remote") or to "Take over Activity" in order to adopt them to local active values.
Note that the tab "Active Values" displays local and remote active values without distinction.
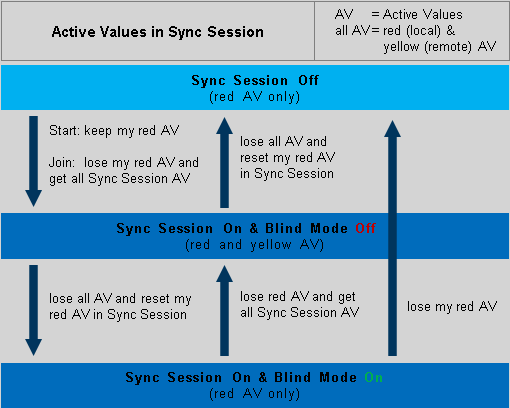
Remote active values can only exist in a Sync Session without an activated Blind Mode. Hence, they dis-/appear when you toggle the Sync Session state or the Blind Mode on or off. In addition red local active values may change. Please see the following diagram.
The "Save" and "Save as" option save the session project on all synced systems. The chapter "File menu" difference between both options, and the third saving option "Save as Copy" are
When starting with all Users on another day, the Main Manager loads the project and starts the session again. All others can then join it as usual. This option is also included in the Start-up dialog. Note that the saved project data does not include information about other Users.
Since Pandoras Box V8 you can save specific settings from the Configuration tab in so called User Profiles. Per default, User settings apply to the local instance only. However, the profiles are part of the project and also synced with all Multi-Users. Note that if no other profile is created and selected, all Users rely on the "Default" profile. This has the result that changes done locally are synced and applied to other instances too. But any User has the choice to create or select an individual profile. All profiles except the "Default" one can be renamed or deleted, which again is synced. Keep in mind, that profiles must have a unique name and cannot be deleted if another Multi-User uses it. Read more about User Profiles in the chapter "Configuration".
So far, continuous synching was explained. For some events however it might be more convenient to not sync every small step but to work asynchronously, at least for a certain time until a more or less final state is achieved and should be shared.
Before you begin, it is recommended to decide for a hierarchy as it makes sense that there is a leading Manager to which all others send their selected project data.
First, decide whether you want to work in a separate project or whether you want to start with the same project that includes for example already some Clients with named Layers and some Resources in the Project tab. For the later case, there are two possibilities. First, you can open a Sync Session as described above and leave it again after having synced the project once. Alternatively, one Manager loads the project. All other Users open the Multi-User tab and click on the "Run Operation" button depicted next to the network address and name of this Manager. This opens the "Edit Multi-User Operation" dialog where the drop-down menu offers the possibility to "Pull Project" which copies the project to the local system.
Now every operator can work in his own project and click the "Run Operation" button whenever he needs to.
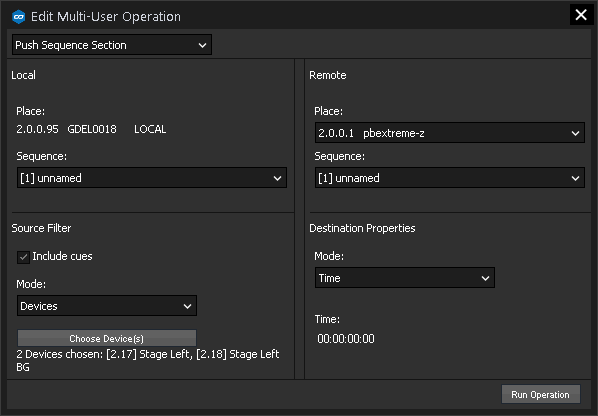
As described above, the "Run Operation" button is for operators who program asynchronously. If the operator likes to distribute (parts of) his work, he clicks the "Run Operation" button depicted next to the network address and name of another Manager. This opens the "Edit Multi-User Operation" dialog where the drop-down menu offers the following possibilities:
Operation |
Description |
|---|---|
Pull Project |
Load the currently opened project from another system. |
Push Project |
Send your currently opened project to a another system. The chosen system loads the project without asking to save its own current project. |
Pull Sequence |
Choose a remote system and a Sequence ID. The other Sequence is added to your Sequence folder in the Project tab, meaning that it might get a new ID. |
Push Sequence |
Choose a Sequence ID and remote system to send it to. The other system adds your Sequence to its Sequence folder in the Project tab, meaning that it might get a new ID. |
Push Sequence Section |
Send a part of your Sequence to another system. You can define the source Sequence ID, and whether Cues are included or not. You can send the entire Sequence ("No Filter") or a part which can be defined with a starting and ending Cue or with Devices. In the Device dialog you can multi-select using the [Shift] and [Ctrl] key. Regarding the receiving system you can choose the remote Sequence ID and whether your data should be added at a certain time or Cue. |
Transfer Resources |
Choose a remote system to view its content tree next to your own content tree from the Project tab. You can now drag and drop files and folders from left to right and vice versa. |
In MU scenarios, DMX devices as well as the TCP device or Widget Devices will behave similar to regular Site. This means they will "manifest" onto the Main system and will not send out any data from Sub Manager. Therefore the Art-Net output on Sub Managers can be activated, but no value will be sent. In the event of a "takeover" the new Main Manager will establish all TCP connections and start to send Art-Net if specified in the configuration. Doubled Art-Net output is prevented the same way as TCP or WD commands are not sent twice.