Loading...
 To open the Audio and Video Export tab, please click on "Tabs" in the Toolbar and choose "Audio and Video Export". Please note that this feature requires an activated Encoding option on the PB Manager. The Audio and Video Export tab allows you to define all settings for exporting audio and video from a sequence. Please note that incoming active values will be ignored, e.g. Widget Designer and Art-Net data. This is because the export is not running in real time, thus the incoming data cannot be allocated to a specific frame. Same applies to containers that are not locked to the timeline. Free-run containers behave differently than during normal play back as the time reference is missing. The Export feature is designed to work with MPEG2 videos, images and ASIO WAV tracks. Exporting other formats such as MOV and AVI might lead to unexpected behavior. Please see the File Inspector for adjusting colorspace settings. Also encrypted media cannot be exported. On the other hand you may encrypt your exported video afterwards. [Export]: [In]: [Out]: [Max. Duration]: [Target Name]: [Target Directory]: |
[Encoder Settings]:
In this section you may choose the settings of the file you're going to export.
There are several predefined profiles:
Profile Name |
Output Type |
Mpeg Settings |
Resolution, px |
Bitrate (constant), kbit/s |
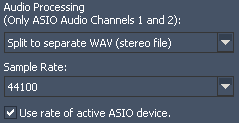
Audio Processing |
|
Profile |
Level |
|||||
SD NTSC 720x480 |
MPEG-2 |
High |
High |
720x480 |
8000 |
separate wav |
SD PAL 768x576 |
MPEG-2 |
High |
High |
720x576 |
8000 |
separate wav |
XGA 1024x768 |
MPEG-2 |
High |
High |
1024x768 |
10000 |
separate wav |
HD 1280x720 |
MPEG-2 |
High |
High |
1280x720 |
12000 |
separate wav |
HD 1408x1056 |
MPEG-2 |
High |
High |
1408x1056 |
15000 |
separate wav |
HD 1920x1080 |
MPEG-2 |
High |
High |
1920x1080 |
20000 |
separate wav |
2048x1080 |
MPEG-2 |
High |
MXL |
2048x1080 |
80000 |
separate wav |
4080x2160 |
MPEG-2 |
High |
MXL |
4080x2160 |
80000 |
separate wav |
Uncompressed |
Uncompressed Frame Images (.png) |
Computer's resolution |
none |
|||
These profiles are not editable. You may choose one of these profiles from the drop-down list or create a new profile by clicking on [New].
[New]:
Click [New] to create a custom encoding profile and name it.
[Output Type]:
Choose between MPEG-1, MPEG-2 and an image format to export an image sequence.
When using MPEG-1 or MPEG-2 go on with the MPEG settings. Pandoras Box Encoder allows to encode files larger than 1080p to our proprietary MXL format. The maximum resolution is 4094 x 2800 px, though it is recommend set 4080 x 2800 px as this conforms with the MPEG standard. The encoding process depends on available graphics card RAM.
If you would like to export an image sequence, you may choose between three image formats: PNG as an lossless compression format, BMP as an uncompressed format and dds as an lossy compression format. For more information please see the chapter "Image Sequences".
Now, simply enter the resolution for the final image sequence and tick the "Export Alpha" check box if you need transparent image parts. Adjust the audio processing as described below.
[Profile]
Set the MPEG Profile and Level.
Please note that you will need High Profile (Profile 4:2:2:) and High Level for HD 1920x1080 px resolution. The Level automatically changes to MXL if you encode files to a format bigger than 1920 x 1080 px.
[Resize Video]:
As long this option is not checked the video resolution will have the size of your windows desktop. Check [Resize Video] and insert a custom resolution for X and Y (in px) if necessary.
[Bitrate (constant)]:
Choose the bitrate (in kbit/s). Recommended are about 8.000 kbit/s for SD and 20.000 or higher for HD.
[GOP-Length]:
The length of the Group Of Pictures is editable from 1 to 100. The higher the GOP-Length the better the compression rate gets at the expense of quality. GOP set to 1 will use I-frames only.
[Number of B-Frames]:
Choose a value between 0 and 7.
[Motion Estimation Level]:
Set a value between 0 (no motion search) and 15 (high quality). The higher the value, the better the quality, the longer the encoding process.
[Motion Estimation Range]:
Set a value between 0 (no motion search) and 15 (high quality).
[Scene Change Detection]:
Choose between None, Fast and Refined.
