Loading...
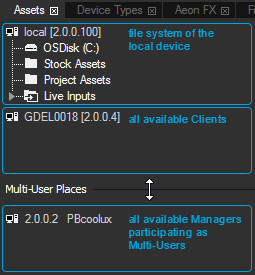 The Assets tab is part of the default View. In case you closed it, please click on "Tabs" in the Toolbar and choose "Assets" or use the shortcut [Ctrl + T]. Even if it was already open and simply overlaid by another tab, it is now the visible tab within the pane. The Assets tab itself is divided into two sections. The upper part shows the local system and then all Clients in the network. The lower part lists all other Managers in the network that participate as Multi-Users in your session. You can change the heights of both parts, if you position your mouse cursor on top the black line and drag it. Troubleshooting: In case you miss a system in the Assets tab, make sure it is started in the same version and Domain channel as the Manager is and that it is in the same IP address range. |
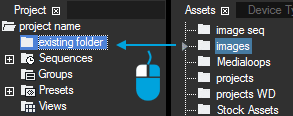 Files are imported from the Asset tree by drag and drop into the Project tab. As said above, you can (un-)fold a drive or folder by double-clicking it. You can also click on the small triangle displays in front a folder or on the vertical line. You can select a single file, multiple files (hold down the [Ctrl] key or [Shift] key) or folders and drag them into the Project tab. There, you can either drop the files into an existing folder including the very first project folder or simply into an empty space. Note that the content is listed in a slightly different order than known from the Windows File Explorer. E.g.: 0,1,10,9,99,AB,abc,de,DEF, _underscore |
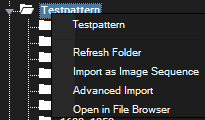 Another available command in the context menu is "Import as Image Sequence". When you drag and drop an image sequence folder, Pandoras Box imports all images separately. To import the folder in terms of one single file that can be played back, use this command. A dialog opens and asks for the frame rate and it can be selected whether FrameSync should be used or not; depending on how the content was created, enter for example 25 fps or 30 fps. This dialog also offers the possibility to activate FrameSync for this file. If FrameSync is activated, the Image Sequence gets the FPS from the device which is selected in the Configuration tab as a basis for representation on the timeline. Find more information about this in the chapter "Image Sequence Formats". The next option, "Advanced Import", is described below. The last command from the context menu is "Open in File Browser" and it opens a new File Browser tab which shows the content of the respective folder from the Assets (or Project) tab as thumbnails. You can open as many File Browsers as you like. If you are interested in changing the layout of the user interface, please see the chapter "Layout". It describes how to add or break-out panes and how to save and load views. |
Alternatively, if you would like to see the content of a folder as thumbnails, select it and open the Thumbnails tab (in the right pane that also contains the Preview). From there or the File Browser tab, you can also drag single files into the Project tab. After adding files to the project you can view its properties, e.g. width or length, in the Inspector tab. Simply select the file in the Project tab to see it there. At the top you will see the most important properties. The following options depend on the file type and are explained in the chapter covering the File Inspector. At the bottom, you will see a table listing all file locations.
It is very important to understand, that importing a file to Pandoras Box, simply creates a link to its location on the hard drive. In case you work in a network with other remote Clients and Multi-User Places and they are part of your project, imported content is automatically spread to them too, which creates a hard copy of the file on the respective system(s). A system can only access a file, if it is available on its own hard drive. In Pandoras Box, however, only the link for each system is saved and listed in the file location table. For more information about Spreading please see the chapter Project.
If you would like to see files only locally, and spread them later for example, you can deactivate the automatic Spread function in the tab Configuration > Resources (Global). However, if you do so, make sure that all files are available on the local system. This might require a manual spread in case you import content from a remote system. This is especially important if you want to transfer show files to other systems later on for backup scenarios or other purposes or if you would like to bundle the project. For a long time the recommended workflow in Pandoras Box was to import files exclusively from the local hard disc system of the Manager system. You do not need to follow this recommendation if you understand manual spreading and the file location table.
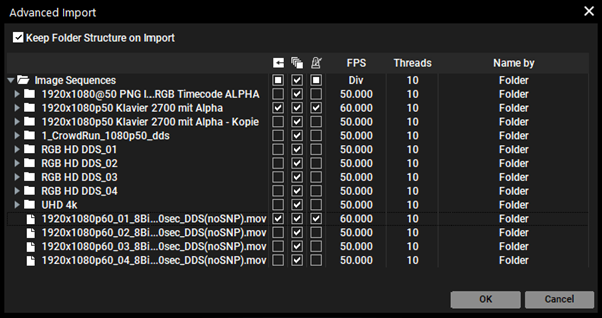 In the Assets tab, simply right-click the main folder with all your content and choose "Advanced Import". A dialog opens, analyzes the content and shows all sub folders. All settings apply to containing sub folders but can be individualized if necessary. At the end, all content will be imported to the folder that is currently selected in the Project tab. Per default, the folder structure from the hard drive is adopted. However, if you uncheck the option "Keep Folder Structure on Import" all items will be imported directly without further sub folders. Click the first check box "Import" The second option "As Image Sequence" As a third option, you can choose if this Image Sequence or mov-file (including an Image Sequence) should be bounded to the FrameSync Further, you can set the frame rate ("FPS") and threads. The frame rate depends on how the content was created, for example with 25, 30 or 50 images per second. "Threads" is a playback option which depends on the chosen image format. It can also be changed later in the Image Sequence Inspector, e.g. if the playback is not fluent. The number alters how many threads are called by the Pandoras Box application from the operating system in order to run the sequence. The number of threads must be smaller than the total number of images in the sequence. Find more information about this in the chapter "Image Sequence Formats". The option "Name by" is set to "File" per default which means that Pandoras Box names the image sequence in the Project tab after the first file in the folder. If you would like to name it according to the folder's name, choose the second option "Folder". |
As mentioned above, if you unfold the local or a remote system, you will see all available drives in alphabetic order and then three special folders: Stock Assets, Project Assets and Live Inputs.
The Stock Assets folder is a shortcut to the location C:\Christie\content\Stock Assets (or C:\coolux\...). If you install Pandoras Box a few content folders are generated here, e.g. "Testpattern" with test pattern images in various resolutions. The standard Stock Assets are only a few examples but they can help you in case you do not have much content yourself. Mainly, it is very "typical" content that can be used in various and frequent programming tasks and thus it makes sense to have fast access to it. Of course you can create your own sub folders and content in the Stock Assets folder.
You can also download the Stock Assets Installer from our Download-Center which gives you more test pattern and over 4000 images supplied by the companies Apollo, GAM and LEE who use them for their gobos in moving lights.
The Project Assets folder is a shortcut to the folder "assets" that is automatically generated next to your project file as soon as you save it. Thus it is not a fixed path but leads to your project path. If you copy content files to that folder and drag them from here into your Pandoras Box project the content links are relative. That means that you can move the project folder ( including the *.pbb file and asset folder) to every path wanted without any inconsistency effect and the need of re-linking the content. This is especially of interest for users that use the "Bundle Project" feature.
The Live Inputs folder lists all available live inputs, i.e. video and audio input cards or devices devices as well as network streams (e.g. NDI or StreamiX feeds). The chapter Input and Output Cards explains all available cards for Pandoras Box hardware. If you would like to use a graphical or audio input, please drag it to the Project tab in the same way as you would do it with regular content. All Live Inputs are analyzed once, hence it is not recommended to change the resolution after adding the source to the project. An exception to this are NDI streams. Note that you can setup a Pre Roll time for Live Inputs, which is 2 seconds per default, when using them as Containers in the Sequence to reduce or compensate for the time the loading process takes.
Bare in mind, that each Client will list its own live inputs and that live inputs are not shared by Pandoras Box over the network. In other words, if only your Client but not the local system offer a video card, you will not be able to preview the source on the local system, but if you assign it to a layer on the Client, it will display it. If your local system does have a video card connected to the same video signal, you can attach it to the Client's live input. The attaching feature is explained in the topic File Location Table.
NDI® provides separated video and audio network streams via uni- or multicast. Besides many devices like CCTV cameras which are able to output NDI feeds directly, there are numerous applications for computers and apps for mobile devices available. Once an NDI input is added to the project and assigned to a Layer, the according PB system subscribes to the stream and displays the content. In difference to other live inputs, there is no need to use the "Attaching" feature to use the stream on multiple systems. Simply spread the NDI stream after you added it to the Project tab. However, all PB systems need to be able to receive the stream directly, no matter on which network adapter. So keep in mind that Pandoras Box just receives the stream, it is not transmitting it to others.
Another difference is, that PB does not require a constant resolution for NDI streams. This allows using applications where the stream's resolution changes dynamically, e.g. due to network issues. The Inspector offers "Maximum Texture Width" and "Height" fields for NDI streams. When adding an NDI stream to a PB project, the texture size adopts to the initial incoming resolution. You can change that by entering new values manually, or, in case the stream size has changed in the meanwhile by clicking the "Reload" button at the bottom of the Inspector. Some NDI applications change the stream resolution e.g. due to network capacity. In that case, PB strives to keep the texture size constant, which means that it resizes the incoming resolution to the "Maximum Texture Width/Height" but at the same time, PB adopts to the (new) incoming aspect ratio.
Pandoras Box supports all NDI variations including different compressions (i.e. NDI and NDI HX = H.264 version with higher compression / lower data rate ) with a resolution of up to 4k@60 and the alpha option which needs to be activated in the Inspector.
NDI HX feeds have a higher latency because they have to be compressed as they are based on a 1G network. Technically, NDI has a latency of 16 lines but in practice it will usually be one frame. NDI HX has 30 to 50 milliseconds of delay which means depending on the framerate it will be 2 to 3 frames delay. NDI streams might not appear synchronized on multiple systems because of different transmission times via the network and decoding times. Keep an eye on the system performance and network traffic. The more streams you would like to use or the higher the resolution or frame rate is, the more it becomes necessary to separate the show network from the streaming network. It is very simple to work with multiple network adapters. Simply choose one for the show traffic (Configuration > Network) and use another for your NDI streams. The system receives the streams automatically without the need to setup the NIC explicitly. So just make sure, that the device or application that streams NDI uses a network that is also shared by the system that receives the stream.
NDI® is a registered trademark of NewTek, Inc. For more information about NDI itself, NDI tools etc., see http://ndi.tv/
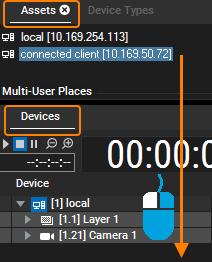 Do add a Client to the Device Tree in order to access its Layers and program content on them for example, simply select it in the Assets tab and drag it in the empty space at the bottom of the Device Tree. You can also multi-select several Clients with the [Ctrl] or [Shift] key and drag them at once. Note that the symbol for the Client indicates that it is "consistent" or simply connected. In case you see the symbol later on with a red exclamation mark, it would be inconsistent because it is not started for example. The topic Device Tree with its sub chapters explain the further steps. Similar to the File Inspector, the Site Inspector shows more information about the added Client. |
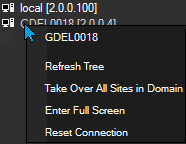 "Refresh" or the shortcut [F5] load the selected entry once more which is of interest if you have moved folders, created or renamed files whilst Pandoras Box was already running. |