Loading...

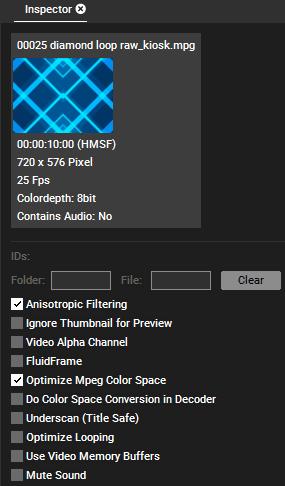
The thumbnail shows a frame of the content with additional information about the length, resolution, frame rate, color depth and (embedded) audio.
Time Offset [Milliseconds]
This option is available for audio content. Enter a time in milliseconds to offset this content if played on the Sequence. Audio delay settings are available per Resource, Layer or on Clip Level. That enables you to set up different delays for different output signal chains.
Folder and File ID
Set numeric virtual file and folder IDs for DMX, PB Automation and Widget Designer remote control and thumbnail exchange. To easily address several files in ascending order, move over to the Folder Inspector and enter the Folder ID and the start File ID.
Press the button "Clear" to remove the virtual file and folder ID.
Anisotropic Filtering
Anisotropic Filtering does pixel smoothing for real-time video and image scaling, default is on.
Ignore Thumbnail for Preview
Even if using the "Thumbnail for Preview"-Option (see Configuration >Local Preview) this file can nevertheless be rendered and played back in full quality instead of showing its thumbnail, (e.g.. if you need to know where exactly the video playback currently is). Check the Ignore Thumbnail for Preview option to make this exception for this file.
Video Alpha channel
If movie type supports embedded alpha, this option lets you activate the alpha channel. The alpha channel inside images is always activated.
FluidFrame
Choose this option for slow motion or smooth motion frame-adaptive frameblending and framerate conversion.
With FluidFrame™, a smooth cross-conversion that can take any input and output framerate, supporting both interlaced and progressive sources and clips is possible now. This way for example 59.94 video input signals are displayed without any frame drop on 60hz output displays. FluidFrame™ can therefore also handle 50hz to 60hz real-time conversions.
In addition to this, it allows smooth playback of highspeed frame rates such as 50 or 60p content and higher. FluidFrame™ Technology can be applied to any live video input or content playback scenario ranging from straight forward Live Video processing to the synchronization of multiple HD SDI streams for Live Stereo 3D applications.
Please note:
When using FluidFrame with 50p, 60p files or live inputs, please check the option "Increase Video Buffer Count" to ensure smooth playback. In all other cases this mode should NOT be used because it requires more system and GPU RAM.
Optimize Mpeg Color Space
MPEG has a reduced colorspace, this option stretches the colorspace (black will become a real black).
Do Colorspace Conversion in Decoder
The MPEG format saves colors in the so called YUV colorspace, whilst Pandoras Box requires the RGB colorspace. Per default the YUV>RGB conversion is done by the graphics card. The advantage is that performance is saved. The disadvantage is that the card's conversion is different to the one used when actually creating an MPEG file. This is for example the case when taking use of any encoding features in Pandoras Box, i.e. Video Export or the Encoder Extension. But also when encoding an MPEG with other programs and tools.
In other words, the Video Export converts RGB>YUV, when using this exported file in Pandoras Box, the graphics card converts YUV>RGB. As the two ways of converting colors do not match, there are different RGB values. To convert in the same way, tick the check box. Note that this will consume more performance and is optimized for the Pandoras Box encoding and decoding features. There still could be a color difference when encoding MPEGs with third party tools.
This option can be used in addition to stretching the colorspace, as described above.
Underscan (Title Safe)
This option is mostly designated for Live Input Signals to crop the image to the Title Safe Area.
Optimize Looping
Check this option if a looped file does not play back smoothly when jumping from the last to the first frame.
Mute Sound
If a video files contains audio as well, you may check this option if you want to completely mute the sound part of the video file without using the Volume fader.

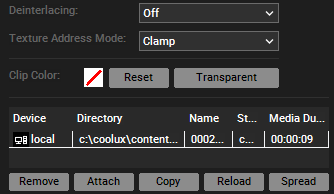
Texture Address Mode
This setting determines how the texture is going to be addressed on objects that use texture coordinates beyond the range [0-1].
- Wrap: the texture will be repeated (wrapped) to infinity
- Clamp (by default): the texture's last pixel will be stretched out to infinity
- Mirror: the texture will be flipped back-and-forth to infinity.
Clip Color
In case this media file the Inspector refers to is saved as a container in the Sequence, the Clip Color is the color the container is filled with. Per default it is gray. In case you set it to "Transparent" it will be of the same color the Layer is set to (see Layer Color).
By clicking into the color field a dialog opens where you can choose any other color for the container. Now, any time you save the file to the Sequence, the container will be filled with the chosen color.
Example: Select a folder in the Project (automatically, the Inspector now refers to all files inside) and set up a purple Clip Color. Select a different folder and choose a different color for it. If you now save files from both folders to the timeline, you can see instantly which folder they belong to.
Note that the (global) Clip Color set up in the File Inspector can be overwritten with the Clip (summary) Inspector. Simply select the containers that should be different and select a new Clip Color.
Notes
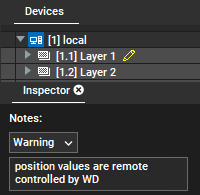
In many Inspectors, similar to the Notes tab, the possibility of writing notes has been created.

However, these notes cannot be formatted. Instead, the urgency for a note can be specified. After a note is entered, a pen is shown for that item (see above). A cue will not be marked with a pen. To illustrate the urgency, there are 3 statuses:
- Default: white pen icon
- Warning: yellow pen icon
- Critical: red pen icon
Spread Selected Resources
In case, you selected multiple files, this option becomes available and spreads the selected content.
Clean up Selected Inconsistent
In case, you selected multiple files, this option becomes available and removes all inconsistent files. Please see the File Location Table for a detailed explanation about inconsistencies.
File location table
Please see the topic File Location Table for a detailed explanation.
Please note, that the changes made in the File location table do NOT apply in a multi-inspector. If you have more than one file selected these changes only apply to one file at time.