Loading...
A Playlist offers an easy and fast possibility to play a certain number of media files in a row without the need of programming separate containers on the sequence.

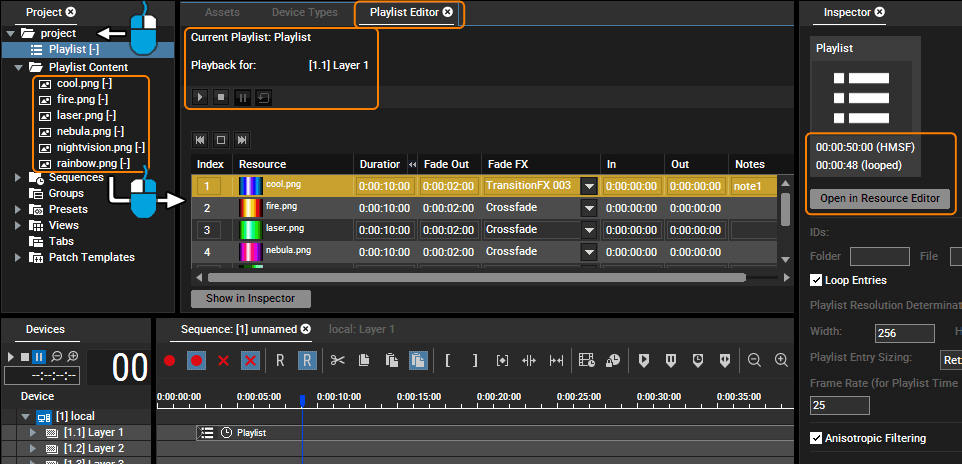
To create a Playlist, simply right-click any folder in the Project tab and choose "Add Playlist". Select it and click the button "Open in Resource Editor" in the Inspector to load the Playlist in the tab "Playlist Editor". Alternatively, you can also switch to the View named "Content".
Now you may drag and drop the following files from the Project tab into the Playlist tab:
- images
- image sequences
- videos
- audio files
Each newly dragged resource will simply be added to the end of the list (even when the Playlist is already playing back). If you would like to reorder the files, (multi-)select an entry and drag it between to others or assign a different "Index" number. Deleting files is possible with the Delete key on your keyboard or by choosing the respective command in the right-click menu.
The duration of images is automatically set to 10 seconds; all other media keeps its real duration. You may change the duration, fade time and transition effect - again, multi-selection applies the chosen setting for all selected items. Further to the right you find "In" and "Out" times that take effect on videos or audio files only and define the starting and ending frame. Notes for internal use can be added too.
The overall duration of all files minus the fade times result in the length of the Playlist. The fade times need to be subtracted as fading two files is obviously shorter then playing them back one after another. The duration is displayed in the Playlist Inspector. It offers general settings like Folder and File ID, resolution or aspect mode.
As a last step, the Playlist needs to be assigned to a Video Layer. You may assign it as an active value or program it on the timeline as one single container. Please note, that you may assign the same Playlist to several Video Layers. Then the playback status can be different per layer, e.g. one layer can be in pause mode showing the file with index 5, the other in play mode between index 10 and 11. The Playlist tab offers a drop-down menu containing all layers the Playlist has been assigned to. Depending on this drop-down menu, the Playlist changes and displays the layer's playback mode and the currently active index file with a green highlight. In the image above the chosen Playlist on Layer 1 is currently fading between two images.
Please note that not only during the cross-fade the Playlist consumes the memory for the current and the following content file, thus it needs the same performance as assigning the assets separately to two layers!
If you setup an ASIO device in the configuration tab > ASIO audio, you see there also the option "Play Audio Files in Parallel with Playlist Entries". This automatically plays the "according" audio file with the video in a Playlist. The audio file does not need to be part of the project, but it has to be named in the same way as the video file and needs to be located in the same folder. Please note that the duration of both files does not need to match.

Step-by-step instruction:
- In the project tab, right-click a folder and choose "Add Playlist" and afterwards "Add Folder".
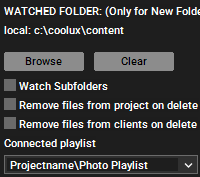
- Select the folder and look at the bottommost options named "Watched Folder" in the Inspector. (Later on, you might need to open the folder attributes by clicking the topmost + icon.)
- Click "Browse" and select the Windows folder you would like to watch. Now, additional options appear for the Watch Folder.
- Open the drop-down list and select the Playlist you would like to link to the Watch Folder.
- Optionally, select the Playlist and in the Inspector, click the button "Open in Resource Editor". All files from the Windows folder are part of the Playlist. If you are missing files, check whether the format can be read from Pandoras Box.