Loading...
This chapter explains how to patch a Pandoras Box Site. In detail, it shows, how to..
- check the default patch when a Site was added with the option "Lighting Console Configuration"
- patch a Site manually
- use the commands in the context menu
Please read the chapter Patch Templates if you would like to learn how to use templates for custom patches.
Remember to activate DMX or Art-Net Input in the Configuration tab in the section Remote Control Protocols to receive incoming data. Please see the chapter "DMX Input" for the general workflow regarding DMX Input.
As explained in more detail in the chapter "Device Types", the "Lighting Console Configuration" can be chosen when opening a new project. Alternatively you can enable the check box in the Device Types tab. All Pandoras Box Sites that you then add to the Device Tree will be patched already. As you see below, the Layers (or rather parameters) are patched according to our DMX tables which include the most relevant parameters. This DMX library can be loaded on most lighting desks to control Pandoras Box.
In addition some "Multi-FX" effects will be added to the Layers which allow to choose various effects but keep a constant parameter count to maintain a fixed channel count for the patch.
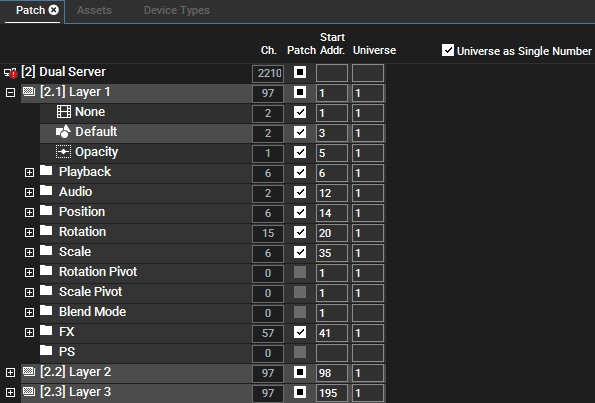
The below image shows a Server with two outputs with the default "console" patch. If DMX Data was coming in already, the parameters would be highlighted in red to show the active value state.
The first field, "Channel", shows that for the entire Server, 2210 channels are patched and for "Layer1" it is 97 channels. When you expand the Layer, you can see that the channel count appears for each parameter. Some parameters like "Opacity" need one (8 bit) channel because their value range is 0-255. Other parameters with two DMX channels either need two individual 8 bit values (like "Media" or "Mesh") or a 16 bit value because their value range is 0-65535. Please check out the DMX tables for more information about the parameters.
Now you can also see which parameters are actually included in the patch, that is those with the activated "Patch" check box. Some parameters have an empty "Patch" check box, e.g. "Blend Mode", which means they are not included in the default patch. Because the Layer or Site is partly patched, their check box is partly activated as indicated by the lighter gray color.
"Start Address" and "Universe" show the starting DMX channel and universe for the Site, Layer and parameter. As explained in the last topic, if you would like to enter a "Subnet" too, please uncheck the option "Universe as Single Number".
Most likely, you will not have to change anythings in here as this also requests to change the patch in the lighting console. However, if you need to, simply use the check boxes to patch / unpatch a parameter or change a channel or universe by entering another number. This is explained in more detail below under "Manual Patch" or under "Entering new Addresses"
If you just like to start with a different universe, the best way is to make a right-click on the Site and choose "Patch > Set Patch Start Values". Enter your new universe as a single or two numbers and press "OK".

If a Site was added to the Device Tree without the "Lighting Console Configuration", no parameters are patched and no effects are added automatically to the Layers.

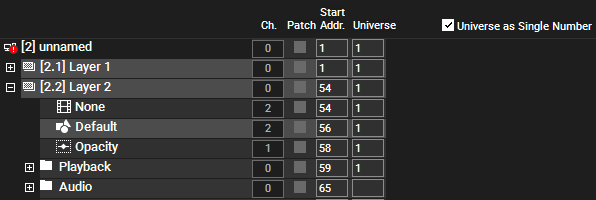
This image shows a Site that is not patched. The "Patch" check box is not set for any single Parameter, Layer or Site.
The first field, "Channel", shows that "0" Channels are patched per Site or per Layer. "Address" and "Universe" show the starting DMX address in case anything would be patched.
When a Layer is expanded, so that the individual parameters are displayed, "Channel" shows the channel count that needs to be occupied by this parameter. In the example, "Opacity" needs one (8bit) channel because the value range is 0-255. Other parameters with two DMX channels either need two individual 8bit values (like "Media" or "Mesh") or a 16bit value because their value range is 0-65535.
You can now activate the "Patch" check box for a Parameter, Layer or Site.

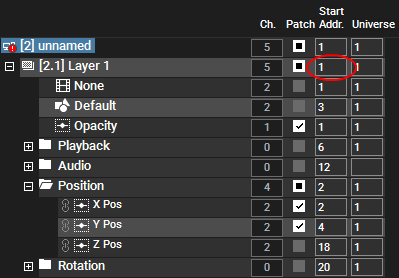
The above image shows a partly patched Site. By clicking the "Patch" check box for "Opacity", this parameter got patched to DMX channel 5 on Universe 1. If DMX Data is coming in already, the parameter would be highlighted in red to show the active value state.
The Patch check box for the Layer or Site is filled out to indicate that some but not all Parameters are patched. The address for the Layer and Site shows also [5,1] as this is now the starting address.
Whilst, "Channel" is an information that updates automatically, "Address" and "Universe" for any Parameter, Layer or Site can be changed from you to suit your needs. Remember that the "Patch" boxes need to be ticked first.
The Universe can be entered as a single or two numbers. |
You can also enter the address in the Patch tab directly. When entering a Universe number on the level of a Layer or Site, all underlying Parameters get the same Universe.
When you enter a "Start Address" on the level of a Layer or Site, the address increases automatically for the included Parameters. If you patch more than 512 channels you will be asked, whether you want to "Wrap" or "Shift" the index. "Wrap" simply uses all available channels even if the Parameters of a Layer would span across two Universes. "Shift" always starts with a new Universe for a Layer if it does not fit into the rest of the last universe.
In other words, first enter a Universe and then a starting address if you would like to patch the channel and universe automatically.

This image shows that "Opacity", "X Pos" and "Y Pos" are patched. After checking the boxes, "1" was entered in the "Addr" field for Layer 2.1 to patch the Layer automatically. This has the result that "Opacity" is patched to channel 1, "X Pos" to 2 and "Y Pos" to 4.

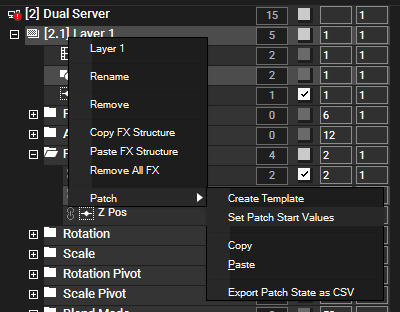
In the Patch tab, you can right-click on a Parameter, a Layer or Site to see their context menus. The commands [Rename, Remove, Copy / Paste FX Structure and Remove all FX] are described in the chapter about the context menus in the Device Tree. They also include the following Patch commands, so you can execute them from many places.
Under "Patch" you will find more options related to patching.
This saves the patched parameters to a template which is added to the Project tab. See further down under "Patch Templates".
This opens a dialog where you can enter a new channel and universe number, which can be entered as a single or two numbers. All included parameters (with an activated "Patch" check box) will receive a new address that increments automatically according to the channel count. If a Layer does not fit into the rest of the last Universe, a new Universe is started so that the Parameters do not span across two Universes.
First, select a Layer and make a "Copy" to save which parameters are patched. Then, right-click another Layer and choose "Paste" to patch the same parameters. You might want to enter a new starting address for the newly patched parameters. You can do this either with the "Set Patch Start Values" command from above or by entering a new starting address in the Patch tab.
This exports a CSV file that includes all necessary patch information, i.e. channel count, starting address and names for all patched Sites, Layers and Parameters.