Loading...
This chapter explains the context menu of the Pandoras Box Preview tab. For other topics regarding the Preview tab please see the introductory chapter.

Right-click anywhere in the Preview to open the context menu. The Mesh and UV Mapping Editing Modes offer a few more commands than the other modes. In the Picking Mode, no context menu is available.
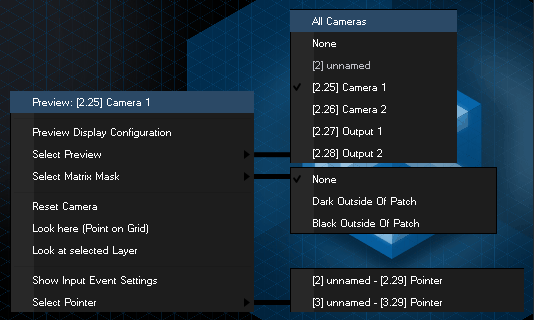
The top line of the context menu informs you which view is active, e.g the view from the Camera with Device ID 2.25. Below, the command "Select Preview" is explained.
Add Sub Mesh
This command is available in the Mesh Editing or UV Mapping Modes and adds a Sub Mesh to the Editable Mesh that is assigned to the Editing Context Layer.
Remove Sub Mesh
This command is available in the Mesh Editing or UV Mapping Modes and removes a Sub Mesh from the Editable Mesh that is assigned to the Editing Context Layer. Position your mouse over the Sub Mesh that you would like to remove and open the context menu.
Reset Sub Mesh
This command is available in the Mesh Editing or UV Mapping Modes and offers several reset options for a Sub Mesh from the Editable Mesh that is assigned to the Editing Context Layer. Position your mouse over the Sub Mesh that you would like to edit and open the context menu.
Reset All resets the transformation, FFD and Vertex Modifier as well as the UV Coordinates which means the mapping.
- In the Mesh Editing you can activate the Sub Mesh Modifier and change the position, scaling or rotation for a Sub Mesh. This also changes the parameters displayed in the Sub Mesh Inspector. The command Reset Transformation resets those changes.
- In the Mesh Editing you can activate the FFD and Vertex Modifier and change the FFD or Vertex points. The command Reset Modifier resets those changes. Alternatively, you can go into the Sub Mesh Inspector and reset the FFD and / or the Vertex grid.
- In the Planar and Perspective UV Mapping Modes you can change the UV Map of Editable Meshes. The command Reset UV Coordinates resets those changes but only for Editable Meshes created in Pandoras Box (not imported and converted ones). Alternatively, you can go into the Sub Mesh Inspector and click the button "Reset UV Coordinates".
Preview Display Configuration
This opens the Configuration tab in a panel and displays the category "Preview Display" that includes for example the visibility for Gizmos and Wireframes.
Select Preview
Open the sub menu and choose one of the offered views to switch to it. Note that a Site must be included in the Preview rendering. The so called "All Cameras" view is always available and allows previewing all included Sites at once. Furthermore the whole 3D space is shown instead of only the specific area seen by the Site's Camera or Output device. The so called "All Cameras" view is always available and allows previewing all included Sites at once. Furthermore the whole 3D space is shown instead of only the specific area seen by the Site's Camera or Output device.
Please note: Everything that is set up in the Output device of this previewed Site, i.e. a warping object, softedge etc. will NOT be shown in the All Cameras view! Please change to the Output's preview if you want to see the Output settings as well!
When working e.g. with LED walls that are controlled via Art-Net you can choose to preview the Art-Net output instead of the video (e.g. DVI) output. Whilst being in the output (!) view right-click and select a matrix mask. To use the matrix feature you first need to create a patch in the Matrix Patcher and export it to your Pandoras Box project. Drag the new format ".pbx file" on any(!) Output Layer. Now, you may choose to preview it as described. Dark Outside of Patch dims the area not covered by the patch whilst the Black option does not display it at all. Choose None to see the entire area without the highlighted patch.
Reset Camera
 Note that only the "Zoom" Interaction Mode is reset. When you toggle to "Parameters", view changes influence the parameters of the Camera or Output device which are not reset with this command. However, the R-button at the top right resets both modes. |
Look here (Point on Grid)
Moves the view so that the point where you clicked (projected to the Ground Grid) is in the center of the view port. This does not work for Camera and Output devices without the Target parameter.
Look at selected Layer
Moves the view so that the selected Layer is in the center of the view port. This does not work for Camera and Output devices without the Target parameter.
Show Input Event Settings
Shows the dialog "Input Event Settings" which includes the Picking settings for all Sites included in the Preview. See more in the chapter Picking Mode.
Select Pointer
This entry has a sub menu listing all Pointer Layers of your Sites. Choose the one you would like to see in the Preview. Pointer Layers are of interest for the Picking Mode etc.