Loading...
In the Text Input Editor you may set up all options regarding the content of the selected Text Input. It also allows to transfer style properties to other Text Inputs. Please note, that .net framework 4.0 is needed to display this tab. |

At the top of the depicted Editor you see in the drop-down list that only one Resource named "MyText." is selected. If multiple Text Inputs were selected, the section "Behavior / Texture" applies to all of them.
Afterwards, it is displayed, that the according Text Input is assigned to the first Video Layer of the second Site and that the Playback command (from the Layer) is set to Play Loop. The playback is needed when the Text Mode is set to Scrolling or Streaming and the container is changed from Lock To Time to free run mode. If the container is locked to time, and the sequence is playing, the text will "play", i.e. move also. Mind that playing back is only possible on Video Layers. If you would like to use scrolling text on another Layer, please use the Aeon FX "UV Scroll".

- Mode
--Static
Your text is displayed on a fixed position according to the Layer's Position parameters.
--Scrolling and Streaming
Your text will move according to the following parameters.
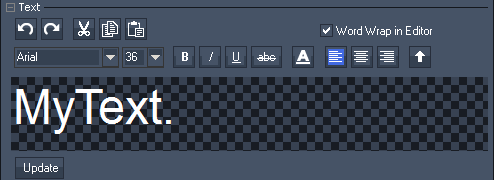
For the Scrolling Mode, you enter text, click "Update" and instantly the entire text will be displayed as scrolling text. Depending on the playback mode, the text will scroll once or endlessly. The old text will be kept in the Editor window. If you would like to show new text, enter it and press "Update". In case, your text is scrolling endlessly (Play Loop) the old text will change abruptly to the new one.
For the Streaming Mode, you enter text, click "Commit" and after a couple of seconds, your entire text will scroll once through the window. Note, that it cannot scroll endlessly. The old text will be deleted from the Editor window. As soon as you enter new text and click "Commit", it stands in a pending line. Only when the old text has moved out of the window, the new one can be displayed. This means on the one hand that you can commit unlimited text entries and PB takes care, that one follows the other. This is done by rendering multiple textures at the same time. Which also means on the other hand, that textures can be empty if now pending text is available. This explains why you have to wait for the duration of one texture width / height before recently committed text becomes visible. If you would like to clear pending text click the "Pending" button underneath the Editor; to clear pending text and the one currently displayed, click "All".
Please note that Widget Designer can send text to a Pandoras Box Text Input regardless from its mode. You can use the Text Input control or the PB Text Output node.
- Base Speed
Enter the speed for Scrolling and Streaming text. It is measured in pixel per second. When entering negative numbers the direction will be reversed.
- Direction
Choose how Scrolling and Streaming text should move: "Horizontal" for right-left movement and "Vertical" for down-up. Note that the direction can be reversed with a negative Base Speed.
Loop Offset
Influence whether Scrolling and Streaming text should have an offset, i.e. blank space before the start of a new text entry.
Start with Blank
Decide whether Scrolling text should start with blank space before its first letter. Use the option "Offset
BG Color / Alpha
Choose a background color (for all text modes) and its opacity (0 = transparent)
Width / Height
Set up how large the texture for a text entry should be. Note that this influences the Base Speed and Font Size. The larger the Font Size the smoother font edges look and the larger the texture needs to be.
Center Text
This centers Static Text vertically.

"Word Wrap in Editor" creates a new line if your text is longer than one line in the Editor.

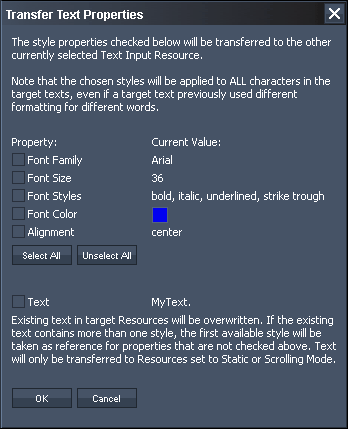
In case you have selected multiple Text Inputs in the Project tab, you can choose with the drop-down list (at the very top) which text is the "source".
Per default, all "Text" options apply only to the source text. With this dialog however, you can choose to transfer the current options to all other selected Text Inputs too. In case you have set up more than one style in your source text, only the first one can be transferred.
Select which property you would like to copy and press "Ok".
If you would like to create multiple copies of your current Text Input, please right-click on it in the Project tab and choose "Clone".