DVI Input Cards (Discontinued)
Loading...
This chapter describes the optional DVI input cards For other input or output boards, please see the introductory chapter.
|
There are two DVI input cards available: Single and Dual. Both cards allow to input DVI signals (Single- and Dual-Link) to be used within the Pandoras Box render engine. However, please note that using a Dual-Link signal with the Dual (channel) DVI card deactivates the second input! |
The DVI capture cards support DVI-D (DVI Digital) as well as DVI-A (DVI Analog). Furthermore, Single-Link and Dual-Link DVI signals are supported which allows all common signals like FullHD 1920x1080p60 but also custom resolutions, e.g. 3840x1080p60. The following table lists the maximum supported video formats (based on a 16:9 or 4:3 image ratio). Please note that HDCP-protected signals can not be processed! Audio formats are also not supported.
Single and Dual DVI input card |
|
|---|---|
Analog RGB |
up to 1600x1200 @ 60Hz, 1920x1080 @ 60Hz |
DVI/HDMI |
up to 1600x1200 @ 60Hz, 1920x1080 @ 60Hz (Single-Link DVI), |

The picture shows the folder "Audio-, Video and Gamecontroller" in the Windows Device Manager after installing a 3G-SDI and Dual-DVI card card using the driver 6.01.
Starting with Pandoras Box version 6.4.1 we are supporting the original Deltacast drivers (version 6.14) which we have added to our driver package in the Download-Center.
The 12G-SDI board can only be used with driver version 6.14 (or later).
The DVI board (and old HD-SDI board) can only be used with driver version up to 6.01.
The 3G-SDI board and HDMI board can be used with both versions.
When having two or more cards in a single computer they have to run with the same driver version. Therefore, a DVI board cannot be used along with the 12G board in a single computer. Using different driver version on separate machines is not a problem.
Video Inputs in Pandoras Box are managed by the Pandoras Box Manager, that is responsible for the entire show control. Only if you use the Manager in stand-alone mode, you would connect the video device to the Manager's input board. In case you work in a Manager-Client-setup and you want to use the stream on a Client, the Client must be equipped with an input board (not the Manager). In other words, the physical signal input happens on the same machine which should render and output the image. The video stream only "exists" on the Client, it is not distributed to the Manager nor to another Client. If you would like to display the stream on several Clients, all of them must be connected to the video source.
Follow this step-by-step description after having connected the video source to the input card.
Manager-Client-setup:
- start the Manager and Client computer and make sure that Pandoras Box runs on both in the correct Manager or Client mode and the same version
- then go to the Manager, Asset tab > your Client > folder "Live Inputs"
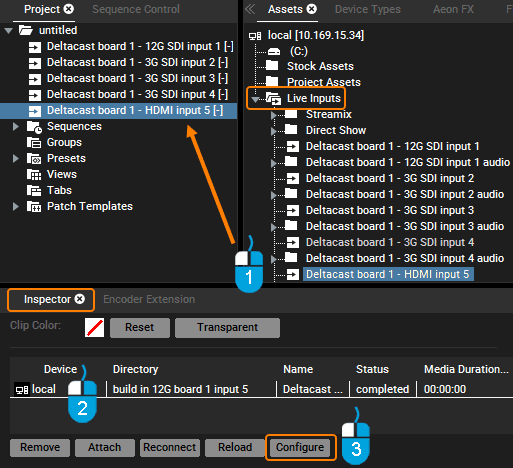
- drag the according card into the Project tab; this initializes the card
- if needed, you may configure the card: make sure, that the PB Client is not in fullscreen, click the button "Configure Live Inputs" and choose the input that you want to configure from the live input list
- assign the live input to a layer in the Device Tree the same way as using common image or video files
It is also possible to record the incoming signal. However, the Client computer must then be started in stand-alone mode, that is with the Pandoras Box Manager software. Please see the chapter "Audio and Video Recording" for more information.
Stand-alone setup:
- start the Manager computer and Pandoras Box in Manager mode
- then go to the Manager, Asset tab > your Client > folder "Live Inputs"
- drag the according card into the Project tab; this initializes the card
- if needed, you may configure the card: select the input in the Project tab to display its properties in the Inspector. Scroll down in the Inspector to see the file table where you can select the live input and click the "Configure" button below (the below image shows the inputs from a 12G card)
- assign the live input to a layer in the Device Tree the same way as using common image or video files

As described above:
To configure the input on the Client side, please click on [Configure Live Inputs] and choose your input from the list.
To configure the input on the Manager side, please select the input in the Project tab and Inspector and click on [Configure].

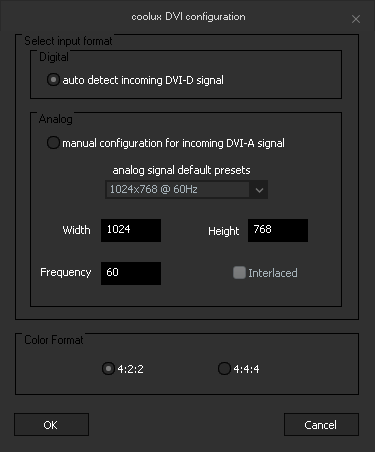
Select "auto detect incoming DVI-D signal" when capturing a digital DVI signal. Here you do not have to define the signals resolution.
When capturing an analog DVI signal, please check the option "manual configuration for incoming DVI-A signal" and choose the correct signal type from the drop-down list or type in the resolution and frequency in the textboxes below.