Loading...
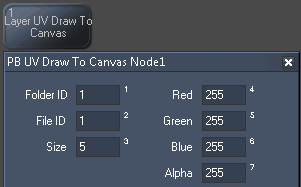
With the Layer UV Draw to Canvas Interaction node you may send mouse click data and mouse move data to a dedicated Canvas asset in Pandoras Box to draw on it. In difference to the "Mouse Draw to Canvas" node, this node does not work with the mouse connected to the Widget Designer system but with a mouse / touch /... input connected to the PB Client or Manager directly. This means that this node routes the remote input events to a Canvas.
Below the explanation of the node's parameters, you will find a step-by-step description of the settings from Widget Designer and Pandoras Box that are necessary when drawing on a Canvas, or receiving mouse or touch input events in general.
 The Size parameter influences whether you draw a fine line or with a thicker brush. |
 |
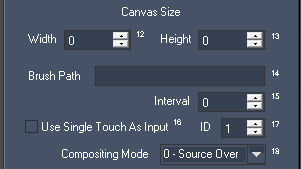
 Enter a Brush Path if you would like to draw with a media e.g an image. The asset name is the one displayed in the PB Manager's Project tab (case-sensitive!), e.g. "Sub folder/Image.png". The interval parameter influences how continuous or interrupted the drawn line looks like. "Use Single Touch As Input" discards multiple input or touch data and takes only the input with the specific "ID". The Compositing Mode influences the Overlay behavior of semi-transparent (Alpha < 255) lines drawn on the Canvas. "Source Over" covers any underlaying layers, the Alpha level simply darkens the color. "Source Copy" does not cover existing layers fully but only according to the Alpha level, i.e. they shine through the Canvas Layer. |
Tick the check box "Mute Node on Page Change" if the node should not process and output data when another page is active. |
The below screenshot depicts settings in Pandoras Box and Widget Designer for a test setup that shows how to draw on a Canvas, or receive mouse or touch input events in general:
- one PB Manager with WD on IP 192.168.2.120
- one PB Client (in fullscreen mode) on another PC with a mouse device attached
- in the PB Manager, drag the Client into the Device tab and in addition a Widget Designer device (from the Device Types tab > Widget Designer > Widget Designer.clib)
- select the WD Device and check the IP address in the Inspector (in our case, as it runs on the same machine, it should be the local IP)
- in WD, go to Connections > PB Configuration and check the IP address from PB Manager then scroll down to the "PB Widget Device Connection" section and tick the check box "Enable Connections"
- now, in the PB Manager's Devices tab, the WD Device should not have a red exclamation mark anymore which means that it now is able to transmit (touch) data from the PB application to the WD application and its nodes)
Before drawing on a Canvas we will check that the UV touch data is send from the PB Client to the PB Manager and from the PB Manager to WD.
- first drag a testpattern into the PB project and display it on the first layer of the Client (Site/Device ID 2.1)
- in the PB Manager's Devices tab, select the Client to display the settings in the Inspector tab and click the button "Input Event Settings". Tick the options for enabling the Output as well as for the Widget Designer Device. Optionally, tick the check box to render the mouse pointer in the fullscreen window
- in WD, go again to Connections > PB Configuration to the "PB Widget Device Connection" section and click the button "Input Tester" to open a dialog that should display incoming information when moving the input device in the PB Client
- alternatively, you can receive UV data from an input device connected to the PB Manager: toggle the Client into the local PB Manager's Preview and change to the Picking mode (by clicking the hand icon), more information about the Picking Mode...
- if you would like to view the incoming data outside this dialog, create a small node chain and a Label. 1) Nodes > Input > Pandoras Box > Layer Mouse Input and 2) Nodes > Output > Controls > Label
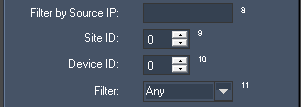
- in the PB Mouse Input node, enter the Manager's (!!) IP address. If you would like not to receive data from all sites and devices, enter the according Site ID and Device ID and set the filter drop-down menu to suit your needs. For our purpose, this is not needed, so the filter can say "Any"
- in WD, set the Label Output node to display the "Texture U" data in the according Label. If you now move the Client's attached mouse from left to right in the fullscreen render window, the Label should display texture data from 0 - 1
If this is working, the data transmission works fine. Now we can set up to draw in the Clients screen.
- first in the PB Manager's Project tab, create a Drawing Canvas asset and assign Folder / File ID 1/1 using the Inspector. Set up the resolution you need and then assign it to the Client's second layer (2.2)
- in WD, create the node Nodes > Interaction > Layer UV Draw to Canvas Pandoras Box. The obligatory settings are what Folder / File ID the Canvas asset has (in our case 1/1), what width / height it has and what the Source IP is ( the PB Manager is in our case the local IP). Optionally you can set up a color and size for the "pen", this is described at the top of this chapter.
- as already mentioned above, you can as well draw on the Canvas with the mouse connected to the PB Manager: toggle the Client into the local PB Manager's Preview and change to the Picking mode (by clicking the hand icon), more information about the Picking Mode...
With Widget Designer version 6, all nodes support so called node commands. Node commands access functions (i.e methods) from a node and / or set a parameter (i.e. property).
Enter "node", followed by the according ID and a dot and a list will pop up showing all available commands for the node. For instance, Node1.TintColor.SetRGB(125,0,255), colors the node in purple.
In addition, the node properties with a parameter ID (the small superscript number) can be edited via the command Node1.SetParam(ID,new Value) or WDNodeSetParam(NodeID,ParamID,Value).