Loading...
This topic explains how to add a Widget Designer Device to the Devices tab allowing to:
- program Widget Designer commands directly in timeline
- send (trigger or feedback) values from the timeline to Widget Designer
- send mouse and touch input events from an attached Client to Widget Designer
Widget Designer is another software product from Christie Digital Systems Germany. One of the main purposes of Widget Designer is to enable users who do not have any programming skills, to create their own custom applications or interfaces. Widget Designer provides a graphical user interface and runtime environment. You can create user-controls such as faders, buttons, labels and many more and instantly use them. The PRO version allows to program visually with so called nodes. By simply connecting those visual control components you may create a dedicated interaction logic. In addition WD has a built-in script language allowing you to create customized routines of commands. For example, a command can be assigned to a button click. Currently there are over 1000 commands that control specific features of Pandoras Box, Widget Designer or other 3rd party products and protocols. There are topics explaining how to use commands and containing the entire command list.
If you would like to execute commands at a defined time within the timeline you can simply add the Widget Designer Device to the Device Tree tab and then program keys directly into the timeline, just as you would add keys for a Video Layer's position for example. If you are not familiar with the timeline and key programming, please read the topic "Sequence".
The second purpose of a Widget Designer Device is to route mouse / touch input from the PB Manager or even PB Client to Widget Designer itself. This is described step-by-step in the Layer picking chapter of the Preview. If you would like to route this data to a Canvas asset in order to draw on it, the node "Layer UV Draw to Canvas" is of interest. Its chapter includes a step-by-step description of all necesary settings in WD and PB. You can also use the data to click on Custom Script Buttons as described in its chapter.
Please follow these steps to set up a Widget Designer Device:
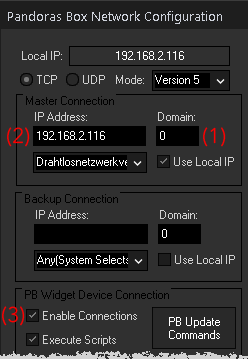 To do so, right-click in the main window and choose "Connection > PB Configuration". Then make sure that the Domain (1) and IP address (2) under "Main Connection" matches with the PC where the Pandoras Box Manager is running on. In Pandoras Box, the IP address is shown in the Assets tab, the Domain in the Configuration tab. Have a look in the section "Pandoras Box Widget Device Connection" and enable the check box "Enable Connections" (3). You can close the dialog.
As an example, please create a fader. Again, right-click in the main window to call the main context menu. Choose Create > Fader Controls > Fader Vertical and make one left-click into the main window. You have now created a fader with the default settings: ID = 1, minimum value = 0 and maximum value (also current value) = 255 . So far, everything is set up in Widget Designer, please switch to your Pandoras Box Manager software. |
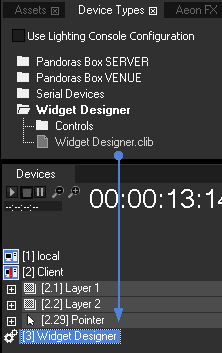 As we have already set up the WD in the first step, the device can connect successfully. If you see a red exclamation mark in the symbol within the Device Tree (as shown in the left image for the Server device), check the IP address and domain number (in the Configuration tab). If the Widget Designer runs on a different PC, the Widget Designer device must be set to the according IP address. Select the Widget Designer device in the Device tab and edit the text field "IP" within the Inspector tab. |
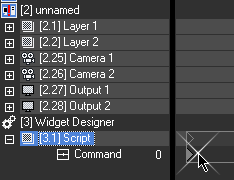 Make a right-click into the timeline at the height of the command parameter, as seen in the left image. To assign a command to this key select it and switch to the Inspector tab. |
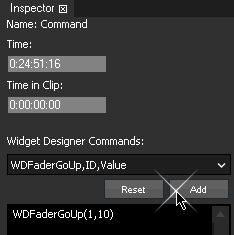 Let's say, we want the fader created in Widget Designer in the very first step to lower its value by 50 steps. The command to add is: As soon as the nowpointer in the timeline passes the key, the command is executed and the fader will go down 50 steps. If you would like to execute more than one command press carriage return and add another one. There is the possibility to work with functions and macros as well. |
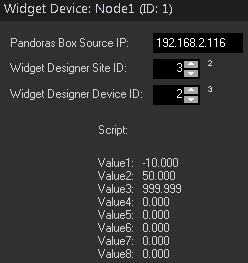 - in the Device Types tab open the folder "Widget Designer > Controls" and drag "Values.clib" onto the Widget Designer site in the Device Tree tab. Now the WD site offers one script device [3.1] with the command parameter and a new values device [3.2] with eight value parameters (each with a value range from -999.999 to +999.999) - program keys either by right-clicking in the timeline as described in the example above. Or, you switch over to the Device Control tab and then store active values - create a node in Widget Designer: Nodes > Input > Pandoras Box > Widget Device in order to retrieve the values and send them to filter nodes or directly to output nodes - in the node's Item Properties dialog, adjust the IP address, the site and device ID. Following the example above, the site ID is 3 and the device ID refers to the newly generated value device, in this case number 2 |